background image

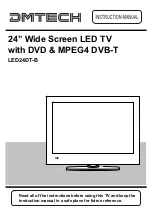
Read all of the instructions before using this TV and keep the
instruction manual in a safe place for futrue reference.

24” Wide Screen LED TV 
with DVD & MPEG4 DVB-T

LED24DT-B

Summary of Contents for LED24DT-B

Page 1: ...Read all of the instructions before using this TV and keep the instruction manual in a safe place for futrue reference 24 Wide Screen LED TV with DVD MPEG4 DVB T LED24DT B ...

Page 2: ......

Page 3: ...View Remote control Powering the TV Selecting input source Operating the Menu Customizing the CHANNEL Settings PVR function Customizing the TIMER Settings Customizing the SOUND Settings Customizing the PICTURE Settings Customizing the OPTION Settings Customizing the LOCK Settings USB Mode Trouble shooting Specifications DVD operation DVD operation Power Supply 1 Installation 2 Use and Maintenance ...

Page 4: ...1 ...

Page 5: ...2 ...

Page 6: ...3 ...

Page 7: ...4 ...

Page 8: ...5 ...

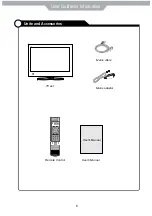
Page 9: ...te and Accessories User Guidance Information POWER MUTE REC EPG SOURCE MENU EXIT VOL CH PICTURE SETUP A B GOTO D MENU TITLE HOLD SIZE SUBPAGE INDEX NICAM A2 TV TXT CANCEL REVEAL SOUND SLEEP FAV 1 2 3 4 5 6 7 8 9 0 DISPLAY REP PVR DVD SUBTITLE OK REC LIST CH LIST PRO SLOW SCREEN LAN ...

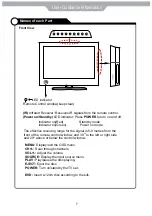
Page 10: ... DVD Insert a 12cm disc according to the silk Remote Control window keep clear LED indicator IR Infrared Receiver Receives IR signals from the remote control Power on Standby LED indicator Press POWER to turn on and off The effective receiving range for the signal is 5 8 metres from the front of the remote control window and 300 to the left or right side and 200 above or below the control window I...

Page 11: ... CI SLOT RF Connect antenna or cable 75 Ohm coaxial to receive TV signal R L in Connect them to the audio output terminal of DVD shared with YPbPr VIDEO Connect it to video output terminal of DVD YPbPr Connect them to the YPbPr video output terminal of DVD used in component source SCART POWER Connect to the power supply USB USB for upgrade media and PVR HDMI Connect it to the HDMI of DVD or other ...

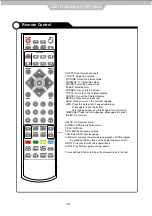
Page 12: ...onic Program Guide during no menu state only in DTV mode REP Repeat playing the title or chapter Load eject DVD disc CURSOR KEYS OK Allows you to navigate the on screen menus and adjust the system settings to your preference NUMBER BUTTONS Press0 9 to select a TV channel directly when you are watching TV Return to the previous channel viewed SOURCE Press to display the input source menu DISPLAY Pr...

Page 13: ...he beginning and end of it GOTO Play your favorite title chapter track SLOW Play DVD programs at slow speed Colour buttons Short cuts follow the coloured links in the text CH Scan through channels VOL Adjust the volume PICTURE Select the picture mode NICAM A2 TV Nicam A2 select SOUND Select the sound mode SLEEP Standby timer SCREEN Turn on off the screen TV TXT Turn off on the Teletext display CAN...

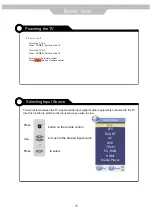
Page 14: ...RCE Basic Use Powering the TV Power on off You can select between the TV signal and the input signal of other equipments connected to the TV Use this function to switch to the input source you wish to view button on the remote control to move to the desired input source to select Press Press Use Selecting Input Source DVD YPbPr PC RGB HDMI Media Player AV SCART ATV ...

Page 15: ...ress the POWER button to turn the TV on 2 Press the Menu button on the remote control the on screen menu will appear on the screen 3 Use and buttons to select your main menu option LOCK MENU Allow you to set up a variety of lock options Select TV source OPTION MENU Allow you to setup a variety of setup options Select TV source 4 Use the buttons to select an option of the sub menu and press the but...

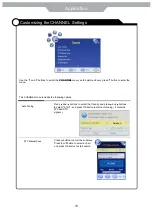
Page 16: ...e press button to enter the menu The CHANNEL menu includes the following options Press and buttons to select the Country and press and buttons to select Start and press OK button to start auto tuning It contains ATV and DTV signals Press buttton to enter the submenu Press or button to select a chart and press OK button to start search Sweden ...

Page 17: ...s BLUE button to sign the program while the program have been signed it will be skiped when you scan programs by CH CI Information Please contact your Pay per View provider who can supply a viewing card and cam unit and instruc tion for their use ATV Manual Scan Press button to enter the submenu Storage To Select a position to store the program Current CH Select a program you want to tuning Search...

Page 18: ... in PVR Record press this button to record List open the Recorder List menu play recorded fils AV select part playback stop Recording and Playback start Time Sfift function Stop stop the watching the recorded programs or stop Time Shift function fast forward playback backword playback play the previous part of recorded file play the next part of the recorded file From CHANNEL MUNU enter into PVR F...

Page 19: ...R File System check if the PVR File System set up in the USB device or not When TV detect this 1st time to use as PVR storage device you need to FORMAT this USB device Format beloe menu appear after Format finish PVR function ...

Page 20: ...low Menu would appear Press Record button switch to simple REC menu press Stop button to exit recording press button to play the file recorded press again the button to start AB repeat playback press stop button to exit playback press list button to open the Recorded list menu PVR function ...

Page 21: ...y playing file Time Shift function When user get away temporarily from the TV set he can recording the TV programs to the storage device and when he back he can start to watch whole programs from the time he left Ź 18 Application PVR function fter a while press button you can continue the playback or you can press button to start AB repeat playback press to fast or backward playback Ź Ź when you p...

Page 22: ...19 Application TIMER Recording in EPG menu In EPG menu press Record button to enter into the Record Menu as below PVR function ...

Page 23: ...olour modes User Cool Standards Warm When you select User model you could adjust the colours below Red Green Blue by yourself Aspect Ratio Cycles among screen display modes Auto 4 3 16 9 Zoom 1 Zoom 2 Noise Reduction Reduce the noise point of the picture when you turn on the function by selecting On PC Setup only exists in PC RGB mode Press button to enter the submenu to adjust the picture of scre...

Page 24: ... of lower pitched sounds Bass could be adjusted when the sound mode is User Controls the relative intensity of lower pitched sounds Balance To adjust the balance of the left and right sound track or turn off the volume of the left and right sound track Auto Volume Control the volume of the programm automatically when you turn on the functions by selecting On Surround Sound Turn on off the surrond ...

Page 25: ...n Time Press button to enter the submenu you could set the time when the TV set will be turned on automatically You could also set the frequency volume and program Sleep timer Allow you to setup the sleep timer among 10min 20min 30min 60min 90min 120min Auto Sleep Turn on off the auto Sleep function Time Zone Allow you to select the time zone 22 Customizing the TIMER Settings Application Use the a...

Page 26: ...owing options Language Allow you to select menu language Audio Languages Could be selected in TV mode Allow you to select audio language Subtitle Language Could be selected in TV mode Allow you to select subtitle language Country Display the current Country and you should select the Country when you want to auto tuning Restore Setting Press button to restore factory default ...

Page 27: ... Press button to enter the submenu and you could change password here Lock Channel Allows you to turn on or off the channel lock The LOCK menu includes the following options Use the and button to select the LOCK menu as the picture above press button to enter the menu Note You should enter the code to operate the menu original code is 0000 When select On channl menu is closed Customizing the LOCK ...

Page 28: ... external hard disk From this mode you may display pictures listen to MP3 music or even play some video formats allows you to play certain kind of files from any external storage device con NOTE The USB multimedia player is an additional feature of this TV therefore only the essential playerback function will be availe Play Pause Stop video files AV1 you may find some AV delay due the high quanlit...

Page 29: ...when highlighted 5 Return to Menu when Playing When playing a DVD disc press the Menu button to return to the ROOT menu When playing a SVCD or VCD and PBC is on press the Menu or Return button to return to the disc menu Title Play 1 Compatible with DVD discs only 2 During DVD playback press Title button to display the DVD title content 3 Press the Ÿź EXWWRQV WR KLJKOLJKW WKH WLWOH RX ZDQW WR FKRRV...

Page 30: ...n a disc press Next on the remote or the right side of the player 3 To skip backward to the beginning of the preceding title chapter track on a disc press Prev on the remote or the right side of the player Multispeed Fast Motion Play 1 Compatible with DVD SVCD VCD CD HD CD WMA Digital Audio disc 2 Press the Multispeed Fast button on the remote during play to search through a disc Multispeed Fast h...

Page 31: ... serial number of playing subtitle the amount of optional subtitles or Off Press the button for the third time the display menu fades out 4 Loading and playing VCD Press Display button once to show the first page Disc Type Track the playing track total tracks Mute PBC Repeat Mode Elapsed Time of the Playing Track Press the button again the display menu fades out 5 Loading and playing CD HD CD WMA ...

Page 32: ... banner will display Subtitle Off 4 To display subtitles press the Subtitle button again The default language with its responding serial number will be displayed in the info banner and subtitles will be displayed in that language There are 8 supported subtitles Chinese English Japanese French Spanish Portuguese Germany and Latin With each consecutive press of the Subtitle button the subtitle switc...

Page 33: ...eature and then press OK to select the new setting 5 To exit the menu press SETUP or ĥ button to select EXIT SETUP and then press OK When launching the setup routine the pressing of the following buttons will turn off the setup menu while the choices that have been changed will be saved 1 SYSTEM SETUP The system setup options are illustrated below TV SYSTEM According to the Color system of your TV...

Page 34: ...elow 3 AUDIO SETUP TONE Use the Ĥ 0 ĥ button to move the scroll and adjust the tone 4 DIGITAL SETUP The video setup options are illustrated below DYNAMIC RANGE Use the Ĥ 0 ĥ button to move the scroll and adjust the dynamic range DUAL MONO Choose the mode of the audio output There are four modes STEREO MONO L MONO R MIX MONO OSD LANGUAGE The OSD will display in the language you choose AUDIO LANG If...

Page 35: ...DVD Operation Disc Care DVD Operation 32 ...

Page 36: ...pes appear on the screen Stop using wireless telephones hair driers and electric drills and it shakes The screen does not move Press the PAUSE button Check if the Pause button is pressed on external equipment Screen appears Voice is not heard 1 Press the MUTE button 2 Increase the sound level by pressing volume adjustment button 3 Check if sound terminal of external input is connected properly 4 C...

Page 37: ...xt DVB standard Fully comply with DVB T and MPEG 2 MPEG4 H 264 standard Video decoder MPEG 2 MPEG4 H 264 ĞŵŽĚƵůĂƟŽŶ QPSK 16QAM 64QAM OFDM 2K 8K Bandwidth 7 8MHz Teletext ETSI EN300472 DTV CI x 1 Playback formats DVD CD MP3 JPEG Supported Media DVD R RW CD R RW System PAL NTSC Semi conductor Laser Wave length 650nm 780nm S N 89dB DVD Audio dynamic range 80dB Connectors RF IN 75 ohm IEC75 SCART Euro...

Page 38: ...and the double D symbol are trademarks of Dolby Laboratories ROVI This item incorporates copy protection technology that is protected by U S patents and other intellectual property rights of Rovi Corporation Reverse engineering and disassembly are prohibited ...

Reviews: