background image


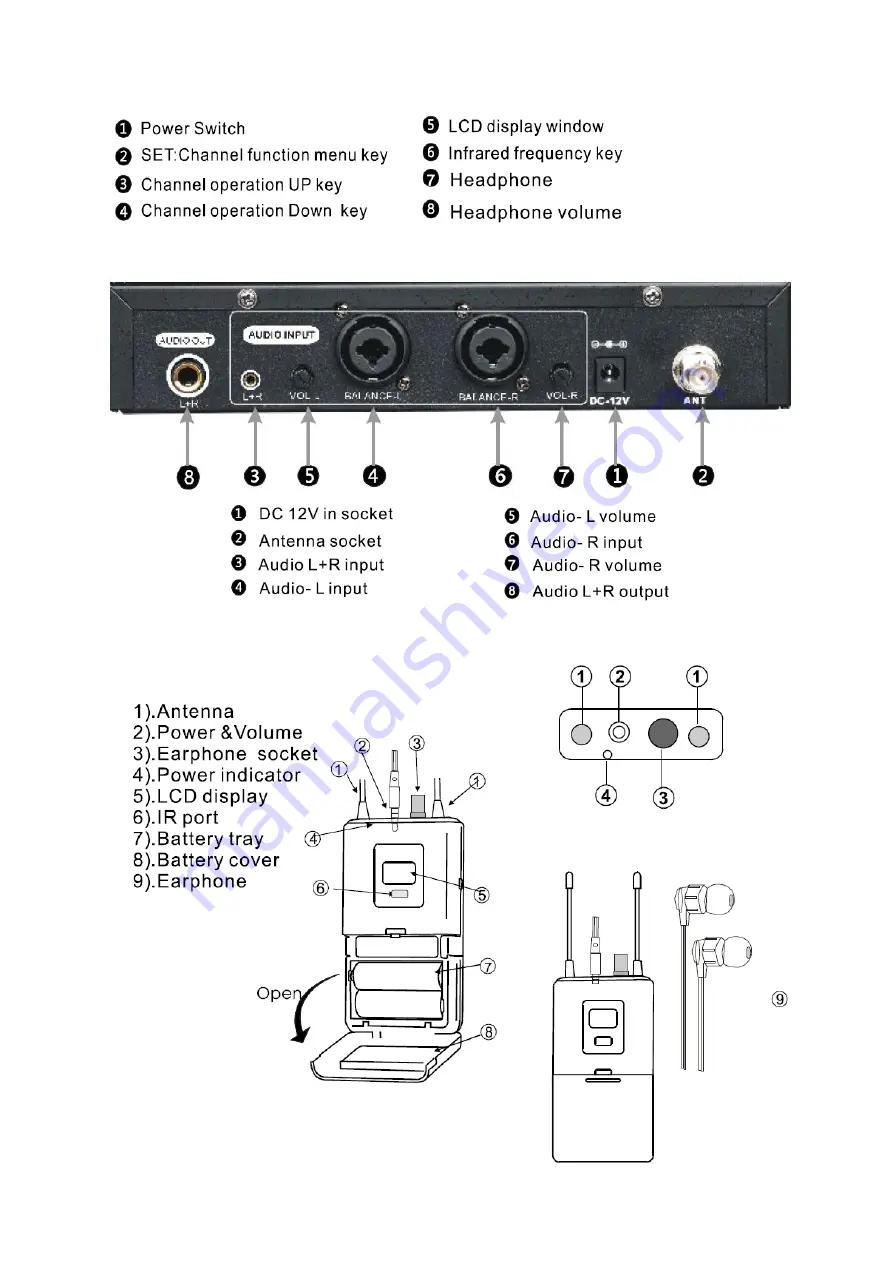
2)


Rear Panel function 


2.


Bodypack Receiver Function 


Summary of Contents for IN-EAR

Page 1: ...IN EAR USER MANUAL INSTRUKCJA OBSŁUGI ...

Page 2: ...onse 30 20KHz RX Sensitivity 94dBm Unique ID Address Yes Some tips to improve the performance of the system The receiver and antenna should be kept in the relative position of accessibility of the straight line Don t put the transmitter close to the metal surface or near any digital device such as CD players computer etc Try to place the transmitter in height of 1 5 meters from the ground and the ...

Page 3: ...2 Rear Panel function 2 Bodypack Receiver Function ...

Page 4: ...ies Channels for the receiver 1 Frequency Channel select STEP 1 Press and hold UP on the transmitter until the channel blinks STEP 2 While the channel is blinking press UP or DOWN to select the desired channel Then press SET to confirm the channel ...

Page 5: ...ualified by the manufacturer However due to the nature of wireless connection interference may occur because of local environments and or radio signals emitted by other wireless devices with the household STEP 2 Press and hold SET unit displays Once syncing is completed the RF level bar appears and the MUTE icon disappears 5 Lock unlock the display Press UP DOWN key at the same time then the displ...

Page 6: ...reen of the receiver shows that there is no RF signal The transmitter and receiver power indicators light Elongate vertically the receiver s antenna Move the receiver away from side of the metal objects Check if there are obstacles between the transmitter and the receiver Move the transmitter closer to the receiver Check whether the receiver and transmitter are using the same frequency Distortion ...

Page 7: ...kaniu najlepszego efektu Odbiornik i antena powinny być w stosunkowo dostępnym miejscu w linii prostej Nie należy montować nadajnika w pobliżu metalowych powierzchni i urządzeń cyfrowych mogących powodować zakłócenia jak odtwarzacze CD komputery itp Staraj się ustawiać nadajnik na wysokości 1 5m od ziemi i w odległości 1m od ściany 1 Funkcje transmitera 1 Panel frontowy 1 Przełącznik zasilania 5 W...

Page 8: ...Wejście Audio R 3 Wejście Audio L R 7 Głośność wejścia R 4 Wejście Audio L 8 Wyjście Audio L R 2 Elementy odbiornika bodypack 1 Antena 2 Zasilanie i głośność 3 Gniazdo słuchawek 4 Wskaźnik zasilania 5 Wyświetlacz LCD 6 Port IR 7 Pojemnik baterii 8 Pokrywa baterii 9 Słuchawki ...

Page 9: ...częstotliwość kanał na nadajniku Wybór kanału częstotliwości KROK 1 Wciśnij i przytrzymaj UP na nadajniku aż wyświetlacz zacznie migotać KROK 2 Następnie wciśnij UP lub DOWN aby wybrać pożądany kanał Wciśnij SET aby potwierdzić wybór ...

Page 10: ...związku z nieprzewidywalnością technologii bezprzewodowej mogą się pojawić różnego rodzaju zakłócenia spowodowane przez inne urządzenia bezprzewodowe otoczenie pracy lub sygnały radiowe KROK 2 Wciśnij i przytrzymaj SET aż na ekranie pojawi się napis Po zakończeniu parowania pojawi się pasek poziomu RF a ikona MUTE zniknie 6 Blokowanie odblkowywanie wyświetlacza Wciśnij równocześnie przyciski UP i ...

Page 11: ...nału RF Wskaźniki nadajnika i odbiornika się świecą Rozciągnij antenę odbiornika w pionie Odsuń odbiornik od metalowych powierzchni Sprawdź czy nie ma przeszkód pomiędzy nadajnikiem a odbiornikiem Zbliż nadajnik do odbiornika Upewnij się że nadajnik i odbiornik używają tej samej częstotliwości Zniekształcenie dźwięku lub wybuchowe dźwięki Wyświetlacz pokazuje obecność sygnału RF Usuń pobliskie urz...

Reviews: