


Polisher
18
ENG
•
continuous operation of the polisher shall not exceed 30 minutes followed by a break
of minimum 20 minutes;
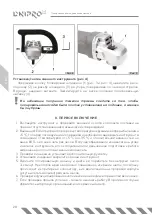
4. Avoid ingress of dust to the polisher air vents, which can cause its overheating. Watch
the polisher body temperature near the gear unit and motor. It shall not exceed 60°C
and 50°C respectively. In case of overheating, let the polisher work idle for 30-60 s, and
then turn it off to cool and remove dust.
5. Upon the polisher turning off wait until the head stops completely before to place the
tool on any surface.
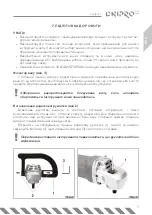
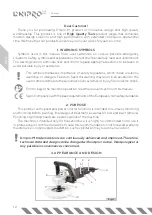
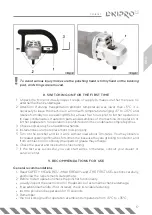
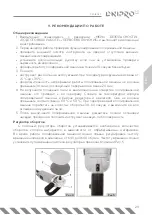
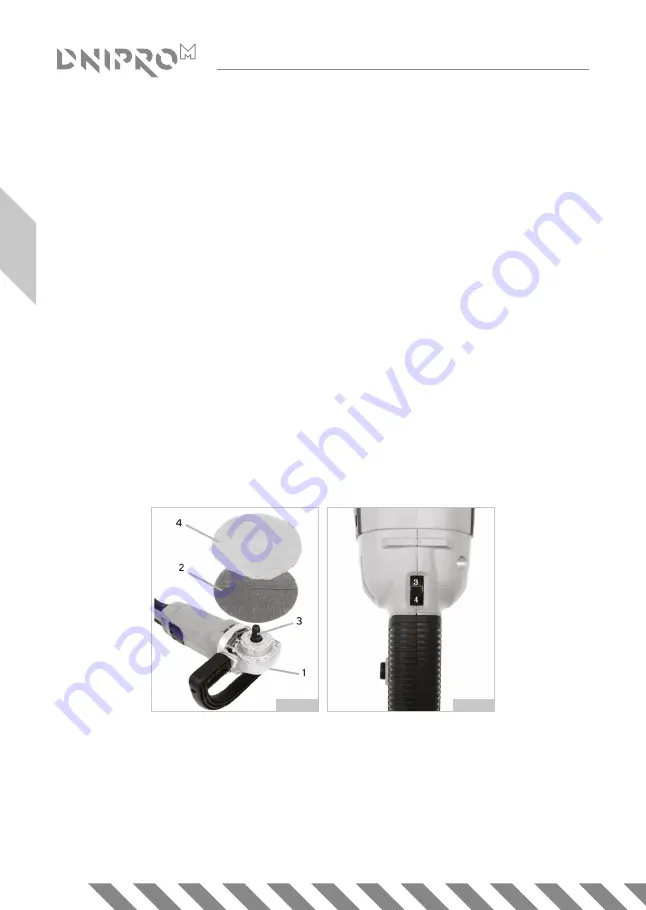
Rotation speed governor
Speed governor sets the necessary number of revolutions, selected depending on
material to be processed. When operating the polisher you can smoothly adjust the spindle
speed within the range from 600 to 3600 rpm. The rotation speed can be set with rotaton of
governor wheel within 6 positions Fig. 5.
«MIN» position corresponds to the minimum spindle speed, and «MAX» position - to
the maximum spindle speed. When working at low speed for a long time (approx. 15 min.),
the machine shall be cooled down for 3 minutes. To do this, set the maximum number of
revolutions and leave the machine idle.
*The rotation speed is preliminary and may differ to a small degree from the specified
in this manual.
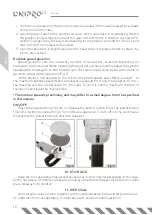
ON/OFF
Press the power button (1) to turn on. Release the button to stop. Press the power button
(1) and fix it with the lock button (2) for continuous operation. To turn off if in the continuous
mode press the power button (1) and then release it.
10. STORAGE
Keep the tool, operating manual and accessories in their original packaging. In this case,
all the necessary information and parts will always be at hand. Always store the tool in a dry
place far away from children.
11. DISPOSAL
Do not dispose electric tools together with household wastes! Store and dispose the out-
of-order electric tools separately in compliance with environmental legislation.
Fig. 4
Fig. 5
Summary of Contents for PM-160SP
Page 1: ...MANUAL POLISHER PM 160SP UA PM 160SP RU PM 160SP...
Page 2: ......
Page 3: ...PM 160SP 2 OPERATION MANUAL Polisher 12 22...
Page 4: ...PM 160SP...
Page 5: ...1 2 2 2 3 3 4 3 5 4 6 4 7 7 8 8 9 8 10 9 11 9...
Page 6: ...2 Dnipro M High Quality Tools 1 2 Dnipro M...
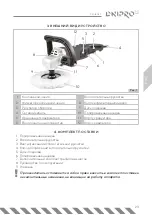
Page 7: ...PM 160SP 3 3 1 7 2 8 3 9 4 10 5 11 6 12 4 1 2 3 4 5 6 7 8 9 1 3 4 2 5 6 12 7 11 10 9 8 1...
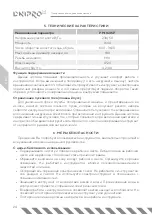
Page 8: ...4 5 PM 160SP 230 50 1600 600 3600 180 M14 IP20 4 2 4 4 6...
Page 9: ...PM 160SP 5 Dnipro M Dnipro M Dnipro M...
Page 10: ...6 1 2 3 4 5...
Page 11: ...PM 160SP 7 7 30 3 1 2 1 2 2 3 1 2 3...
Page 12: ...8 4 1 3 4 2 3 4 8 1 2 5 5 35 80 3 4 5 3 6 7 9 1 2 10 3 5 35 30 20 4...
Page 13: ...PM 160SP 9 60 C 50 30 60 5 600 3600 6 5 MIN MAX 15 3 1 1 1 2 1 10 11 4 5...
Page 14: ...PM 160SP OPERATING MANUAL Polisher...
Page 23: ...PM 160SP 19 ENG NOTES...
Page 24: ...PM 160SP...
Page 25: ...1 22 2 22 3 23 4 23 5 24 6 24 7 27 8 28 9 29 10 30 11 30...
Page 26: ...22 Dnipro M High Quality Tools 1 2 Dnipro M...
Page 27: ...PM 160SP 23 3 1 7 2 8 3 9 4 10 5 11 6 12 4 1 2 3 4 5 6 7 8 9 1 3 4 2 5 6 12 7 11 10 9 8 1...
Page 28: ...24 5 PM 160SP 230 50 1600 600 3600 180 M14 IP20 4 2 4 4 6...
Page 29: ...PM 160SP 25 Dnipro M...
Page 30: ...26 Dnipro M Dnipro M...
Page 31: ...PM 160SP 27 7 30 3 1 2 1 2 2 3...
Page 32: ...28 4 1 3 4 2 3 4 8 1 2 5 5 35 80 3 4 5 3 6 7 1 2 3...
Page 33: ...PM 160SP 29 9 1 2 10 3 5 35 30 20 4 60 50 30 60 5 600 3600 6 5 4 5...
Page 34: ...30 MIN MAX 15 3 1 1 2 1 10 11...
Page 35: ......
Page 36: ......


