background image

Dobinsons Springs and Suspension                                                                                  

www.dobinsonsprings.com


22.


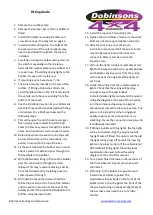
Align the bar with the vehicle into its correct 
position, leaving an even gap between the top 
of the bullbar and the bottom of the 
flare/headlight/grill of about 10-20mm.  


23.


Once you are happy with the alignment 
tighten the nuts and bolts on each side. 

24.


Tighten the adjustment stopped bolts so they 
are firm against the front of the chassis. 

25.


Using a 10mm drill bit, drill 10mm holes 
through the bullbar mount into the mounting 
bracket as seen below. This only drills through 
the outer plate on the mounting face of the 
mounting bracket. 

26.


Install 10mm x 25mm high tensile bolts into 
the pinning holes. Slide an 10mm nyloc nut 
into the space between the 2 bracket plates 
and align with the nut and tighten. This must 
be done to prevent the bullbar moving when 
winching. 


27.


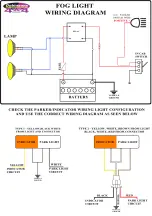
Plug the wires into the indicator, parker light 
plug and fog lights. Test all lights and adjust 
the position of the fog lights if required. 

28.


Fit the under bar protection kit now with the 
bolts supplied. The original plastic splash 
guard can be secured to the rear of the new 
bash plate.  

29.


Trim the wheel arch mud guard liners back so 
they are not visible from the front of the 
vehicle.  

30.


Check over all items removed during 
installation. 

31.


IMPORTANT NOTES: It is important to inform 
the customer that headlight adjustment may 
also be required due to the change in ride 
height. It is also important to inform the 
customer that there will be a change in 
vehicle handling characteristics. It is also 
important to note that due to their nature fog 
lights are required to provide a yellow light to 
allow clear fog vision. For this reason 
Dobinsons bullbars utilise a Halogen bulb. 
Halogen bulbs generate a considerable 
amount of heat to achieve the yellow colour 
and this causes the air inside the fog light lens 
to expand and contract. For this reason the 
fog light assembly cannot be sealed and has a 
small breather on the back. In some cases this 
may cause condensation to form inside the 
fog light. The customer may choose to seal 
the lens of the fog light but must not seal the 
rear breather.  


Summary of Contents for BU45-3505

Page 1: ...This Bullbar will take approximately 2 5 hours to install Tools required are Spanners and socket set Pneumatic hacksaw Screwdrivers Pliers and side cutters Dobinsons BULLBARS should be installed by a qualified installer and it is the installer responsibility to ensure correct fitment Fully read and understand the instructions before beginning the installation ...

Page 2: ...Dobinsons Springs and Suspension www dobinsonsprings com ...

Page 3: ...Dobinsons Springs and Suspension www dobinsonsprings com ...

Page 4: ...the fairlead in position at the front of the bullbar and the winch in position at the rear of the bullbar and bolt the winch and fairlead to the bullbar using the lower bolts 14 Install the top winch mounting bolts 15 Tighten the winch bolts and ensure the winch bolts are not too long and tighten correctly 16 Wire the winch up as per the winch instruction manual and bolt the winch to the mounting ...

Page 5: ...f required 28 Fit the under bar protection kit now with the bolts supplied The original plastic splash guard can be secured to the rear of the new bash plate 29 Trim the wheel arch mud guard liners back so they are not visible from the front of the vehicle 30 Check over all items removed during installation 31 IMPORTANT NOTES It is important to inform the customer that headlight adjustment may als...

Page 6: ......

Page 7: ... is especially important in coastal and high dust areas The loops can simply be cleaned with most regular car cleaning items like a soft sponge car wash and a chamois avoid strong cleaning chemicals Like many other highly polished exterior metals over extended periods of time and heavy weathering can cause some staining of the surface may occur If this occurs the surface can be simply polished usi...

Page 8: ...ng of the buffing wheel for best results However if no instructions are provided the following guidelines can be used A Carefully dress the buff wheel with the compound across the rotating wheel for a few seconds taking care not o apply too much compound it is better to apply a little compound more frequently than to overdress the buff B Gently buff the work area with the buffing wheel and with li...

Reviews: