background image

Dobinsons Springs and Suspension                                                                                  

www.dobinsonsprings.com


Fitting Guide 


1.


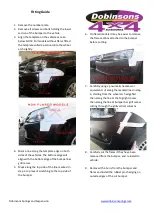
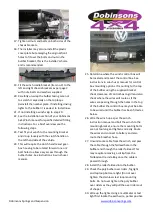
Remove the number plate. 

2.


Remove all screws and bolts holding the lower 
section of the bumper to the vehicle.  

3.


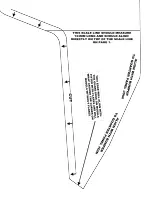
Align the template on the vehicle as seen 
below NOTE: For models without flares fitted 
the template will wrap around into the wheel 
arch slightly. 


4.


Mark a line along the template edge on both 
sides of the vehicles. The bottom edge will 
align with the bottom edge of the bumper bar 
grill recess.  

5.


Mask along the top side of the line marked in 
step 4 to prevent scratching to the top side of 
the bumper. 

6.


On flared models it may be easier to remove 
the flare sections attached to the bumper 
before cutting. 


7.


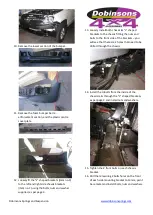
Carefully using a pneumatic hacksaw or 
equivalent cut along the marked lines in step 
4, starting from the wheel arch edge first, 
then along the line at the fog light recess, 
then along the line at bumper bar grill recess 
cutting through the grill vertical columns. 


8.


Carefully cut the flares if they have been 
removed from the bumper, and re install to 
vehicle.  
 

9.


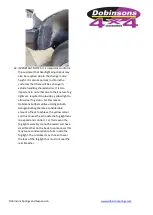
Removed the burrs from the bumper and 
flares and install the rubber pinch edging on 
outside edges of the cut bumper.  

Summary of Contents for BU63-3523

Page 1: ...arok 2011 on This Bullbar will take approximately 4 hours to install Tools required are Spanners and socket set Pneumatic hacksaw Screwdrivers Pliers and side cutters Dobinsons BULLBARS should be inst...

Page 2: ...Dobinsons Springs and Suspension www dobinsonsprings com...

Page 3: ...Dobinsons Springs and Suspension www dobinsonsprings com...

Page 4: ...k along the top side of the line marked in step 4 to prevent scratching to the top side of the bumper 6 On flared models it may be easier to remove the flare sections attached to the bumper before cut...

Page 5: ...age 3 13 Loosely Install both chassis L shaped brackets to the chassis fitting the nuts and bolts to the front side of the brackets you will see that there are 2 holes that need to be drilled through...

Page 6: ...tions in winch user manual 25 Determine where the winch control box will be located and mount the control box See instructions in winch user manual for control box mounting options If mounting to the...

Page 7: ...an be used Follow the wiring diagram at the end of this manual 33 With help fit the bulbar into position and install nuts and bolts supplied 34 Align the bar with the vehicle into its correct position...

Page 8: ...ture fog lights are required to provide a yellow light to allow clear fog vision For this reason Dobinsons bullbars utilise a Halogen bulb Halogen bulbs generate a considerable amount of heat to achie...

Page 9: ...ST UR NE DOF FA ND P R I NTA TF UL LS I Z E C HE C K T HE S C A L EL I NEON B OT H S HE E T SA ND A L I GN B OT H S C A L EL I NE SD I R E C T L Y ON T OPOFE A C H OT HE RA NDT A P E T OGE T HE R C U...

Page 10: ...O U N D T H E C O R N E R O N M O D E L S W I T H O U T F L A R E S A L I G N W I T H B U M P E R T O Q U A R T E R P A N E L J O I N A L I G N W I T H B U M P E R T O Q U A R T E R P A N E L J O I N...

Page 11: ......

Page 12: ...is especially important in coastal and high dust areas The loops can simply be cleaned with most regular car cleaning items like a soft sponge car wash and a chamois avoid strong cleaning chemicals Li...

Page 13: ...g of the buffing wheel for best results However if no instructions are provided the following guidelines can be used A Carefully dress the buff wheel with the compound across the rotating wheel for a...

Reviews: