background image

Before using the terminal

19

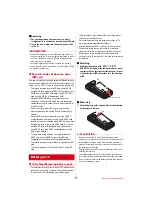
Charging with AC adapter

Charging with the optional AC Adapter 04 is described.

a

Open the external connection jack cap of the 
terminal, insert the microUSB plug of the microUSB 
cable horizontally into the external connection jack 
with engraved side facing up

b

Insert the AC adapter's power plug into an outlet

Indication light lights red while charging, and turns 
off when charging is complete.

c

When charging is complete, remove the AC adapter's 
power plug from the wall outlet

d

Remove the microUSB plug from the terminal and 
close the external connection jack cap of the terminal

Charging with a PC

If you connect the terminal with a PC using a USB Cable 
A to C 01 (optional), you can charge the terminal with a 
PC.

When a screen of new hardware detection or 
operation selection appears on the PC, close the 
terminal.

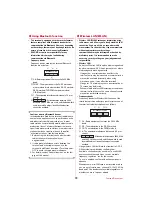
Turning power ON

1

Press 

f

 for 2 seconds or more

The terminal vibrates once, after a short time a 
waterproof confirmation message is displayed, and 
Standby screen will appear.

The terminal may turn on by pressing 

f

 several 

times in a row instead of pressing it for 2 seconds 
or more.

When the terminal is turned on for the first time

Turning power OFF

1

Press 

f

 for 2 seconds or more

The terminal vibrates twice, a shutting down 
message is displayed, and the terminal turns off.

For the first time you turn the power ON, a confirmation 
screen appears. Make settings or perform operations as 
required. The settings can be changed later.

After turning ON for deleting all the data, the setting 
screen is displayed in the same way.

If you turn the power OFF with some settings not made 
in the initial settings, unset items appear again when 
you turn the power ON next time.

If the confirmation screen of sending the terminal error 
information is displayed, press 

g

.

1

On the screen for preparation before using 
the terminal, 

g

2

Following the onscreen instructions to set 
each item

音声読み上げ

 (Text-to-speech)

Set whether to let 

the terminal read information on the screen or 
operation.

メニュー形式

 (Menu form) : 

Select the menu format.

端末暗証番号

 (Terminal security code) : 

Change the 

terminal security code for operating each 
terminal.

By default, "0000" is set.

歩数計/活動量計

 (Pedometer/Activity meter) : 

Enter and set the height/weight. 

 p.xxx

3

On the docomo service setting screen, 

g

4

Check each caution and press "

同意する

(Agree)"

5

Follow the onscreen instructions to set each 
item

d

アカウント

 (d account) : 

Set the d account for 

DOCOMO applications.

ドコモ位置情報

 (docomo location information) : 

Set 

whether to provide the location information of 
the terminal.

6

On the setting complete screen 

g

The Standby screen appears.

Turning power ON/OFF

Initial settings

Summary of Contents for Rakuraku F-01M

Page 1: ...Rakuraku phone QUICK INSTRUCTION MANUAL F 01M NAME PHONE NUMBER MAIL ADDRESS...

Page 2: ...hased Unauthorized copying of parts of or this entire manual is prohibited The contents in this manual URL and contents are subject to change without prior notice Kantan operation guide booklet This m...

Page 3: ...using the terminal 14 Part names and functions 14 docomo nano UIM card 16 Battery pack 17 Charging 18 Turning power ON OFF 19 Initial settings 19 Calling 21 Making a call 21 Receiving a call 22 One to...

Page 4: ...you want to use beforehand and then use it You are recommended to save important data to microSD card or a PC This terminal supports FOMA Plus Area and FOMA HIGH SPEED Area The terminal does not suppo...

Page 5: ...ecified by NTT DOCOMO for your terminal May cause fire burns injuries electric shock WARNING Do not throw the equipment or give a strong force or hard shock to it May cause fire burns injuries electri...

Page 6: ...as liquid like water metal pieces or burnable things into docomo mini UIM card slot or microSD card slot May cause fire burns injuries electric shock Do not turn on the light aiming directly at the dr...

Page 7: ...hysical condition If you develop skin problems immediately stop using the phone and see a doctor When watching the display take a certain distance from the display in a fully bright place May reduce v...

Page 8: ...insert and remove the AC adapter from power outlet do not contact a metal strap or other metal objects with the jack May cause fire burns electric shock Do not touch the adapter cord desktop holder o...

Page 9: ...cal facility be sure to observe the regulations of the facility Material list F 01M Body Do Do Do Do Do Part Material Surface treatment Exterior case Movable part Back Display PC GF resin Acrylic UV c...

Page 10: ...aged or malfunction And if external devices are plugged into the external connection jack or the stereo earphone jack the breakage of the connector or malfunction may result Do not rub or scrape the d...

Page 11: ...arge too exhausted to turn on the terminal They may cause the battery pack performance to be degraded or its lifetime to be shortened A recommended battery level when keeping the battery pack is appro...

Page 12: ...information using radio waves and allows you to freely establish LAN connection if you are within an area where radio wave reaches On the other side if you communicate without appropriate security se...

Page 13: ...identification of mobile objects or amateur radio stations or if any trouble contact General Inquiries on the last page of this manual CAUTION Do not use a remodeled terminal Using a remodeled termina...

Page 14: ...mediately pick it up to drain water in specified procedure Never put the terminal in hot spring water or water containing soap detergent or bath powder In case the terminal gets wet with water other t...

Page 15: ...n causing troubles such as electric shocks or corrosion of the battery If the terminal gets wet with water or other liquids with the external connection jack cap or the back cover open the liquid may...

Page 16: ...e Back microphone Reduce the noise when talking Be careful not to block here f docomo nano UIM card slot g Back cover Remove this cover and the battery pack to access the docomo nano UIM card slot and...

Page 17: ...display E Microphone Speaker 3 Send your voice when talking on the phone recording the voice memo etc Collect the ambient sound as a sound collector F p Phonebook Display Phonebook execute the operati...

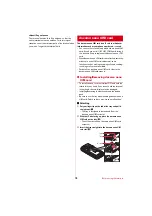
Page 18: ...g receiving mails are not available For details on docomo nano UIM card refer to the docomo nano UIM card manual Installing Removing docomo nano UIM card To install remove turn the terminal OFF and ho...

Page 19: ...patible with SDXC use a microSDHC card or microSD card compatible with the device of copied destination The terminal supports up to Class 10 speed microSD card The terminal supports UHS speed Class 1...

Page 20: ...attery pack lifetime When a time available with each charging is reduced to about a half from that of a new battery replacement of the battery is recommended because it is near the end of life The bat...

Page 21: ...FF 1 Press f for 2 seconds or more The terminal vibrates twice a shutting down message is displayed and the terminal turns off For the first time you turn the power ON a confirmation screen appears Ma...

Page 22: ...Standby screen Marks and information displayed The current condition status and notifications new information etc can be checked by the mark or information displayed on the Standby screen a Mark Uppe...

Page 23: ...aking a call from the detailed screen of the phonebook Select a receiver e g e lr to display the number e n or g International call WORLD CALL WORLD CALL is an international call service available fro...

Page 24: ...eived The ringtone sounds and n flashes 2 n The connection is made The talk time etc is displayed on the display 3 When a call is ended f You can also end a call by closing the terminal Register frequ...

Page 25: ...g e Enter a day e g e g 9 a Set e select a group e g e p Registering a group or pressing b Not set completes the group registration 10 b Complete Searching in the phonebook You can quote from the pho...

Page 26: ...ing result list 1 p on the Standby screen e search in the phonebook 2 Select a receiver e m e g Delete from the phonebook The confirmation screen asking whether to delete the receiver is displayed To...

Page 27: ...websites listed below if you would like more detailed information regarding SAR Ministry of Internal Affairs and Communications Website https www tele soumu go jp e sys ele index htm Association of R...

Page 28: ...o as to use only the power required to reach the network In general the closer you are to a wireless base station antenna the lower the power output level of the phone Before a phone model is availabl...

Page 29: ...locations with flammable material and chemicals Switch off your wireless device whenever you are instructed to do so by authorized staff INTERFERENCE Care must be taken when using the phone in close...

Page 30: ...tered trademarks of Wi Fi Alliance OBEX is a trademark of Infrared Data Association Other company and product names mentioned in this manual are trademarks or registered trademarks of their respective...

Page 31: ...ock service is provided at a docomo Shop A SIM unlock charge is separately required With UIM other than by DOCOMO using the terminal in LTE system is unavailable And available services and functions w...

Page 32: ...ttdocomo co jp english 2019 9 1st Edition 8000120 0151 81 3 6832 6600 toll free International call access code for the country you stay You are charged a call fee to Japan when calling from a land lin...

Reviews: