background image


Dol Sensors

           Hedelund 4, Glyngøre           7870 Roslev           Denmark           Tlf. +45 72 17 55 55           Fax +45 72 17 59 59           

www.dol-sensors.com


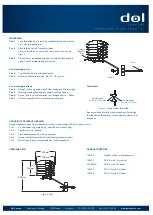
MOUNTING 

Step 1

:  Loosen the plastic sensor retainer on the radiation shield by 


unscrewing two retainer screws. 

Step 2

:  Slide the sensor completely into the radiation shield. 


Make sure that the sensor is inserted as far as possible. See 


Figure 1. 

Step 3

:  Screw the retainer to the radiation shield until the sensor is 


firmly held in place. Do not over tighten the screws. 


For Pipe Mounting 

Step 4:

  Remove the U-bolt from the mounting fittings. 

Step 5

:  Secure the radiation shield to a 

3/4˝ to 1-1/2˝ iron pipe. 


For Surface Mounting 

Step 4

:  Remove the U-bolt and the screw holding the pipe-retaining fittings. 

Step 5

:  Mark the outer two holes of the mounting fittings on the surface. 

Step 6:

  Drill the two holes marked in the previous step into the surface. 

Step 7

:  Attach the radiation shield to the surface. 

Sensor Retainer 


Figure 4: Optional two sided sensor retainer 

This two-sided sensor retainer can be used for varying 

sensor diameters depending on which side of the retainer is 

being used. 

MAINTENANCE GUIDE 

Clean the radiation shield when needed. At least once a year: 

Step 1:   Check for damage and miscolouring 

– replace if necessary.  

Step 2:   Remove the sensor from the shield. 

Step 3:   Clean out spider webs, dust and the like. 

Step 4:   Clean the top of the shield for any droppings from birds. 

Step 5: 

Refit the sensor in the radiation shield. 


TECHNICAL DATA 

PRODUCT SURVEY 


Figure 5: Dimensions


140245 

Radiation Shield 

140200 

DOL 12 with 1.4 m cable 

S140200A 

DOL 12 with 5 m cable 

140252 

DOL 114 with 2 m cable 

140253 

DOL 114  with 5 m cable 

– TECHNICAL USER GUIDE 


130 mm

126 mm

220 mm

120 mm

U-bolt 

Sensor diameters 

10.2 mm - 12.44 mm 

(

0.40” - 0.49”) 

Sensor diameters 

12.7 mm - 17.5 mm 

(

0.50” - 0.69”) 

Plastic 
sensor 

retainer 

Figure 3


Summary of Contents for 140245

Page 1: ...ngøre 7870 Roslev Denmark Tlf 45 72 17 55 55 Fax 45 72 17 59 59 www dol sensors com RADIATION SHIELD FOR TEMPERATURE AND HUMIDITY SENSORS EN Technical User Guide DA Teknisk brugervejledning DE Technisches Anwenderhandbuch ES Guía técnica de usuario ...

Page 2: ...Dol Sensors Hedelund 4 Glyngøre 7870 Roslev Denmark Tlf 45 72 17 55 55 Fax 45 72 17 59 59 www dol sensors com ...

Page 3: ...es from sun rooftops and surrounding surfaces from affecting the sensor readings For ease of installation the shield has integral pipe mounting fittings These fittings can also be removed for surface mounting The fittings are specifically designed for mounting in outdoor conditions DOL 12 temperature or DOL 114 temperature and humidity sensor can easily be installed using the sensor retainer in Fi...

Page 4: ...oles marked in the previous step into the surface Step 7 Attach the radiation shield to the surface Sensor Retainer Figure 4 Optional two sided sensor retainer This two sided sensor retainer can be used for varying sensor diameters depending on which side of the retainer is being used MAINTENANCE GUIDE Clean the radiation shield when needed At least once a year Step 1 Check for damage and miscolou...

Page 5: ...e fra sol tagbeklædning og omgivende flader i at påvirke følerens målinger For nem installation har vejrbeskyttelsen indbyggede rørmontagebeslag Disse beslag kan også aftages ved montering på en flade Beslagene er specielt udformet til udendørs montering DOL 12 temperaturføleren eller DOL 114 temperatur og fugtighedsføleren er nem at montere med føler holderen i figur 3 Figur 1 PLACERING Placer ve...

Page 6: ...aden Trin 7 Skru vejrbeskyttelsen for klimasensorer på fladen Følerholder Figur 4 Valgfri tosidet følerholder Denne tosidede følerholder kan anvendes til forskellige følerdiametre afhængigt af hvilken side af holderen der anvendes VEDLIGEHOLDELSESVEJLEDNING Rengør vejrbeskyttelsen for klimasensorer når det er nødvendigt Mindst en gang om året Trin 1 Se efter skader og misfarvning udskift den om nø...

Page 7: ...rn oder umliegenden Flächen beeinträchtigt werden Dank integrierter Rohrbeschläge ist der Schutzschild leicht zu installieren Für eine Oberflächenmontage können diese Beschläge auch entfernt werden Die Beschläge sind speziell für die Montage im Außenbereich konzipiert DOL 12 Temperatursensor oder DOL 114 Temperatur und Feuchtesensor können mit dem Sensorhalter in Abbildung 3 ganz einfach installie...

Page 8: ...ie zwei Löcher an den Stellen die in Schritt 5 auf der Oberfläche markiert wurden Schritt 7 Befestigen Sie den Strahlungsschutz an der Oberfläche Sensorhalter Abbildung 4 Optional doppelseitiger Sensorhalter Dieser doppelseitige Sensorhalter kann für unterschiedliche Sensordurchmesser genutzt werden je nachdem welche Seite des Halters verwendet wird WARTUNGSLEITFADEN Reinigen Sie den Strahlungssch...

Page 9: ... a las lecturas del sensor Para facilitar la instalación el escudo incorpora accesorios de montaje de tuberías integrales Estos accesorios pueden también quitarse para su montaje en una superficie Los accesorios se han diseñado específicamente para montar el escudo en exteriores Los sensores de temperatura DOL 12 y de temperatura y de humedad DOL 114 pueden instalarse fácilmente utilizando el rete...

Page 10: ...izar los dos orificios marcados en el paso anterior en la superficie Paso 7 Unir el escudo de radiaciones a la superficie Retenedor del sensor Imagen 4 Retenedor del sensor opcional de dos lados El retenedor del sensor de dos lados puede usarse para modificar los diámetros del sensor dependiendo del lado del retenedor que se vaya a utilizar GUÍA DE MANTENIMIENTO Limpiar el escudo de radiaciones cu...

Page 11: ...Dol Sensors Hedelund 4 Glyngøre 7870 Roslev Denmark Tlf 45 72 17 55 55 Fax 45 72 17 59 59 www dol sensors com ...

Page 12: ...604167 2014 12 18 ...

Reviews: