3
14. Connect P1, P2, and P3 connectors to the appro-
priate terminals on circuit board.
15. Snap cover into place carefully so as to avoid pinch-
ing any wiring. Secure cover to backplate with #4 x
1/2" self-tapping screw provided.
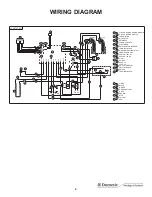
16. Place new wiring diagram decal over the old one.
17. Installation of this Universal Power Module Kit is
now complete
B. 3308742.000 3-Way AES/AMES Refrigera-
tor Universal Power Module Kit
1. Disconnect all wires and harnesses from circuit
board.
2. Remove old circuit board.
3. Disconnect P3 harness from gas valve solenoid,
ignitor, and ground terminal.
4. Replace P3 harness with new version. Connect
white wire to one side of the gas valve solenoid,
and the yellow wire to the other side. The second-
ary yellow wire spliced to the solenoid wire con-
nects to the (+) of the ignitor.
5. Unscrew chassis ground screw from backplate and
attach black ground wire; reinsert ground screw
and firmly retighten.
6. Install relay by utilizing the screw hole (and screw)
used previously on the older style circuit board to
attach the cover to the backplate. Mount relay with
the connection terminals pointing to the right, and
mounting hole to the left.
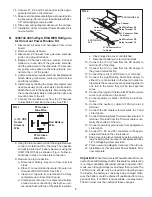
7. Connect the two Blue wires from the P3 harness
to terminals 85 and 86 on the relay. See FIG. 1.
8. Using the tab connector end of the single Red wire
connect it to terminal 30 or the relay. The opposite
end will tap into the J1 battery input wire using the
SCOTCHLOC 562 as shown in Fig. 2. Follow in-
structions in step 9 to make this connection.
9
.
Red wire line tap connection.
a. Disconnect battery input wire from terminal
block.
b. Place J1 connector tab input wire into outer run
channel of SCOTCHLOK. See FIG. 2.
c. Insert red tap wire from terminal 30 of relay
completely up to inner stop channel.
d. Clamp pliers onto top of u-contact and bottom
of case; make connection by driving the u-con-
tact down flush with top of the plastic insulator.
e. Close hinged top cover until latched.
f. Reconnect battery wire to terminal block.
10. Connect the 12V (+) lead from the DC heater to
terminal 87 of the relay.
11. Connect the 12V (–) lead from the DC heater to
the ground terminal strip.
12. Connect the red (+) 12VDC wire to J1 terminal.
13. Connect the Light/Heating Cable blue wire(s) to
either J2 or J3 terminals on the board. In older re-
frigerators these two wires are spliced together to
one tab. In the future they will be two separate
wires.
14. Connect the longer of the two black Thermocouple
wires to J4 terminal on the board.
15. Connect positive (+) black 120 VAC Line to J5 ter-
minal.
16. Connect the neutral (–) white 120 VAC wire to J6
terminal.
17. Connect the AC Heater element wires to J7 and
J8 terminals.
18. Connect remaining black Thermocouple wire to J10
terminal. This lead from the Thermocouple is nor-
mally the shortest of the two.
19. Connect new black ground wire from backplate to
J9 terminal.
20. Connect P1, P2, and P3 connectors to the appro-
priate terminals on the circuit board.
21. Snap cover into place carefully so as to avoid pinch-
ing any wiring. Secure cover to backplate with #4 x
1/2" self-tapping screw provided.
22. Place new wiring diagram decal over the old one.
23. Installation of this Universal Power Module Kit is
now complete.
Important:
When this Universal Power Module Kit is con-
nected to an AES display, the DC threshold level detection
is no longer available; board will continue to operate in DC
mode, even though voltage level is lower than normal. The
12VDC mode should only be used while traveling down
the road so the battery is constantly being charged other-
wise the battery could be drained if unattended for a long
period of time. If 120VAC is not available, use Gas mode.
The RV owner must be notified of these changes.
Outer Run
Channel
U-Contact
J1 Connector Wire
To Board
Stop Channel
Red Wire From DC
Relay Terminal 30
SCOTCHLOK 562
J1 Connector Wire
To Board
Red Wire From DC
Relay Terminal 30
SCOTCHLOK
562
85
(+) 12 VDC
Heater
Element
Wire
P3 Harness
Blue Wire
P3 Harness
Blue Wire
Red Battery
Wire
86
30
87
FIG. 1
FIG. 2


