background image

CFX75_95DZW--O-AU.book  Seite 2  Dienstag, 3. April 2018  8:49 08

Summary of Contents for 9600001409

Page 1: ...CFX75DZW CFX95DZW Compressor Fridge Freezer Operating manual EN PORTABLE REFRIGERATION CFX SERIES CFX75_95DZW O AU book Seite 1 Dienstag 3 April 2018 8 49 08 ...

Page 2: ...CFX75_95DZW O AU book Seite 2 Dienstag 3 April 2018 8 49 08 ...

Page 3: ...ssories 8 5 Intended use 8 6 Function description 9 6 1 Scope of functions 9 6 2 Operating and display elements 10 7 Operation 13 7 1 Before initial use 13 7 2 Energy saving tips 15 7 3 Connecting the cooler 16 7 4 Using the battery monitor 18 7 5 Using the cooler 19 7 6 Setting the temperature 20 7 7 Switching a compartment off or on 21 7 8 Enabling Wi Fi signal for optional app 22 7 9 Set bright...

Page 4: ...on will cause fatal or serious injury WARNING Safety instruction Failure to observe this instruction can cause fatal or serious injury CAUTION Safety instruction Failure to observe this instruction can lead to injury NOTICE Failure to observe this instruction can cause material damage and impair the function of the product NOTE Supplementary information for operating the product CFX75_95DZW O AU b...

Page 5: ...risks Cleaning and user maintenance must not be carried out by children without supervision Children must not play with the cooling device Children must be supervised to ensure that they do not play with the cooling device Always keep and use the cooling device out of the reach of children under the age of 8 years Do not store any explosive substances such as spray cans with a flammable propellant...

Page 6: ...oling device safely CAUTION Before starting the cooling device ensure that the power supply line and the plug are dry A NOTICE Do not use electrical devices inside the cooling device unless they are recommended by the manufacturer for the purpose Do not place the cooling device near naked flames or other heat sources heaters direct sunlight gas ovens etc Danger of overheating Ensure at all times t...

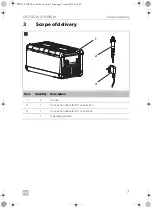
Page 7: ...delivery 7 3 Scope of delivery Item Quantity Description 1 1 Cooler 2 1 Connection cable for DC connection 3 1 Connection cable for AC connection 1 Operating manual 1 2 3 1 CFX75_95DZW O AU book Seite 7 Dienstag 3 April 2018 8 49 08 ...

Page 8: ...oolingdeviceisintendedtobeusedinhouseholdandsimilarapplicationssuch as staff kitchen areas in shops offices and other working environments farm houses clients in hotels motels and other residential type environments bed and breakfast type environments catering and similar non retail applications Designation Ref no Universal fixing kit belt system CFX UFK 9108300002 Insulated protective cover CFX I...

Page 9: ...cting to the AC mains Three level battery monitor to protect the vehicle battery Display with temperature gauge in C and F switches off automatically at low battery voltage Independent settings controls and displays for each compartment Temperature setting With two buttons in steps of 1 C 2 F Integrated Wi Fi transmitter hence controllable using an app Lid open alarm USB port for power supply Emer...

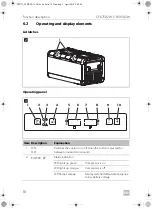
Page 10: ...the cooler on or off when the button is pressed for between one and two seconds 2 POWER P Status indication LED lights up green Compressor is on LED lights up orange Compressor is off LED flashes orange Display switched off automatically due to low battery voltage 2 1 SET 1 2 3 4 5 6 7 8 9 10 3 CFX75_95DZW O AU book Seite 10 Dienstag 3 April 2018 8 49 08 ...

Page 11: ...compartment is cooling LED off compartment is not cooling 6 Display large Shows information for large compartment Shows OFF when the compartment is switched off 7 Display small Shows information for small compartment Shows OFF when the compartment is switched off 8 Cooling small Status indication small compartment LED lights up blue compartment is cooling LED off compartment is not cooling 9 DOWN ...

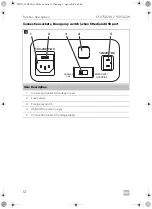
Page 12: ...d and USB port Item Description 1 Connection socket AC voltage supply 2 Fuse holder 3 Emergency switch 4 USB port for power supply 5 Connection socket DC voltage supply EMERGENCY OVERRIDE NORMAL USE 100 240V AC 12 24V DC 2 3 4 5 1 4 CFX75_95DZW O AU book Seite 12 Dienstag 3 April 2018 8 49 08 ...

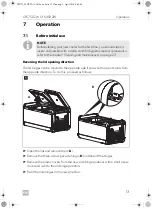
Page 13: ...ree screws per side hinge B and take off the hinges Remove the plastic covers from the new side hinge positions with a small screw driver and re fit to the old hinge positions Re fit the side hinges in the new positions NOTE Before starting your new cooler for the first time you should clean it inside and outside with a damp cloth for hygienic reasons please also refer to the chapter Cleaning and ...

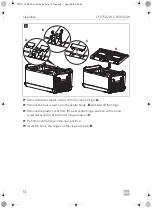
Page 14: ...re hinge B and take off the hinge Remove the plastic cover from the new centre hinge position with a small screwdriver and re fit to the old hinge position C Re fit the centre hinge in the new position Insert the lids in the hinges on the opposite side D A B C D 6 CFX75_95DZW O AU book Seite 14 Dienstag 3 April 2018 8 49 08 ...

Page 15: ...n both displays for a few seconds The displays flash several times before returning to the current temperature 7 2 Energy saving tips Choose a well ventilated location which is protected from direct sunlight Allow warm food to cool down first before placing it in the cooling device to keep cool Do not open the cooling device more often than necessary Do not leave the cooling device open for longer...

Page 16: ...ion cable fig 1 2 page 7 into the DC voltage socket of the cooler fig 4 5 page 12 Connect the connection cable to the DC power outlet NOTICE Danger of damage Disconnect the cooler and other consumer units from the battery before you connect the battery to a quick charging device Overvoltage can damage the electronics of the device NOTICE Danger of damage For protection of the device the DC cable s...

Page 17: ...power supply and the DC battery supply the red LED may light up briefly Plug the AC connection cable fig 1 3 page 7 into the AC voltage socket of the cooler fig 4 1 page 12 Connect the connection cable to the AC power outlet DANGER Danger of electrocution Never handle plugs and switches with wet hands or if you are standing on a wet surface If you are operating your cooler on board a boat with an ...

Page 18: ...ig 3 9 page 10 buttons to select the battery monitor mode Digital display will be as follows Lo LOW ΠEd MED HI HIGH The selected mode then appears in the display for a few seconds The display flashes several times before it returns to the current temperature I NOTICE Danger of damage When switched off by the battery monitor the battery will no longer be fully charged Avoid starting repeatedly or o...

Page 19: ...is cooling I NOTICE Danger of overheating Ensure at all times that there is sufficient ventilation so that the heat that generated during operation can dissipate Ensure that the ventilation slots are not covered Make sure that the device is sufficiently far away from walls and other objects so that the air can circulate NOTE Place the cooler as shown fig 1 page 7 If you operate the box in a differ...

Page 20: ...temperature so that each compartment works as a refrigerator compartment or as a freezer compartment The cooling temperature appears in the display for a few seconds The display flashes several times and then the current temperature is displayed again I NOTE Lid Open Alarm If the lid is left open for three minutes or more and the device is switched on the interior light will flash until the lid is...

Page 21: ... the ON OFF button fig 3 1 page 10 OFF flashes for five seconds on the display of the respective cooling compartment then OFF is displayed Switching on compartment If the display of the compartment shows OFF you can switch on the compartment as follows Press the SET button fig 3 4 page 10 once for the large compartment twice for the small compartment The display of the respective compartment blink...

Page 22: ... several times and then the current temperature is displayed again I Resetting the Wi Fi to factory settings In case you have personalized the Wi Fi settings of your cooling device using the Wi Fi app and forgotten your password you can reset to the factory settings as follows Press the SET button fig 3 4 page 10 six times Hold the UP fig 3 10 page 10 button for at least five seconds In both displ...

Page 23: ...ergency switch The emergency switch fig 4 1 page 12 is located below the control panel For normal operation the switch is in the NORMAL USE position If an electronic control failure occurs slide the switch to EMERGENCY OVERRIDE position I NOTE The factory setting of brightness of the display is d0 default If a fault occurs the brightness automatically is d0 default After troubleshooting the set br...

Page 24: ...ting the cooler Humidity can form frost in the interior of the cooling device or on the evaporators This reduces the cooling capacity Defrost the device in good time to avoid this A To defrost the cooler proceed as follows Take out the contents of the cooling device If necessary place them in another cooling device to keep them cool Switch off the device Leave the lids open Wipe off the defrosted ...

Page 25: ... 15 Replacing the DC plug fuse Unscrew the contact pin housing 3 from the plug 1 Replace the defective fuse 2 with a new fuse of the same type and rating 3AG Fast Acting 10 A Re assemble the plug in reverse order I DANGER Danger of electrocution Disconnect the power supply and the connection cable before you replace the device fuse NOTE Internal DC fuse There is an additional DC fuse inside the de...

Page 26: ... screwdriver A Unscrew the PCB mounting screws B Pull out the plug from the PCB C Replace the defective light PCB with a new one Fit the new PCB using reverse of removal instructions Press the transparent cover back into the housing Reconnect the power supply to the device 8 A B C CFX75_95DZW O AU book Seite 26 Dienstag 3 April 2018 8 49 08 ...

Page 27: ...not glow No voltage was detected in the DC power outlet In most vehicles the ignition must be turned on before power will be sup plied to the DC power outlet No voltage present in the AC voltage outlet Try using another plug outlet The device fuse is defective Replace the device fuse see chapter Replacing the AC fuse on page 25 The integrated mains adapter is defective This can only be repaired by...

Page 28: ... fuse on page 25 The DC fuse inside the device has blown This can only be repaired by an authorised repair centre The vehicle fuse has blown Replace the vehicle s DC socket fuse Please refer to your vehicle s operating manual The display shows an error message e g Err1 and the device does not cool The device has switched off due to an internal fault This can only be repaired by an authorised repai...

Page 29: ... the following documents when you send in the device A copy of the receipt with purchasing date A reason for the claim or description of the fault 11 Disposal Place the packaging material in the appropriate recycling waste bins wherever possible M If you wish to finally dispose of the product ask your local recycling centre or specialist dealer for details about how to do this in accordance with t...

Page 30: ...kWh annum 109 kWh annum Gross volume Large compartment Small compartment 45 l 30 l 54 l 40 5 l Storage volume Large compartment Small compartment 43 l 27 l 50 5 l 34 5 l Climate class N T Ambient temperature 16 C to 43 C Noise emission 37 dB A USB 5 Vg 500 mA Frequency band WiFi 2 4 GHz RF power WiFi 16 1 5 dBm 802 11 b CCK 11 Mbps 12 1 5 dBm 802 11 g OFDM 54 Mbps 11 1 5 dBm 802 11 n HT20 MCS7 Ref...

Page 31: ...x H x D in mm Including handles Without handles 887 x 472 x 495 832 x 472 x 495 957 x 472 x 530 900 x 472 x 530 Weight 31 kg 32 kg Test certificates NOTE If the ambient temperature is above 32 C 90 F the minimum temperature cannot be attained CFX75DZW CFX95DZW 4 CFX75_95DZW O AU book Seite 31 Dienstag 3 April 2018 8 49 08 ...

Page 32: ...ER dometic com dealer YOUR LOCAL SUPPORT dometic com contact dometic com A complete list of Dometic companies which comprise the Dometic Group can be found in the public filings of DOMETIC GROUP AB Hemvärnsgatan 15 SE 17154 Solna Sweden 4445101768 4450018145 01 2020 ...

Reviews: