EN
Operation
RH418NTE, RH 418NTEG
18
6.2
Saving energy
•
Only open the minibar as often and for as long as necessary.
•
Avoid unnecessarily low temperature settings.
•
For optimal energy consumption, position the shelves and drawers according to
their position on delivery.
•
On a regularly basis, make sure the door seal still fits properly.
•
Clean dust and dirt from the condenser at regular intervals.
6.3
Switching on
I
1. Place the cooling device on a firm base.
2. Connect the connection cable to the AC mains supply.
✔
The cooling device starts cooling the interior.
6.4
Setting the temperature
To avoid food waste, note the following:
•
Keep temperature fluctuation as low as possible. Only open the minibar as often
and for as long as necessary. Store the foodstuff in such a way that the air can still
circulate well.
•
The minibar is equipped with an automatic temperature regulation function.
Select the average of the possible temperature values.
•
Adjust the temperature to the quantity and type of the foodstuff.
Foodstuff can easily absorb or release odor or taste. Always store foodstuff covered
or in closed containers/bottles.
The cooling device is equipped with an automatic temperature regulation function.
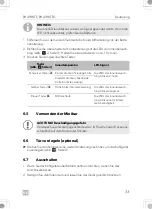
With the optional remote control (fig.
, page 3) you can adjust the temperature to
four different levels. Three buttons on the remote control the temperature settings.
•
Black button (
2
): Low inside temperature (two different levels possible)
•
Yellow button (
3
): High inside temperature
NOTE
•
A few water drops may form inside the cooling device if it has been
cooling for a lengthy period. This is normal because the moisture in
the air condenses to water when the temperature in the cooling
device falls. The cooling device is not defective. Wipe it out with a
dry cloth if necessary.
Summary of Contents for 9600050033
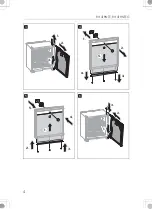
Page 3: ...RH418NTE RH418NTEG 3 4 3 2 1 1 1 2 3 4 2...
Page 4: ...RH418NTE RH418NTEG 4 1 2 3 3 1 2 5 4 3 4 5 4 1 2 3 5 6 3 2 1...
Page 5: ...RH418NTE RH418NTEG 5 1 2 3 7 1 3 2 4 8 2 1 9 1 3 2 0...
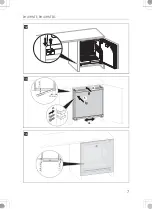
Page 6: ...RH418NTE RH418NTEG 6 A D C B 2 2 3 2 2 3 3 1 1 1 1 1 1 1 1 3 a...
Page 7: ...RH418NTE RH418NTEG 7 b 40 mm 10 mm 3 4 1 2 c 6 8 mm 1 2 mm d...
Page 8: ...RH418NTE RH418NTEG 8 e 80 mm 90 2 1 f...
Page 160: ...RU RH418NTE RH418NTEG 160 A I 2 2 1 Dometic...
Page 161: ...RU RH418NTE RH418NTEG 161 8 3 8...
Page 162: ...RU RH418NTE RH418NTEG 162 A 2 2 D...
Page 163: ...RU RH418NTE RH418NTEG 163 A 3...
Page 164: ...RU RH418NTE RH418NTEG 164 Dometic 4...
Page 165: ...RU RH418NTE RH418NTEG 165 4 1 4 2 5 A 1 3 1 2 3 4 2 3 1 2 3 4...
Page 166: ...RU RH418NTE RH418NTEG 166 65 25 C 5 1 3 4 6 4 5 2 7 5 0 5 I 1 1 3 3 2 3 5 3 a 6 A B C D 1 200...
Page 167: ...RU RH418NTE RH418NTEG 167 105 x b 7 5 4 c 7 f 8 6 6 1 171 6 2 a 6 2 20 3 105...
Page 168: ...RU RH418NTE RH418NTEG 168 6 3 I 1 2 6 4 2 3 2...
Page 169: ...RU RH418NTE RH418NTEG 169 3 4 I 8 1 2 1 2 3 10 3 6 5 A 2 3 2 3 4...
Page 170: ...RU RH418NTE RH418NTEG 170 6 6 g 9 6 7 1 2 6 8 1 3 3 1 2 3 1 1 3 2 1 3 4 6 9...
Page 171: ...RU RH418NTE RH418NTEG 171 7 A 1 2 3 8...
Page 172: ...RU RH418NTE RH418NTEG 172 9...

