background image

EN

Cleaning and maintenance

EA3280 (A803E)

16

8

Cleaning and maintenance

!

A

Use a soft cloth, lukewarm water and a mild detergent to clean the inside of the 
cooling device.

Wash out the cooling device using clean water and dry thoroughly.

At annual intervals, remove dust from the cooling aggregate at the back of the 
cooling device using a brush or a soft cloth.

Wipe the doors' PVC seals with a damp cloth and rub them with talcum powder 
from time to time.

8.1

Defrosting the device

A

I

To avoid impairing the performance level defrost the device, if the frost layer on the 
cooling gills attains a thickness of approximately 3 mm.

Disconnect the device from the AC mains supply.

Empty the device.

Leave the door of the device and the freezer compartment slightly ajar.

Put a cloth into the freezer compartment to absorb a part of the defrost water.

WARNING! 

Always disconnect the device from the power supply before you clean 
and service it.

NOTICE! Risk of damage

Never clean the cooling device under running water or in dish water.

Do not use abrasive cleaning agents or hard objects during cleaning 
as these can damage the cooling device.

NOTICE! 

Do not expose the cooling device to external heat to accelerate the 
defrosting.

Do not attempt to scratch away the frost with sharp objects.

NOTE 

If there is a thick frost layer inside the device, use a cloth to absorb the 
defrost water below the cooling gills. This prevents the collection con-
tainer from overflowing.

Summary of Contents for A 803 E

Page 1: ...EA3280 A803E Fridge Installation and Operating Manual 7 EN REFRIGERATION CLASSIC...

Page 2: ...EA3280 A803E 2 2 1 3 4 1 A D C B 2 1 2 3...

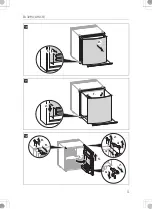
Page 3: ...EA3280 A803E 3 40 mm 10 mm 1 2 4 1 2 mm 6 8 mm 5 6...

Page 4: ...EA3280 A803E 4 1 2 7 8 80 m m 90 9...

Page 5: ...EA3280 A803E 5 2 1 0 2 1 a 8 9 2 4 3 6 7 5 1 b...

Page 6: ...EA3280 A803E 6 180 4 2 1 3 180 c 7 6 5 4 8 9 10 3 1 2 d 2 1 3 e...

Page 7: ...on of symbols 7 2 Safety instructions 8 3 Intended use 10 4 Scope of delivery 11 5 Technical description 11 6 Installation 11 7 Operation 14 8 Cleaning and maintenance 16 9 Troubleshooting 17 10 Dispo...

Page 8: ...is not intended for usebypersons includingchildren with reducedphysical sensoryormentalcapabilities orlack ofexperience and knowledge unless they have been given supervision or instruc tion concernin...

Page 9: ...ing caustic materials or materials containing solvents The insulation of the cooling device contains flammable cyclopentane and requires special disposal procedures Deliver the cooling device at the e...

Page 10: ...of the cooling device Keep the ventilation area free of any objects that could restrict the air flow to the cooling components Do not place the cooling device in closed compartments or areas with none...

Page 11: ...the cooling process can last between 8 and 18 hours Thesevaluesaremaintainedatambienttemperaturesbetween 16 Cand 32 C 5 1 Components 6 Installation A Quantity Description 1 Fridge 1 Installation and...

Page 12: ...ation duct as shown fig 2 page 2 Other parts of the device may not project into the ventilation duct Air passing through the ventilation duct must not be preheated by any source of heat Ventilation gr...

Page 13: ...can mount a sliding hinge that allows the cooling device door to be opened together with the door of the built in cabinet Mount the sliding hinge as shown fig 7 page 4 to fig 9 page 4 6 4 Changing the...

Page 14: ...ze and can therefore destroy the glass containers NOTE Before starting your new cooling device for the first time you should clean it inside and outside with a damp cloth for hygienic reasons please a...

Page 15: ...ease the temperature warmer rotate anti clockwise 7 3 Making ice cubes Fill the ice cube tray up to three quarters full with water Place the ice tray in the freezer compartment fig 1 3 page 2 of the c...

Page 16: ...isconnect the device from the AC mains supply Empty the device Leave the door of the device and the freezer compartment slightly ajar Put a cloth into the freezer compartment to absorb a part of the d...

Page 17: ...oling the cooling unit at the back of the device is cold The device plug is not plugged in Plug the device plug in No voltage present in the AC voltage socket Check fuse or try using another plug sock...

Page 18: ...ion grids are not covered Check that device has been installed in accordance with fig 2 page 2 The device is exposed to heat or direct sunlight Relocate the device The device door does not close tight...

Page 19: ...Ambient temperature 16 C to 32 C Noise emission sound power 0 dB Connection voltage 230 Vw 50 Hz 60 Hz Power consumption 115 W Cooling capacity Freezer compartment Regular compartment max 18 C 3 C to...

Page 20: ...OCAL SALES OFFICE dometic 0 0 s YOUR LOCAL DEALER dometic com dealer YOUR LOCAL SUPPORT dometic com contact dometic com 1 01 1 0 4 0 1 1 2 2 1 2 9 0 DOMETIC GROUP AB 3E 0 1 4 4445102883 207 4885 19 04...

Reviews: