background image

15

-  Insert locking-panel, secure with screws.
- Reinstall 

lock 

(see 2.2.4)

- Reinstall 

door 

(see 2.2.1)

2.3. Electrical 

component 

 (Fuzzy logic solution)

2.3.1. Replacing lighting device and bulb

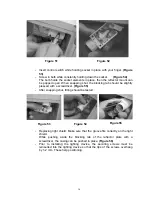
-  Remove screws securing lighting device.

 (Figure 46)

-  Detach blocking tab on reflector from the lighting device by pressing the

reflector plate. At the same time, push the light shield off of the casing.

(Figure 47,48)

- Unscrew 

bulb.

 (Figure 49)

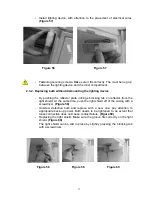
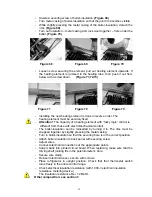
-  Snap the lighting device open by detaching the tab behind the threaded

part of the casing with a screwdriver.

 (Figure 50)

-  Disconnecting electrical wires, removing defective lighting device.
-  Reconnecting electrical wires in new casing. Prior to wiring, wires must be

threaded in the appropriate bore of the reflector holder.

 (Figure 51)

-  Placement of the socket in the casing so that its securing rib fits in the

groove of casing. Screws securing the wires must stand outwards from
lighting device.

 (Figure 52)

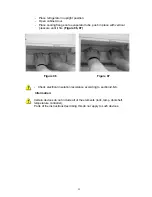
Figure 46

Figure 47

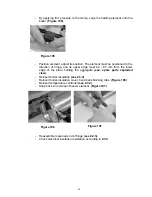
Figure 48

Figure 49

Figure 50

Summary of Contents for EA 3080

Page 1: ...Pub Nr 599363870 REV A Service Manual Models EA 3080 WA 3080 EA 3120 WA 3120 EA 3140 WA 3140 ...

Page 2: ...15 2 3 2 Replacing bulb without dismounting lighting device 17 2 3 3 Replacing heating element Cylinder heating element 18 2 3 4 Replacing temperature sensor 20 2 3 5 Temperature controller Thermo fuse 21 2 4 Cooling aggregate 22 2 4 1 Replacing cooling aggregate 22 3 Devices of different composition 26 3 1 Model with half moon shaped heating element as of May 2003 26 3 1 1 Spare parts Aggregate a...

Page 3: ... Important Notes Do not repair or clean the appliance with the power supply cord plugged in The appliance may only be operated by adults All instructions in the operating manual must be followed when operating the appliance Any repair or service of the appliance that involves disassembling electrical parts may be carried out by authorized service technicians only Certain parts of the aggregate rem...

Page 4: ...5 Shelf 19 Door stop 20 Ice tray 21 Ice tray pad 30 Door stop plate 52 Sensor cover 53 4 C temperature indicator 502 Lock cover 1 3 2 Aggregate and electrical circuit 200 Cooling aggregate 335 Thermostat 201 Foam pad I 202 Foam pad II 203 Boiler insulation 205 Drain water evaporizer 300 Various power outlets 306 Electrical cover 310 Heater element 323 Wire clamp 333 Temperature sensor 334 Circuit ...

Page 5: ...4 Lock bar 106 Lock 110 Door shelf 111 Bottle holder rail Attention Any functional parts that need to be replaced during repair may only be replaced by parts identical to the originals and which were chosen based on the list of spare parts Figure 3 ...

Page 6: ...6 1 4 Wiring diagram Wiring diagram without temperature controller Wiring diagram with temperature controller as of April 2002 Figure 5 Figure 4 ...

Page 7: ...rations 2 1 Tools Recommended tools Universal pliers 160 mm 2 pc magnetic screwdriver handle Pz 1 fitting strip Pz 2 fitting strip Phillips screwdriver Ph 1 Standard screwdriver 120 5 Standard screwdriver 100 4 14 mm wrench Figure 6 ...

Page 8: ...gure 7 Unscrew door mount hole cover screws Figure 8 Open door Pull top door mount by tilting door Figure 9 Set aside door mount unhinge door from bottom door mount pin Pull door mount hole cover Help with standard screwdriver when pulling Figure 10 11 Figure 7 Figure 8 Figure 9 Figure 10 Figure 11 ...

Page 9: ...bottom door mount and door stop Help with gently pulling the elements crosswise Figure 15 16 17 Push top door mount in place of the door stop door stop in place of the bottom door mount by turning it lengthwise 180 Screw legs in place Figure 18 Stand cabinet on its legs Reinsert door mount plate on to door mount pin of bottom door mount Place door on bottom door mount Figure 19 Figure 12 Figure 14...

Page 10: ...crews When only replacing the door dismounting of the door mount hole cover and door stop or the switching of the door mounts is not necessary 2 2 2 Replacing the legs Place unit on its back carefully so that the hinge is not damaged Dismount outer legs by unscrewing 2 2 screws Figure 23 Take out inner legs from outer legs Figure 24 Mount inner legs by securing front legs using bores closer to doo...

Page 11: ...using appropriate protection support In case of curved door use support on both sides to avoid oscillation cardboard support Figure 26 Unscrew the screw that secures hinge while keeping the end of hinge from folding down Figure 27 28 Lastly remove screw next to boiler insulation Figure 29 mounting ease Lift up hinge then put replacement part in place Figure 30 Figure 26 Figure 27 Figure 28 Figure ...

Page 12: ...ock cover With the bolt in locked position pull the rim of lock cover onto the bolt using a standard screwdriver to keep it from snapping back Figure 32 Snap off lock cover lid using 2 standard screwdrivers Figure 33 Unscrew securing screws Figure 34 Pull out lock Figure 35 Reassembly is done in reverse order Rosette and lock cover lid should be snapped in place applying slight pressure When poppi...

Page 13: ...d the lock dismounted see 2 2 1 2 2 4 Remove door shelves They can be removed by lifting the shelves Figure 36 37 Place door with door lining down on protective support Unscrew screws that secure locking panel Figure 38 Lift locking panel from its nest Figure 39 Figure 36 Figure 37 Figure 38 Figure 39 ...

Page 14: ... lath into groove on one side of door Figure 42 Slightly bend door panel Figure 43 Snap door panel into place in groove on other side of door Push door panel until cylindrical bores on the plate and on the door are concentric Figure 44 45 Figure 42 Figure 43 Figure 44 Figure 45 Figure 40 Figure 41 ...

Page 15: ...igure 47 48 Unscrew bulb Figure 49 Snap the lighting device open by detaching the tab behind the threaded part of the casing with a screwdriver Figure 50 Disconnecting electrical wires removing defective lighting device Reconnecting electrical wires in new casing Prior to wiring wires must be threaded in the appropriate bore of the reflector holder Figure 51 Placement of the socket in the casing s...
Page 16: ... a screwdriver Figure 55 After snapping shut fitting should be tested Replacing light shield Make sure that the groove fits correctly on the light shield While pushing aside the blocking tab of the reflector plate with a screwdriver the casing can be pushed in place Figure 56 Prior to installing the lighting device the securing screws must be reinserted into the lighting device so that the tips of...

Page 17: ... from the light shield At the same time push the light shield off of the casing with a screwdriver Figure 58 Unscrew defective bulb and replace with a new one pay attention to appropriate back up power Bulb needs to be tightened to an extent that loose connection does not cause contact failure Figure 59 Replacing the light shield Make sure the groove fits correctly on the light shield Figure 60 Th...

Page 18: ...63 Push off flat socket of heating element from flat connector with a screwdriver x3 connector Figure 64 Push off flat socket of the heating element s protective grounding with a screwdriver while the protective tab is pressed Figure 65 Spread the the temperature controller connection of the heating element Figure 66 Unscrew and remove the wire clamp Figure 67 Figure 61 Figure 62 Figure 63 Figure ...

Page 19: ... electromechanical control The boiler insulation can be reinserted by turning it in The rims must be snapped together by slightly pressing the metal casing Turn in boiler insulation so that the securing bore is in the correct position Attach boiler insulation to back panel with securing screw Adjust wires Connect electrical connections at the appropriate points Snap it back into printed circuit bo...

Page 20: ...e lead rubber gasket Figure 77 78 Thread back new sensor wire Practical way to do it From the back panel side insert a 4x100 standard screwdriver through the lead bore Slightly push the flat connector of sensor insulation socket onto the edge of the screwdriver secure with insulating tape Fold back the end of wire with insulation socket by 180 Using the screwdriver pull the wire through the bore t...

Page 21: ...mperature controller in the event of a circuit break may not be replaced as a service component If switched off the cooling appliance may only be repaired by replacing the aggregate The aggregate for servicing purposes is only available as a set Beside the aggregate the set includes 1 temperature controller with the necessary maximum length wire without the connection element on the ends of the wi...

Page 22: ...oor fasten see 2 2 3 Figure 83 Disassemble heating element from boiler see 2 3 3 Remove electrical cover lift off printed circuit board See 2 3 3 Pull off electrical wire of temperature controller from the flat connector of base x4 connector Temperature controller spread connection of heating element See 2 3 3 Figure 66 Unscrew wire clamp See 2 3 3 Figure 67 Unscrew 5 screws securing aggregate 1 i...

Page 23: ...g onto aggregate Figure 89 presents the necessary elements and tools for your information Cut the wire of the temperature controller to size according to the temperature controller on the replaced aggregate Figure 90 From the connection kit choose the connection elements that are identical to the original temperature controllers Press connection elements with press tool Figure 91 Pull insulation s...

Page 24: ...ate and heating element in opposite order disassembly Reinsert electrical connections of temperature controller according to the status prior to disassembly Screw wire clamp back on Reinsert electrical cover secure with screw Push drain water evaporator onto fluid heat exchange pipe Make sure the drain water outlet pipe s outlet portion reaches in the drain water evaporator Figure 95 Figure 90 Fig...

Page 25: ...ce with vertical pressure until it fits Figure 96 97 Check electrical insulation resistance according to section 2 3 3 Information Certain devices do not include all of the elements lock lamp doorshelf temperature controller Parts of the instructions describing this do not apply to such devices Figure 96 Figure 97 ...

Page 26: ...ical circuit 200 Cooling aggregate 335 Temperature controller 201 Foam insert I 202 Foam insert II 203 Boiler insulation 205 Drain water evaporator 300 Various power outlets 306 Electrical cover 207 Boiler cover 310 Heating element 323 Wire clamp 333 Temperature sensor 334 Base installed 337 Securing clamp I 338 Securing clamp II Figure 98 ...

Page 27: ... wire Figure 102 Rotate back heater element in the direction of back panel Figure 103 Push down securing clamp of heater element using 2 universal pliers Figure 104 Reinsert the heating element Electronically this operation is identical to those described for cylindrical element see 2 3 3 Attention The capacity of a heating element with fuzzy logic control is different from those with electromecha...

Page 28: ... mm from the lower edge of the plate holding the aggregate see spare parts exploded view Reinsert boiler insulation see 2 3 3 Reinsert boiler insulation cover bend back blocking tabs Figure 106 Reinsert temperature controller see 2 3 4 Snap back wire clamp of heater element Figure 107 Reassemble loosened end of hinge see 2 2 3 Check electrical insulation resistance according to 2 3 3 Figure 105 Fi...

Page 29: ...ical cover 307 Timer 308 Timer ground plate 309 Timer cover 310 Heating element 323 Wire clamp With Half moon heating element 200 Cooling aggregate 335 Temperature controller 201 Foam insert I 202 Foam insert II 203 Boiler insulation 205 Drain water evaporator 207 Boiler cover 300 Various power outlets 303 Terminal ground plate 304 Thermostat 305 Thermostat case 306 Electrical cover 307 Timer 308 ...

Page 30: ...30 3 2 2 Wiring diagram Wiring diagram without temperature controller Wiring diagram with temperature controller as of April 2002 Figure 110 Figure 111 ...

Page 31: ...switch pull off thermostat switch from the thermostat switch s axis with a universal plier with protective coating Figure 114 115 If the gasket slips off of the thermostat switch remove it from the bore with a magnetic screwdriver detach it to the driving bolt Reinsert the plug into the bore set aside switch Figure 116 117 Figure 112 Figure 113 Figure 114 Figure 115 Figure 116 Figure 117 ...

Page 32: ...ary from refrigerator cabinet remove difective thermostat Reinstall thermostat case onto the new thermostat secure with nut During assembly make sure that the navigation securing pin of thermostat fits into the bore of plate Figure 123 Reinsert thermostat onto panel secure with screws Reassemble thermostat wires Reinsert thermostat cover secure Insert thermostat capillary into cabinet approx 200 m...

Page 33: ...g fits with the switch bore jointing Figure 125 Make sure that the thermostat can be turned within the entire control range Adjust the capillary spiral that remains outside of thermostat so that it does not overhang from the outline of the cabinet Seal the point of exit of capillary from the cabinet with rubber insulator Check electrical insulation resistance according to 2 3 3 3 2 4 Replacing tim...

Page 34: ...ut the user needs to initiate it by pressing the defrost switch located in the middle of the thermostat switch Restarting is done automatically by the thermostat Its assembly is almost identical to electromechanical thermostats with timers The defrost switch is located in the place of the plug in the middle of the thermostat switch It is pulled of together with the thermostat switch It can be reas...

Reviews: