34
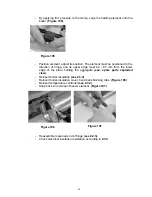
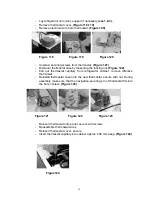
- Replace timer, set: turn defrost marking clockwise by 90º compared to
marking on the casing. Meanwhile, you should hear 2 clicks. This way the
timer is definitely turned on.
(Figure 129,130)
- Reinsert timer, making sure that the rotating part sits in the bore of the
textile-bakelite housing.
(Figure 131)
- Secure timer with screws.
- Push back electrical wires according to the wiring diagram.
(Figure
110,111)
- Reinsert timer cover, secure.
- Check electrical insulation resistance according to
2.3.3
.
3.3. Appliance with semi-automatic defrosting
In some models defrosting is not controlled by automatic controls but the user
needs to initiate it by pressing the defrost switch located in the middle of the
thermostat switch. Restarting is done automatically by the thermostat. Its
assembly is almost identical to electromechanical thermostats with timers.
- The defrost switch is located in the place of the plug, in the middle of the
thermostat switch.
- It is pulled of together with the thermostat switch.
- It can be reassembled after pushing up the thermostat switch. The defrost
switch should be inserted in the bore of the thermostat switch and should
be pushed up onto the defrost pin in the middle of the thermostat shaft with
an approx. Ø5 cylinder pin.
Naturally, there is no defrost timer in these devices.
Jászberény, 10/01/2003 Compiled by: László Kaszab
Technologist engineer
Rev. : A
Figure129
Figure130
Figure131


