background image

6. Making ice

Put the ice dishes, filled with water, on the place provided for them on the evaporator. To make ice
quickly set the thermostat to its highest setting. It is easier to take the ice cubes out if you hold the dish
under a running tap.

7. Lightning

The interior ligth, working on mains, is switched by a sensor.

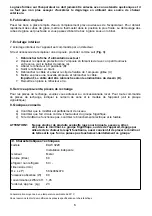
If a bulb has to be replaced, proceed as follows (fig. 3):

1.

Pull out mains plug !

2.

Remove cover of the lamp using a small srew driver (A)

3.

Snap out the reflector at 4 positions (B)

4.

Pull out reflector

5.

Pull off the cabling and and clips out the defective bulb (C).

6.

Put in a new bulb and reconnect the cabling
Important: Reconnect the cabling as shown in (D) !

7.

Re- install reflector and lamp cover

8. Customer service, spares

Spare parts are obtainable from the agent for your area. When ordering spares, state serial No. and
description of model (see data plate).

9. Some useful hints

a) Check that the miniCoool is in an accurately horizontal position
b) Check that the air flow round the absorber unit (incoming and outgoing air).
c) If the frigde is not woking, check whether it is properly plugged in and check the fuse.

ATTENTION:

Do not store explosive substances, e. g. lighter fuel, petrol, ether, or the
like in the miniCool.
The absorber unit at the back of the appliance produces heat in operation. The
fridge has to be place in such a way, that an accidental touch of the unit is
impossible.

10. Technical Data

Model

EAW 3220

Free-standing

Cabinet exterior

Metal

Volume (litres)

60

refrigerated/ non refrigerated60 / -

(H x W x D)

563 x486x474

Electric rating (W)

80

Power consumpt. kWh/ 24h* 1,45

Net weight approx. (kg)

23

* Power consumption at an anual ambient temperature of 25 °C

Technical details may change without notice

4

Summary of Contents for EAW3220

Page 1: ...70 04 Deutsch Seite 1 English Page 3 Français Page 5 Italiano Seite 7 Español Seite 9 Svenska Sida 11 Dansk Side 13 Norsk Side 15 Nederlands Zijde 17 Suomi Sivu 19 miniCool BEDIENUNGSANLEITUNG ABSORBER KÜHLSCHRANK T B 12 2003 MB ...

Page 2: ...ält eine hohe Lebensdauer wenn sie von Zeit zu Zeit mit Talkumpuder abgerieben wird besonders an der Scharnierseite In Abständen von ca 1 Jahr sollte das auf der Rückseite der miniCool angebrachte Aggregat mit einem Pinsel oder weichem Lappen gereinigt werden Einer weiteren Pflege bedarf das Aggregat nicht Die eingesetzten Zylinderschlösser dürfen nicht mit herkömmlichen Gleit oder Schmiermitteln ...

Page 3: ...Kundendienst und Ersatzteile Ersatzteile sind beim zuständigen Händler für Ihr Gebiet erhältlich Bei Bestellungen bitte Produktnum mer und Modellbezeichnung gemäß Typenschild angeben 9 Einige allgemeine Hinweise a Kontrollieren ob die miniCool waagerecht steht b Kontrollieren ob die Be und Entlüftung des Aggregates richtig ist c Keine Kühlung Prüfen Sie ob der Stecker fest in der Steckdose und ob ...

Page 4: ... and will last a long time if you wipe it occasionally with talcum powder in particular on the hinge side At about yearly intervals clean the unit at the back of the miniCool by means of a brush soft rag It does not require any other kind of attention Do not treat the cylinder locks with conventional lubricants as this may cause faulty operation If lubrication is absolutely necessary use a special...

Page 5: ...able from the agent for your area When ordering spares state serial No and description of model see data plate 9 Some useful hints a Check that the miniCoool is in an accurately horizontal position b Check that the air flow round the absorber unit incoming and outgoing air c If the frigde is not woking check whether it is properly plugged in and check the fuse ATTENTION Do not store explosive subs...

Page 6: ...manière Le joint d étanchéité en PVC de la porte ne doit pas être en contact avec l huile ou la graisse Pour lui conserver sa souplesse et en prolonger la durée le frotter de temps à autre avec du talc en particulier du côté des charnières Une fois par an environ nettoyer le groupe frigorifique au dos de l appareil avec une brosse ou un chiffon souple sans plus Ne pas utiliser de lubrifiants conve...

Page 7: ...ble doit être rebranché selon les indications du dessin D 7 Remettre en place le réflecteur et la 8 Service après vente pièces de rechange Pour les pièces de rechange veuillez vous adresser au concessionnaire local Pour toute commande de pièces de rechange indiquer le numéro de série et le modèle de l appareil voir la plaque signalétique 9 Quelques conseils a Contrôler que le miniBar est parfaitem...

Page 8: ......

Reviews: