EN
Connecting the transport refrigeration system
Frigo DC
30
8.2
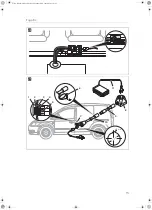
Installing the console
➤
Determine a suitable installation position for the console in the vehicle cab.
➤
Attach both holders with the 4 black 3.9 x 9.5 self-tapping screws.
➤
Attach the control unit with the sealing and the frame.
➤
Connect the cable set.
➤
Attach the console to the holders with the 4 M4 x 16 bolts and M4 washers.
9
Connecting the transport refrigeration
system
9.1
Standard tightening torques
A
Recommended tightening torques if no other tightening torque is specified:
9.2
Information about installing O-ring fittings
A
➤
Make sure that the O-ring (
1
) is sitting on the correct position on the fitting.
NOTICE!
Do not exceed the specified tightening torque under any circumstances. This
is the only way to avoid unintentional loosening of screw connections or tear at
high loads, if the fasteners were tightened too tight.
M5
(0.80)
M6
(1.00)
M8
(1.25)
M10
(1.25)
M10
(1.50)
M12
(1.50)
M12
(1.75)
4 Nm to
6 Nm
8 Nm to
12 Nm
20 Nm to
30 Nm
40 Nm to
55 Nm
37 Nm to
52 Nm
70 Nm to
90 Nm
60 Nm to
85 Nm
5/8" 18 UNF
3/4" 16 UNF
7/8" 14 UNF
1" 14 UNS
2 Nm to 4 Nm
3 Nm to 5.5 Nm
4 Nm to 6 Nm
4 Nm to 6 Nm
NOTICE!
•
Observe the specified tightening torques. A tightening torque that is too
high can damage the O-ring seat and cause leaks.
•
Use two spanners when tightening or releasing a connection to prevent the
cables from twisting.
•
Reusing O-rings is not permitted.
Frigo_DC-I-West.book Seite 30 Mittwoch, 24. Juni 2020 11:27 11
Summary of Contents for Frigo DC 2500
Page 9: ...Frigo DC 8 A C D E F G B d Frigo_DC I West book Seite 8 Mittwoch 24 Juni 2020 11 27 11...
Page 12: ...11 Frigo DC h 80 mm i Frigo_DC I West book Seite 11 Mittwoch 24 Juni 2020 11 27 11...
Page 13: ...Frigo DC 12 2 1 j 2 3 1 4 k Frigo_DC I West book Seite 12 Mittwoch 24 Juni 2020 11 27 11...
Page 15: ...Frigo DC 14 A B n 2 3 1 o Frigo_DC I West book Seite 14 Mittwoch 24 Juni 2020 11 27 11...

