10
EN
Preinstallation
4. Insert the provided mounting brackets.
5. Reverse these steps to install the new mounting
brackets.
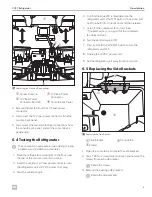
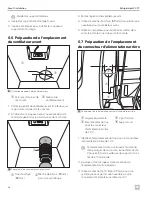
6 .6 Preparing the Front Fan Location
w
q
9
Using the Front Fan Template
q
Console Bin Front
Wall
w
Front Fan Template
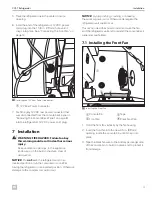
1. Tape the front fan template to the inside, front wall of
the console bin.
2. Using a marker, trace the center point opening from
the template onto the console bin wall.
q
w
10
Drilling the Front Fan Opening
q
3.5 in. (89 mm) Hole
w
3.5 in. (89 mm) Hole
Saw Drill Bit
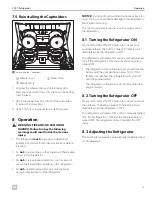
3. Remove the front fan template.
4. Use the 3.5 in. (89 mm) hole saw drill bit to drill an
opening for the front fan.
5. Vacuum any debris from the console and console bin
area.
6 .7 Preparing the Rear Power
Connector Location
w
e
r
q
q
11
Drilling the Rear Power Connector Opening
q
Equal Width
e
2 in. (50 mm)
w
Hole Location for
the 12 V Rear Power
Connector
r
Black Bracket
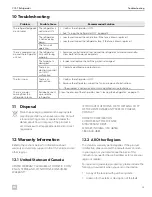
1. Identify the hole location for the 12 V rear power
connector.
I
The hole location is on the rear passenger side
of the console, measured 2 in. (50 mm) above
the black bracket and centered horizontally.
2. Using a marker, trace the center of the drill hole
location.
3. Use the 1 1/8 in. (29 mm) hole saw drill bit to drill an
opening for the 12 V rear power connector.
4. Vacuum any debris from the console and console bin
area.
Summary of Contents for GM CCF-T
Page 46: ...46 EN CCF T Refrigerator...
Page 47: ...47 EN CCF T Refrigerator...

