5
EN
Positioning
Position the appliance away from heat sources such as stoves, radiators, direct sunlight
etc. Before connect the power supply, remove the supporting base and then screw down
the front foot of appliance correctly to make it leveled correctly.
This appliance is suitable in ‘ST’ climate.
Hot to install
Install the refrigerator in a convenient location away form extreme heat and cold.
Allow sufficient clearance between the refrigerator and side wall so the door(s) will open
without obstruction. Refrigerator is not designed for recessed inst
Select a space with strong level floor.
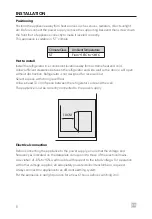
Allow at least 10 cm of space between the refrigerator’s side and the wall.
The appliance must be correctly connected to the power supply.
Electrical connection
Before connecting the appliance to the power supply, ensure that the voltage and
frequency as indicated on the data plate correspond to those of the electrical mains.
A deviation of -6% to +6% is admissible with respect to the rated voltage. For operation
with other voltage supplies, an adequately powered auto=transformer is required.
Always connect the appliance to an efficient earthing system.
Put the appliance in upright position for at least 2 hours before switching it on.
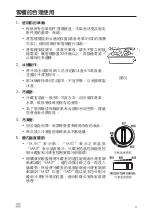
Temperature Control Panels
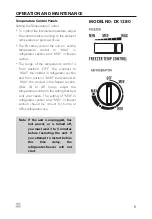
Setting the Temperature Control
• To control the internal temperature, adjust
the control dials according to the ambient
temperature or purpose of use.
• The first time you turn the unit on, set the
temperatore control to “MAX” in
refrigerator section and “MID” in freezer
section.
• The range of the temperature control is
from position “OFF” the warmest to
“MAX” the coldest in refrigerator section
and from position “MIN” the warmest to
“MAX” the coldest in the freezer section.
After 24 to 48 hours, adjust the
temperature control to the setting that best
suits your needs. The setting of “MID” in
refrigerator section and “MID” in freezer
section should be correct for home or
office refrigerator use.
Note: If the unit is unplugged, has
lost power, or is turned off,
you must wait 3 to 5 minutes
before restarting the unit. If
you attempt to restart before
this time delay, the
refrigerator-freezer will not
start.
INSTALLATION
10 CM
Climate Class
Ambient Temperature
ST
From +18˚C to +38˚C
Summary of Contents for MYFRIDGE DX 1280
Page 12: ...1 ZH MODEL NO DX 1280 1 2 3 4 5 6 7 8 9 1 2 10 3 1 8 9 10 2 3 4 5 6 7...
Page 13: ...ZH 2 1 2 10A 187 242V 3 5 4 5 6 7...
Page 14: ...3 ZH 8 9 10 45 20 30cm 10cm 120...
Page 15: ...ZH 4 1 3 4 30 2 4 5 3 3 0 10 4 5 M I N M I D MAX MAX MID MID...
Page 16: ...MAX MID E14 220 240V 10W 6 5 ZH...
Page 17: ...ZH 6 7 8 90 55 0...
Page 18: ...7 1 5 2 3 4 5 6 R600a ZH...

