17
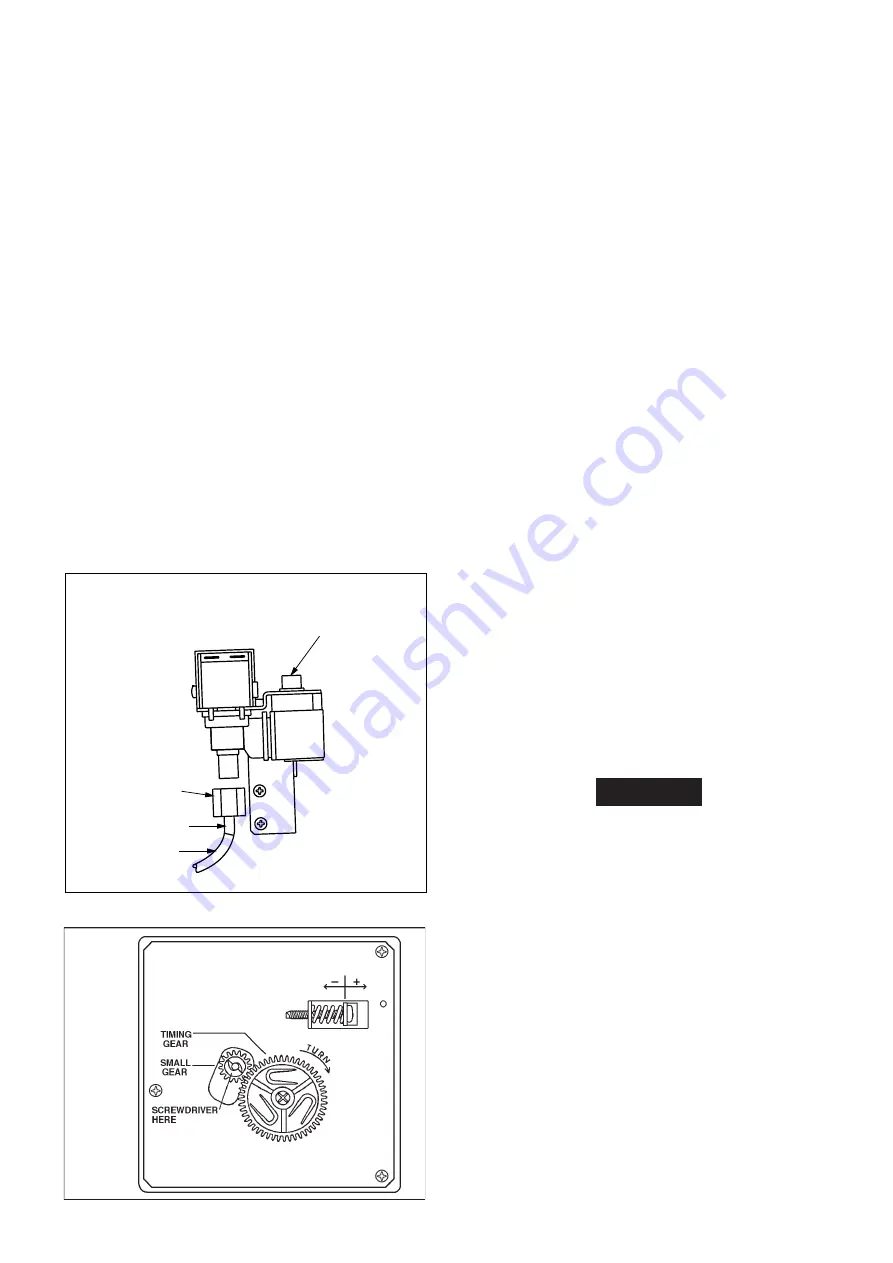
6. Connect compressed air onto the inlet fitting of the
water solenoid valve. See FIG. 14. Apply AC power
to the solenoid valve by forcing the ice maker mold
assembly through several harvest cycles. Remove
the plastic cover from the mold assembly. The bail
arm must be in the down (“ON”) position. Start the
harvest cycle with a flat blade screw driver inserted
into the center of the small gear. Turn the gear
counterclockwise, when the hold switch closes, the
mold assembly will continue to operate through the
harvest cycle. See FIG. 15. During the water fill
sequence of the harvest cycle the compressed air
will blow out the water trapped in the solenoid
valve. Repeat the harvest cycle operation several
times.
Note: Up to 20 PSIG air pressure can be used to clear
the solenoid valve. Damage to solenoid can occur if AC
power is applied for more than 20 seconds.
7. Make sure that the metal tube is in the plastic water
line to the ice maker. Reconnect and tighten lines
on water solenoid valve. Leave the water supply
turned off until temperatures are above 0°F/-18°C.
See figure 14.
8. Dry out ice maker mold assembly with a soft cloth.
Place bail arm in the “UP/OFF” position.
FIG. 15
MAINTENANCE & SERVICE
The user should be aware of service that must be
done on a regular schedule to keep the refrigerator
operating properly. The service should only be per-
formed by a qualified technician who is familiar with
refrigerators.
1. REFRIGERATOR REMOVAL
Before working on the refrigerator, make sure the AC
voltage and DC voltage leads are disconnected.
Loosen the screws anchoring the refrigerator to the
enclosure and slide the refrigerator out of the com-
partment.
When replacing the refrigerator make sure that the
sealing strips are properly positioned.
Replacement is the reverse of removal.
Refer to section INSTALLATION, page 5 to 9.
2. PERIODIC MAINTENANCE
To keep your Dometic refrigerator operating efficiently
and safely, periodic inspection and cleaning of sev-
eral components once or twice a year is recom-
mended.
A. It is important to keep the area at the back of the
refrigerator clean. Check the lower vent, upper vent
and area between these openings for any obstruc-
tions such as bird/insect nests, spider webs, etc.
Clean the coils on the back of the refrigerator. Use
a soft bristled brush to dust off the coils. The entire
cooling unit at the back must be kept clear from all
kinds of object that obstruct the air flow.
It is important to keep the refrigerator area free from
combustible material, gasoline and other flammable
vapors or liquids.
3. REPLACING A HALOGEN LAMP
FIG. 14
Inlet fitting for
water supply line
Plastic nut
Metal tube
1/4” Water line
to ice maker
Water solenoid valve
! CAUTION
Turn off the refrigerator before replacing the lamp.
Wear gloves as protection against hot lamp, broken
glass and as protection of the new lamp.
Refrigerator
The lamp is located at the top of the refrigerator com-
partment.
To replace the lamp proceed as follows:
•
unhook the tab on the lamp cover by pressing in
with the thumb on the side of the lamp cover.
•
remove the lamp cover.
•
with gloves, pull out the lamp from the socket and
replace it with a new 12V, 10-watt (maximum)
halogen lamp base G4.
•
replace the lamp cover by placing the two tabs into
the corresponding slots of the lamp house and
press the tab into place.

