3. Electrical operation:
When running on electricity the cooling unit operates by means of two separate 75 W heating
elements, one for 120 V a.c., the other for 12 V d.c..
a) 120 Volts a.c.:
Warning: Electrical earthing instructions:
This appliance is equipped with a three-pin (earthing) plug to protect you from shock
hazards and should be plugged directly into a properly earthed three-pin socket. Do not
cut or remove the earthing pin from this plug.
The lead is approximately 5 feet bng and an earthed three-pin socket should be installed
in an accessible position within reach of the plug. Do not use any extension leads!
b), 12 Volts d.c.:
The current drawn is 7,O amps. If the box is run on the car battery it is recommended that
the refrigerator be operated only when the car engine is running. If the engine is stopped,
the car battery will lose power and become fiat.
The 12 V supply is protected by a fuse of maximum 10 amps.
The fuse-holder is fitted into the control panel. Check that a correct fuse is installed.
4. Starting the refrigerator:
Do not operate the unit on two or more power ‘sources (i.e. gas and 120 V or 12 V)
SIMULTANEOUSLY. The cooling unit will not operate properly in this case and damage may
be caused.
4.1
a:
b:
c:
d:
e:
f :
g:
4
Propane gas operation-Lighting the burner:
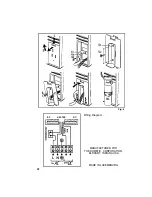
open gas cylinder valve (fig. 2.2).
turn gas thermostat
knob (fig.
2.6) in the clockwise direction to MAX setting
depress button (fig.
2.7)
of flame failure safety device and keep it pressed down for about
20-30 seconds, the gas pipe to the burner is thus vented.
keep tie button (fig. 2.7) of safety device pressed down and ignite the burner by pressing
the piezogas lighter button (fig. 2.8) several times.
when the burner is lit, the red pointer of the flame in-
dicator is going from the white into the green field. When
the pointer is in the green field, keep knob (fig. 2.7)
pushed for another 20-30 seconds, then release it. Check
that the pointer remains in the green field. Check the
flame visually through the opening (fig. 2.9). If the flame
is not burning, repeat ignition procedure.
if, for any reason, the gas flame goes out, the flame safety device works automatically and
shuts off the gas supply. While the button (fig. 2.7) is depressed, this device is temporarily
inoperative.
when the refrigerator is no longer run on gas, turn off the gas supply at the gas cylinder.

