background image

7

GB

6. Defrosting, cleaning and

maintenance

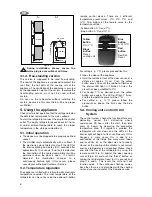
This miniBar is fitted with an automatic defrost system

Automatic defrost function

The first defrosting phase commences 39 hours after
the start and lasts for two hours.

After this, the device operates for 22 hours at a time,
followed by a defrosting period of 2 hours.

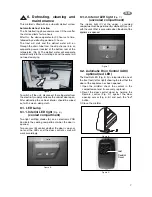
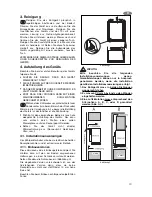
The frost will melt and the defrost water will run
through the drain tube from the drip channel into an
evaporating vessel located at the bottom rear of the
refrigerator. (Fig 5) The defrost water will evaporate
automatically into the circulating air and the vessel will
not need emptying.

Figure 5.

To switch off the unit, disconnect the refrigerator from
the electricity supply and leave the cabinet door open.
After defrosting the cabinet interior should be wiped
out with a clean, damp cloth.

6.1. LED Lamp

6.1.1. Interior LED light 

(Fig. 6.)

(cooled compartment)

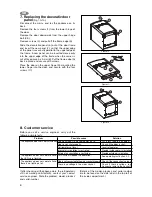
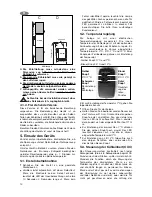
Two light emitting diodes (A) on an electronic PCB
illuminate the cooling compartment when the door is
opened.

Two sensors (B) control whether the door is open or
not and the LEDs and the door control as well will
work accordingly.

Figure 6.

6.1.2. Interior LED light 

(Fig. 7.) 

(uncooled compartment) 

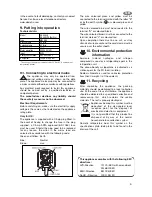
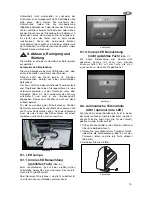
The interior light (C) of the upper / uncooled
compartment can be permanently switched (D) on / off
with the switch that is accessible when the door of the
appliance is opened.

Figure 7.

6.2. Automatic Door Control (ADC) 

optional (red LED)

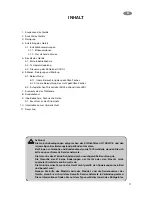
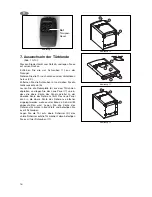
The Red Dot LED (Fig. 8. A) is integrated to one of
the front feet (left or right) showing the fact that the
door of the appliance has been opened.

1. Open the miniBar, check the content in the

compartement and if necessary, replenish.

2. Reset the door control signal by helding the

Remote control (Fig. 9.) against the door
opening sensor (Fig. 6. B) and push the "red"
button.

3. Close the miniBar.

Figure 8.

Figure 9.

A

C

D

B

red

Reddot
Reset

Summary of Contents for RH 456LD

Page 1: ...e et version encastrable Versione normale e versione da incasso Vrijstaand model en inbouw model Versi nes de unidad libre y versi nes de unidad empotrada Vers o isolada e Vers o incorporada Operating...

Page 2: ...ventilation as a failure to do this will result in component failure and possible content loss See installation instructions Parts which heat up should not be exposed Wherever possible the back of th...

Page 3: ...e model product number and serial number You will find this information on the data plate inside of the refrigerator CONTENTS 1 Unpacking 2 View of the appliance 3 Cleaning 4 Positioning the appliance...

Page 4: ...y to the transportation firm 1 Door 2 Door lock if available 3 LED Lamp 4 Illumination of the uncooled Compartment 5 Storage compartment uncooled 6 Evaporator cover 7 Evaporator sensor behind evaporat...

Page 5: ...ning the appliance When first using this refrigerator please consider the following points ENSURE REFRIGERATOR IS LEVEL THE PIPEWORK AT THE BACK GETS HOT IN USE THE REFRIGERATOR HAS NO MOTOR AND IS TH...

Page 6: ...et values 3 C 5 C 7 C and 12 C Two buttons of the remote serve for the temperature setting Yellow button 3 C and 7 C Blue button 5 C and 12 C For setting e g 7 C please proceed like this Open the door...

Page 7: ...6 1 LED Lamp 6 1 1 Interior LED light Fig 6 cooled compartment Two light emitting diodes A on an electronic PCB illuminate the cooling compartment when the door is opened Two sensors B control whethe...

Page 8: ...checking all the above points the refrigerator is still not working satisfactorily contact your nearest service engineer State the problem model product and serial number Details of the model product...

Page 9: ...loured red Upon completion there must be no cut or stray strands of wire present and the cord clamp must be secure over the outer sheath 10 Environmental protection information Ammonia natural hydroge...

Page 10: ...end Luftzirkulation zur Verf gung steht da das Ger t sonst besch digt werden kann und der Inhalt verdirbt Siehe auch Installationsanweisungen Hei e Ger tekomponenten d rfen nicht frei zug nglich sein...

Page 11: ...10 Informationen zum Umweltschutz 11 Recycling Achtung Die Garantiebedingungen entsprechen der EU Richtlinie 44 1999 CE und den im jeweiligen Bestimmungsland geltenden Gesetzen Bei Fragen zu Garantie...

Page 12: ...uchtung des nicht gek hlten Faches 5 Fach zur Aufbewahrung nicht gek hlt 6 Vorplatte Verdampfer 7 Verdampfersensor hinter dem Verdampfer 8 Verdampfer 9 Einlegeb den 10 Luftsensor 11 Beine 12 R der 13...

Page 13: ...r ersten Benutzung des Ger ts folgende Punkte ACHTEN SIE DARAUF DASS DAS GER T WAAGERECHT STEHT DIE LEITUNGEN AUF DER R CKSEITE WERDEN IM BETRIEB HEISS DAS GER T ARBEITET OHNE KOMPRESSOR ES L UFT DAHE...

Page 14: ...ent wenn die T r ge ffnet ist Wird ein Fehler erkannt beginnt die LED permanent zu blinken In diesem Fall benachrichtigen Sie bitte Ihren zust ndigen Kundendienst 5 2 Temperaturregelung Die Anlage ist...

Page 15: ...ie Umgebungsluft abgegeben Daher muss die Wanne nicht von Hand entleert werden F r die Ausschaltung der Einheit stecken Sie den K hlschrank vom elektrischen Netz ab und lassen Sie die T r des K hlschr...

Page 16: ...men abgleiten und legen Sie das neue Panel 7 so ein dass die obere Kante des Panels parallel zu der oberebn Kante des Rahmens l uft Des neue Panel kann in die obere Kante des Rahmens einfacher eingele...

Page 17: ...e seiner Lebensdauer einem Entsorgungsunternehmen dass die wieder verwendbaren Materialien aufbereiten kann und den Restm ll fachgerecht entsorgt Ger te die mit diesem Symbol gekennzeichnet sind m sse...

Page 18: ...arer aux directives d installation Tout contact avec les surfaces br lantes des composants est viter Il faudra donc veiller placer l appareil sa partie arri re tourn e vers un mur Tout en veillant res...

Page 19: ...de garantie sont conformes la D cision du Comit mixte de l EEE n 44 1999 du 26 mars 1999 modifiant l annexe environnement de l accord EEE et galement conformes aux lois applicables dans les divers pay...

Page 20: ...iment non r frig r 5 Compartiment de rangement non r frig r 6 Couvercle pour le compartiment du bloc r frig rant 7 Capteur de l vaporateur derri re l vaporateur 8 vaporateur 9 Clayettes de rangement 1...

Page 21: ...l appareil sur une surface plane Vous pourrez contr ler tr s simplement le niveau en posant un verre d eau sur le couvercle de l appareil N exposez pas l appareil une source de chaleur directe soleil...

Page 22: ...aillance la lampe LED de l clairage int rieur commencera clignoter au bout de 10 secondes pendant 2 secondes S il n y a pas d anomalie l clairage du compartiment r frig r est continu quand la porte es...

Page 23: ...nettoyage et entretien Le miniBar est quip d un syst me de d givrage automatique Degivrage automatique La premi re phase de d givrage commencera environ 39 heures apr s la premi re mise en service et...

Page 24: ...sur son dos Enlevez les quatre vis 1 de la charni re basse de la porte Enlevez la porte de la charni re sup rieure 2 3 en la d pla ant vers le bas Enlevez les vis 4 et tirez le bout de l encadrement...

Page 25: ...s en uvre est l ammoniaque un compos naturel d hydrog ne et d azote Le cyclopentane ne pr sentant aucun potentiel d appauvrissement de la couche d ozone a t utilis comme isolant thermique dans la mous...

Page 26: ...de l appareil Les appareils portant ce symbole doivent tre obligatoirement remis un point de collecte local pour la mise au rebut d appareils lectriques et lectroniques Il est interdit de jeter ce pr...

Page 27: ...per l installazione Le parti che si riscaldano non devono essere messe allo scoperto Pertanto si consiglia di sistemare il frigo con la parte posteriore vicina al muro rispettando la distanza necessa...

Page 28: ...zio caratteristiche tecniche 9 1 Collegamento alla rete elettrica 10 Informazioni per la protezione dell ambiente 11 Riciclaggio Attenzione Le condizioni di garanzia sono conformi alla direttiva CE 44...

Page 29: ...Illuminazione interna dello scompartimento non raffreddato 5 Scompartimento di deposito non raffreddato 6 Riparo dell evaporatore 7 Sensore dell evaporatore situato dietro l evaporatore 8 Evaporatore...

Page 30: ...evuto di acqua tiepida e asciugare con un panno pulito Usare solo ed esclusivamente acqua tiepida non calda per lavare le parti di plastica e non esporre queste ultime a calore per asciugarle Si consi...

Page 31: ...e il controllo elettronico non rileva alcun errore dopo circa 10 secondi il LED di segnalazione per l illuminazione interna del frigo si accende per 2 secondi Se non rileva ness n errore l illuminazio...

Page 32: ...ntillo continua questo significa che presente un anomalia grave col gruppo refrigerante e bisogna contattare il servizio di assistenza tecnica Dometic 6 Sbrinamento pulizia e manutenzione Il miniBar d...

Page 33: ...e secondo la procedura descritta per la versione normale non da incasso 7 Sostituzione del pannello decorativo frontale fig 10 12 Staccara la spina del frigorifero e posare l apparecchio sul rovescio...

Page 34: ...utti i LED lampeggiano L apparecchio non raffredda e tutti i LED sono spenti Causa possibile Il frigo stato caricato con troppi cibi e o bevande da raffreddare La porta non stata chiusa correttamente...

Page 35: ...di sodio meno del 2 del peso del refrigerante 11 Riciclaggio Dopo aver tolto l apparecchio dalla confezione portare il materiale d imballaggio in un punto di raccolta locale Alla fine del suo ciclo vi...

Page 36: ...Perugia Cavallino Verona Rubano Indirizzo Via Mazzini 144 Via Terravecchia Inf 99 Via Salomone 23 Via Acquasanta Zona Ind P zza della Pace 7 F Via Paolucci 14 B Via Collegarola 70 Via Darsena 74 Str P...

Page 37: ...installatie instructies Let op dat de warme delen van het koelaggregaat niet vrij toegankelijk zijn Plaats de koelkast daarom altijd met de achterkant naar een muur Houdt hierbij wel rekening met de v...

Page 38: ...t 10 Informatie omtrent milieubescherming 11 Recycling Let op Garantiebepalingen zijn conform EU richtlijn 44 1999 CE en de wettelijke bepalingen van het land waarin het product wordt gebruikt Voor vr...

Page 39: ...Binnenverlichting van het gekoelde deel 4 Binnenverlichting van het ongekoelde deel 5 Opslagdeel ongekoeld 6 Verdamperdeksel 7 Verdampervoeler achter verdamper 8 Verdamper 9 Legplank 10 Luchtvoeler 1...

Page 40: ...houden ZORG DAT DE KOELKAST WATERPAS STAAT BIJ GEBRUIK WORDEN DE LEIDINGEN AAN DE ACHTERKANT WARM DE KOELKAST WERKT ZONDER COMPRESSOR EN MAAKT DAAROM GEEN GELUID NA DRIE UUR TREEDT WAARNEEMBARE KOELI...

Page 41: ...ndsbediening dienen om de temperatuur in te stellen Gele knop 3 C en 7 C Blauwe knop 5 C en 12 C Bijv om 7 C in te stellen doe het volgende Open de deur van de installatie Houd de afstandsbediening vo...

Page 42: ...ichting met LED gekoelde deel Afb 6 Twee lichtgevende diodes A op een elektronische printplaat verlichten de binnenruimte van het apparaat wanneer de deur geopend wordt Twee sensoren B herkennen of de...

Page 43: ...Hang de deur in het bovenste scharnier 9 plaats het onderste scharnier op de deur en bevestig dit met vier schroeven 11 Afbeelding 10 Afbeelding 11 Afbeelding 12 43 NL Probleem Het apparaat koelt nie...

Page 44: ...ektrische eisen Controleer of de aanwezige stroomspanning overeenkomt met de gegevens op het typeplaatje 10 Informatie omtrent milieubescherming Ammoniakgas natuurlijke waterstof en stikstofverbinding...

Page 45: ...podr an ocurrir aver as y la posible p rdida del contenido Vea las Instrucciones de instalaci n Las partes que se calientan no deben dejarse al descubierto La parte posterior de este aparato debe est...

Page 46: ...roducto y su n mero de serie al comunicarse con la Red de Servicio de Dometic Hallar estos datos en la placa de caracter sticas t cnicas situada en el interior del refrigerador CONTENTS 1 Desembalaje...

Page 47: ...Alumbramiento interior del compartimiento sin refrigeraci n 5 Compartimiento de almacenaje sin refrigeraci n 6 Tapa del evaporador 7 Sensor del evaporador detr s del evaporador 8 Evaporador 9 Estantes...

Page 48: ...a que est a mayor temperatura que la temperatura del cuerpo y no exponga esas piezas a una fuente de calor seco La parte exterior del refrigerador debe limpiarse regularmente con un pa o h medo y limp...

Page 49: ...madamente 10 segundos Si no detecta anomal as el alumbramiento del compartimiento refrigerado es cont nuo cuando la puerta del aparato est abierta Si detectan alguna falla dicho diodo interno cambia a...

Page 50: ...mantenimiento El miniBar est equipado de un sistiema de descongelamiento autom tico Funci n de descongelaci n autom tica La primera fase de descongelaci n se inicia 39 horas despu s de la operaci n i...

Page 51: ...la puerta Figuras 10 12 Desenchufar el aparato y colocarlo sobre el respaldo Quitar los cuatro tornillos 1 de la charnela baja de la puerta Quitar la puerta de la charnela superior 2 3 hacia abajo Qui...

Page 52: ...Control de la Unidad Refrigeradora dej de funcionar El aparato no est correctamente conectado a una toma de corriente No hay voltaje en la toma de corriente Soluci n Reduzca la cantidad de alimentos e...

Page 53: ...iales conforme a las normas Los aparatos que lleven este s mbolo deber n depositarse en los lugares locales de recogida de aparatos el ctricos y electr nicos Este producto no debe desecharse en la bas...

Page 54: ...ltar em falhas nos componentes e uma poss vel perda do conte do Veja as instru es de instala o Os componentes que aquecem n o devem ser expostos A parte traseira do produto deve estar perto de uma par...

Page 55: ...or favor o modelo n mero do produto e n mero de s rie Encontrar esta informa o na placa de dados colocada na parte interior da geladeira NDICE 1 Desembalar 2 Vista do aparelho 3 Limpeza 4 Coloca o do...

Page 56: ...m refrigera o 4 Ilumina o interior do compartimento sem refrigera o 5 Compartimento sem refrigera o 6 Tampa do evaporador 7 Sensor do evaporador atr s do evaporador 8 Evaporador 9 Prateleiras 10 Senso...

Page 57: ...ar a geladeira pela primeira vez tenha aten o aos seguintes pontos ASSEGURE SE DE QUE A MINIBAR SE ENCONTRA NIVELADA A LIGA O NA PARTE TRASEIRA AQUECE COM A UTILIZA O A MINIBAR N O POSSUI MOTOR PELO Q...

Page 58: ...mina o muda para um piscar cont nuo Caso isto aconte a fa a o favor de consultar o servi o de clientes 5 2 Regula o da temperatura O miniBar est equipado com um sistema electr nico de regula o de temp...

Page 59: ...o descongelamento poss vel limpar o interior do refrigerador com um pano h mido Figura 5 6 1 LED 6 1 1 Ilumina o LED interior compartimento com refrigera o Fig 6 Dois d odos de ilumina o A colocados...

Page 60: ...decora o 6 do marco de porta e colocar o novo painel 7 de maneira que o bordo superior do painel esteja paralelo com o bordo superior do marco Pudemos colocar facilmente o novo painel no bordo superio...

Page 61: ...ualmente competente 61 Modelo RH 456LD RH 456LDE Incorporado Tipo MB20 60 Volume m ximo 56 litros Capacidade refrigerada 40 litros Capacidade n o refrigerada 16 litros Corrente 220 240V AC Consumo 65W...

Page 62: ...parelho da caixa deve remover os materiais de embalagem para um local de recolha Ao fim do seu tempo de uso o aparelho deve ser entregue a uma firma especializada em recolha e reciclagem que aproveita...

Page 63: ......

Page 64: ...Printed by Oc Hung ria Kft 2012 02 24...

Reviews: