17
EN
Service Procedures
7. Refer to steps in “Replacing the Burner Assembly”
on page 15 to remove the burner assembly from
the cooling unit.
8. Pry out the defective cooling unit. Some careful
force may be required.
9. Clean and prepare the inside of the cavity space for
the new cooling unit. A bead of thermal mastic is
required to help the heat transfer process.
10. Apply a thick bead of thermal mastic to the
following:
– The cavity-facing side of the new cooling coils.
– Each inner corner of the recessed cavity from
bottom to top.
– Around the middle of the inner walls of the cavity.
11. Perform these steps in reverse with the new cooling
unit to complete the replacement.
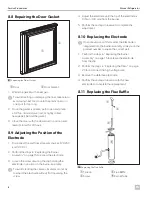
8.6 Replacing the Door
q
w
7
Removing the Door
q
Door Hinge
w
Door
1. Locate and gain access to the door hinges. Refer to
“Removing the Refrigerator from an Enclosure” on
page 15 if removing the refrigerator is necessary
to access the hinges.
2. Remove the bolt from the top hinge securing the
door to the hinge.
3. Remove any washers.
4. Lift the door from the bottom hinge pin. It may be
necessary to do this at an angle.
5. Perform these steps in reverse with the new door to
complete the replacement.
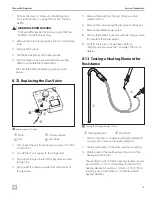
8.7 Testing the Door Gasket
q
w
8
Testing the Door Gasket
q
Door
w
Paper
1. Open the refrigerator door and place a piece of
paper, such as a dollar bill, near the door hinge and
between the gasket and the liner of the refrigerator.
2. Close the door on the paper.
3. Try to pull out the paper.
If the paper slips out with no resistance, the gasket is
weak at that point.
4. Repeat this test at points all around the door.

