16
EN
Service Procedures
1. Disconnect the unit from all power sources (120 VAC
and 12 VDC).
2. Turn off the LP gas supply to the refrigerator and cap
the gas line.
3. Remove the screw securing the shielding around the
burner assembly.
4. Remove the screw and washer securing the burner
assembly to the burner tube.
5. Slide the burner assembly out of the burner tube.
6. Remove the screw securing the clip that holds the
thermocouple and electrode in position.
7. Disconnect the gas line from the burner assembly.
8. Remove the defective burner assembly.
9. Perform these steps in reverse with a new burner
housing to complete the replacement.
10. Confirm there are no LP gas leaks. Refer to
“Performing a Gas Leak Test” on page 15 for more
details.
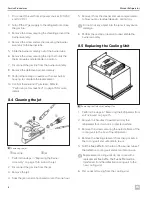
8.4 Cleaning the Jet
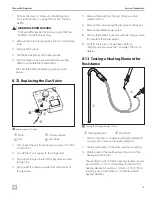
q
w
5
Removing the Jet
q
Gas Line
w
Jet
1. Perform the steps in “Replacing the Burner
Assembly” on page 15 to access the jet.
2. Disconnect the gas line from the jet.
3. Remove the jet.
4. Soak the jet in an alcohol-based solvent for one hour.
5. Remove it from the cleaner and use compressed air
to blow out any residual deposits. Let it air dry.
I
Do not stick any object into the jet as it may cause
damage.
6. Perform these steps in reverse to reassemble the
burner assembly.
8.5 Replacing the Cooling Unit
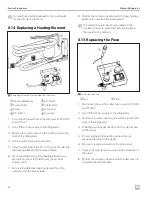
6
Removing the Defective Cooling Unit
1. Perform the steps in “Removing the Refrigerator from
2. Remove the handles (if needed) and lay the
refrigerator face down on a protected surface.
3. Remove the screws securing the outside frame of the
cooling unit to the box of the refrigerator.
4. Remove the heating elements from their pockets in
the cooling unit and set aside to re-use.
5. Pull the flue baffle from the top of the burner tube of
the defective cooling unit and set aside to re-use.
I
Replacement cooling units do not come with a
replacement flue baffle. The flue baffle must be
transferred from the defective cooling unit to the
new cooling unit.
6. Disconnect all wiring from the cooling unit.

