background image

EN

RMDX21, RMDX25

Using the refrigerator

27

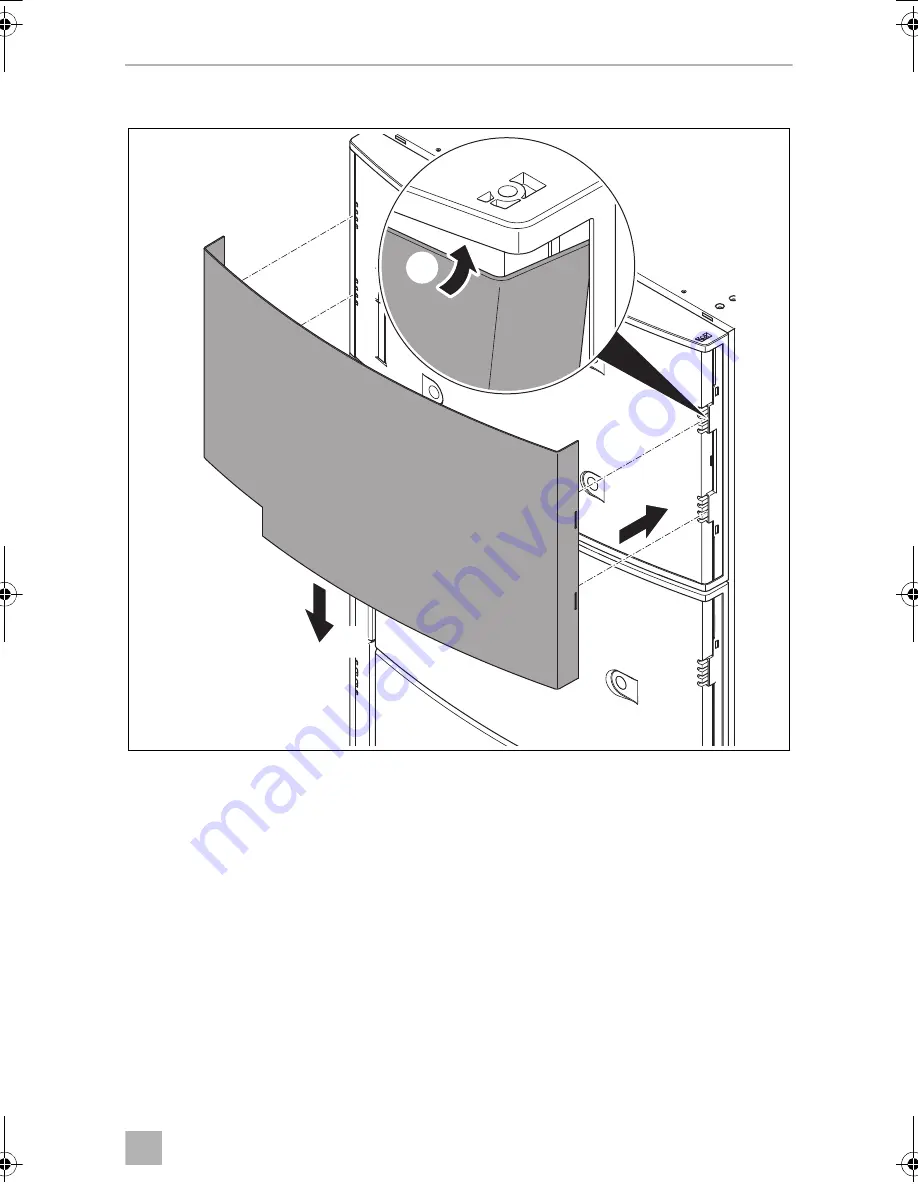
Installing the new door panel on frameless door model

Freezer compartment door:

Push the new panel upwards in the door as far as the stop. Make sure that the new 
panel fits the door at the left and right, and that it clicks into place.

Push the new panel downwards into the door.

3.

1.

2.

e

RMDX21-25--O-AU.book  Seite 27  Freitag, 3. Februar 2017  5:10 17

Summary of Contents for RMDX 21

Page 1: ...RMDX21 RMDX25 Absorber refrigerator Operating manual EN REFRIGERATION REFRIGERATORS...

Page 2: ......

Page 3: ...rson hand over this instruction manual along with it Table of contents 1 Explanation of symbols 4 2 Safety instructions 4 3 Scope of delivery 7 4 Accessories 7 5 Intended use 8 6 Technical description...

Page 4: ...is opened Do not operate the refrigerator if it is visibly damaged If the power cable for this refrigerator is damaged it must be replaced by the manufacturer customer service or a similarly qualifie...

Page 5: ...ood may only be stored in its original packaging or in suitable containers A NOTICE Do not open the refrigerant circuit under any circumstances The refrigerant in the refrigerator circuit is highly fl...

Page 6: ...te Make sure that the refrigerator is sufficiently far away from walls and other objects so that the air can circulate Ensure that the ventilation openings are not covered Do not fill the inner contai...

Page 7: ...exceed 50 C Never operate the refrigerator with gas at petrol stations while driving while transporting the caravan or mobile home with a transport vehicle or tow truck Never use a naked flame to che...

Page 8: ...ry can be used The thermostatic control ensures that the refrigerator temperature is kept constant and as little power as possible is consumed The refrigerator is equipped with an automatic safety dev...

Page 9: ...onents No in fig 1 Description 1 Ice compartment 2 Top tray with flap 3 Bottom tray with bottle holder 4 Vegetable compartment 5 Type plate 6 Thawed water drainage channel 7 Secondary evaporator for r...

Page 10: ...ion value 5 Gas pressure 6 Test mark certification BRUTTOINHALT TOTAL CAP VOLUME BRUT VERDAMPFERFACH FREEZER COMP VOLUME COMPT BT MADE IN GERMANY MLC PROD NO MOD NO TYPE C 40 110 100 l 106 l 230 240V...

Page 11: ...owing illuminated control elements No in fig 3 Description 1 ON OFF button 2 Operating with AC power supply 3 Gas operation 4 Operating with DC power supply 5 Automatic mode RMDX25 only 6 Setting the...

Page 12: ...the lock for the freezer compartment Blue The refrigerator is operating Red Problem 7 Using the refrigerator A NOTICE Make sure that you only put items in the refrigerator which may be kept at the se...

Page 13: ...ew refrigerator for the first time you should clean it inside and outside with a damp cloth for hygienic reasons The cooling performance can be affected by the ambient temperature e g when the vehicle...

Page 14: ...settings Arrange the food in the refrigerator so that air can circulate inside Leave a distance of about 10 mm between the contents and secondary evaporator 7 3 Switching on the refrigerator Make sur...

Page 15: ...ested to ensure contamination vermin does not impede the burners performance Ignition problems may occur at altitudes above 1000 m Switch to a different energy source NOTE To avoid unintentionally swi...

Page 16: ...compartment door Press the lock button and pull the door out at the same time Fixing the locking catch in place Whenthevehicleisparked youcan fixthelockingcatchinplace Thismakesiteasier to open the d...

Page 17: ...bolt under the locking catch upwards until it clicks into place The door can be opened by pulling it without pressing the button Re engaging the locking catch Push the locking catch downwards The door...

Page 18: ...hear it clearly click The door is now closed and locked for travelling 7 6 Selecting the temperature I Set the required temperature with the button You can see the set temperature in the display one b...

Page 19: ...od CAUTION Only store heavy objects such as bottles or cans in the refrigerator door in the vegetable compartment or on the bottom shelf No in fig 8 Food 1 Frozen food 2 Dairy products ready made meal...

Page 20: ...rage If the refrigerator is exposed to a room temperature of below 10 C for a prolonged period of time an even temperature of the ice compartment cannot be guaranteed This can lead to a potential incr...

Page 21: ...e two locks under the shelf inwards to release the shelf Pull out the shelf For fixed shelves only Replace the locking pins again WARNING Children beware Two shelves are fixed in place to prevent chil...

Page 22: ...age and gas supply Empty the refrigerator Put a cloth in the ice compartment and the refrigerator to absorb any excess water Leave the door open The thawed water of the main refrigerator runs into a r...

Page 23: ...th a frame heater 12 Vg 3 5 W Switch the frame heater on to prevent condensation from forming on the frame of the freezer compartment The frame heater is switched on continuously in the following oper...

Page 24: ...llows Remove the door trim carefully It is only clipped in and held in place by small hooks Pull the old panel away from the door trim still installed Push the old panel upwards as far as the stop Pul...

Page 25: ...on framed door model Proceed as follows Push the new panel upwards in the door as far as the stop Push the new panel downwards into the door Pull the new panel into the door trim still installed inser...

Page 26: ...EN Using the refrigerator RMDX21 RMDX25 26 Removing the door panel from frameless door model Proceed as follows Push the old panel upwards as far as the stop Pull the old panel out of the door 1 2 3 d...

Page 27: ...e new door panel on frameless door model Freezer compartment door Pushthenewpanelupwardsin thedoorasfar asthestop Makesurethat thenew panel fits the door at the left and right and that it clicks into...

Page 28: ...EN Using the refrigerator RMDX21 RMDX25 28 Refrigerator door Push two spacers downwards into the door if necessary f...

Page 29: ...Using the refrigerator 29 Pushthenewpanelupwardsin thedoorasfar asthestop Makesurethat thenew panel fits the door at the left and right and that it clicks into place Push the new panel downwards into...

Page 30: ...sure that the ventilation grille in the outer wall of the caravan or mobile home and the roof vent fig h of the refrigerator are free of any dust and dirt so that heat generated during operation can...

Page 31: ...r can be cleaned of impurities whenever necessary Vermin infestation is possible after extended periods withoutusing gas operation Yearly inspection of the burner is suggested Keep a record of any mai...

Page 32: ...er cover fig j Press the catch below the burner cover inwards and pull off the burner cover fig j WARNING Disconnect the AC power supply Close the gas valve to the refrigerator before cleaning the gas...

Page 33: ...with soft bristles fig k Blow out the burner pipe with compressed air through the slots in the burner pipe fig l Attach the burner cover The burner cover is fixed in place when it audibly clicks into...

Page 34: ...e refer to the operating manual of your vehicle The vehicle battery is discharged Test the battery and charge it The ignition is not turned on Switch on the ignition The DC heating element is defectiv...

Page 35: ...ature is set too high Set a lower temperature The ambient temperature is too high Remove the ventilation grille for a while so that warm air can escape quicker Too much food at once was placed in the...

Page 36: ...erature sensor has no contact or is defective With AC operation and flashing abeep is emitted for 20 seconds The power supply is not available or insufficient Check the AC power cable the power supply...

Page 37: ...the receipt with purchasing date A reason for the claim or description of the fault 12 Disposal Place the packaging material in the appropriate recycling waste bins wherever possible M If you wish to...

Page 38: ...partment 160 l 30 l Power consumption 250 W 230 Vw 170 W 12 Vg Power consumption 4 2 kWh 24 h 230 Vw 340 Ah 24 h 12 Vg Gas consumption 420 g 24 h Climatic class T Noise emission 0 dB A Dimensions H x...

Page 39: ......

Page 40: ...642 64 9 622 1490 64 9 622 1573 Mail customerservices dometic co nz NORWAY Dometic Norway AS ster yveien 46 N 3232 Sandefjord 47 33428450 47 33428459 Mail firmapost dometic no POLAND Dometic Poland Sp...

Reviews: