EN
RML9xxx
Installing the refrigerator
23
6.8
Reversing the door (RML9430/9431/9435 only)
➤
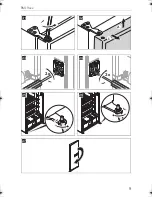
Remove the control panel.
–
RML9430
: Unscrew the dials carefully and loosen the screws (fig.
i
,
page 8).
–
RML9431/9435
: Open the refrigerator door and undo the screws
underneath the control panel (fig.
j
, page 8).
➤
Undo the hinge screw on the top door hinge and keep it in a safe place (fig.
k
,
page 9).
➤
Lift up the door and remove it (fig.
l
, page 9).
➤
Undo the two screws on the door lock and remove the door lock (fig.
m
,
page 9).
➤
Place the door lock on the other side again and tighten it with the two screws
(fig.
n
, page 9).
➤
Undo the hinge pin (fig.
o
, page 9) and position it on the other side (fig.
p
,
page 9).
➤
Turn the door by 180° (fig.
q
, page 9).
➤
Place the door on the hinge pin.
➤
Replace the control panel and screw it down tightly.
6.9
Put on the door panel
A
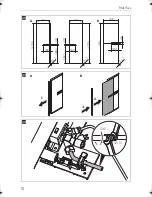
The door panel has the following dimensions (fig.
r
, page 10):
•
RML9330/9331/9335:
A
•
RML9430/9431/9435:
B
Proceed as follows (fig.
s
, page 10):
➤
Remove the door trim carefully. It is only stuck on and held by small hooks (
A
).
➤
Slide the new panel into the opening (
B
).
➤
Replace the door trim (
B
).
✓
The door trim is secure once it clicks into place.
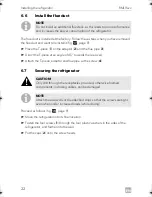
NOTICE! Beware of damage
Only ever lay the refrigerator on its side and never on its back. Otherwise
the unit may be damaged.
RML9xxx-I-West.book Seite 23 Donnerstag, 7. Dezember 2017 11:24 11
Summary of Contents for RML933 Series
Page 2: ......
Page 4: ...RML9xxx 4 2 3 4 1 3 1050 1050 1 4...
Page 5: ...RML9xxx 5 15 25 mm 25 mm 25 mm 5 1350 15 25 mm 1 6...
Page 6: ...RML9xxx 6 300 1 2 7 9 1 8 1 2 3 4 1 3 2 4 LS 230 LS 330 0...
Page 7: ...RML9xxx 7 LS 230 LS 330 a LS 230 LS 330 b LS 230 LS 330 1 2 3 c 1 2 d...
Page 8: ...RML9xxx 8 1 2 e f 1 2 3 4 g 1 2 h 1 2 3 RML 9430 i 1 3 2 RML 9431 RML 9435 j...
Page 9: ...RML9xxx 9 k 1 2 l 2x n 2x m p o q...
Page 13: ...RML9xxx 13 RML93 RML94 w...

