background image

15

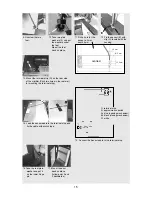
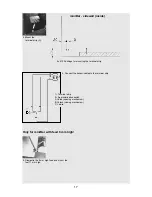
9. Unscrew the two 

feet.

10. Take two plain

washers (F) und put

the washers under 

the feet.

Mount the feet 

back on place.

11. Drill a hole for the

sensor, ø3mm, 

depth 5mm.

12. Fix the sensor (E) with

clip (C), leveled with the

housing.

13. Mount the terminal strip (D) on the rear side

of the miniBar (Prick two holes in the rear wall 

for mounting the terminal strip).

F

C

E

D

centred

10 mm

Ø 3 mm

13,5 mm

14. Lead the sensor-cable to the terminal strip and

fix the cable with scotch tape.

1= terminal strip

2= approximation switch

A= blue (opening mechanism)

B= black (closing mechanism)

C= white

15. Connect the Sensor-cable to the terminal strip.

16. Take the last plain-

washer and put it

on the lower hinge

pin.

17. Mount the door

back on place

(follow point 2 and

3 backwards).

Summary of Contents for SK 160

Page 1: ...iniCool Previous models Greenline Face lifting HiPro 599 5152 85 Publication No 04 02 25 EN SERVICE MB KV RS DES Dometic GmbH In der Steinwiese 16 D 57074 Siegen Tel 0049 271 692 0 Fax 0049 271 692 30...

Page 2: ...Tips 20 16 0 Technical Data 21 17 0 Wiring Diagrams 24 17 1 Refrigerators without Lighting 24 17 2 Refrigerators with Lighting 25 17 3 Refrigerators with 55l 56l Capacity 26 18 0 HiPro Generation 27...

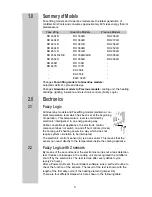
Page 3: ...olled by electronic intelligence in an energy saving way Unlike conventional appliances the electronic control component does not switch on and off but controls clocks the cooling unit s heating power...

Page 4: ...refrigerator up to the first defrosting is 15 hours for greenline models and 39 hours for the new face lift models RH4XX For all models the defrosting takes 2 hours Then the refrigerator works 22 hou...

Page 5: ...ablished by inspectors that the coolant poses no threat to health Heating Shell The conventional heating element previous models is replaced by a hea ting shell The heating shell is situated directly...

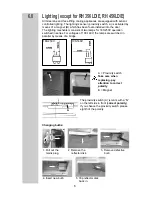
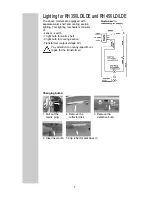
Page 6: ...operation switched in series For voltages of 100 140V the lamps are switched in parallel by means of a bridge A Proximity switch Take care when replacing pay attention to correct polarity B Magnet Cha...

Page 7: ...chanism consists of sensor switch 1 light bulb for warm shelf 2 light bulb for cooling section Transformer output voltage 6V Pay attention to country specific vol tages for the transformer Changing bu...

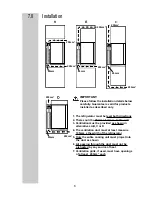
Page 8: ...e wtdth of the refrigerator 5 Only the entire cooling unit must project into the duct as shown 6 Air passing through the duct must not be preheated by any source of heat 7 Ventilation grills if used m...

Page 9: ...dimensions in mm Model Hight Width Depth RH 430LD RH 330LD 526 388 432 RH 436D RH 136D 526 388 432 EA 330L 526 388 432 RH 440LD RH 340LD 558 405 466 RH 447D RH 137D 558 405 466 RH 441LD RH 341LD 558 4...

Page 10: ...3 4 Distance to cupboard door A A 1 When closed the cupboard door A must not lie against the rest of the surrounding cupboard area distance 1 2mm 1 2 1 2 mm mm 2 There must be a distance of 6 8mm betw...

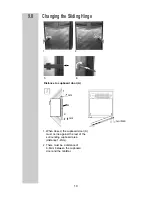
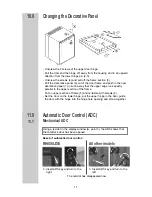
Page 11: ...in the new decorative panel 7 in such a way that the upper edge runs exactly parallel to the upper section of the frame Put on upper section of frame 5 and re fasten with screws 4 Set the door on the...

Page 12: ...complete component is not screwed in the doorframe but inserted So without removal of the door or loosing of screwings the ADC component can be exchan ged Press in the mounting pins and pull out the c...

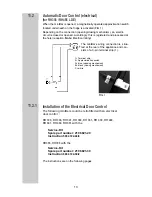
Page 13: ...tua ted at the rear of the appliance and con sists of a 3 pin terminal strip 1 Installation of the Electrical Door Control The following miniBars could be retrofitted with an electrical door control R...

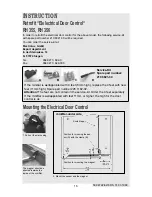
Page 14: ...0049 271 629 303 Mounting the Electrical Automatic Door Control 14 Service kit Spare part number 210 6821 20 B C D E F A three pieces 1 Pull out the mains plug 2 Unscrew the door hinge 3 Remove the do...

Page 15: ...the miniBar Prick two holes in the rear wall for mounting the terminal strip F C E D centred 10 mm 3 mm 13 5 mm 14 Lead the sensor cable to the terminal strip and fix the cable with scotch tape 1 term...

Page 16: ...pare part number 210 6821 30 A B C D If the minibar is wellappointed with 4 feet 8mm high replace the 4 feet with new feet 11mm high Spare part number 295 1182 02 Attention The feet are not contain in...

Page 17: ...sensor cables to the terminal strip C 4 Mount the terminal strip C miniBar sidewall inside 2 x 2 2 drillings for mounting the terminal strip Only for miniBar with feed 8 mm high 1 Terminal strip 2 App...

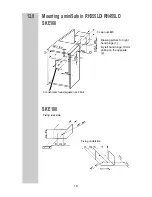
Page 18: ...afe in RH355LD RH455LD SKE160 SKE 180 18 Drawing picture for right hand hinge 1 By left hand hinge 10mm drilling on the opposite 2 3 cap nuts M8 3 mushroom head square neck bolt 12 0 Fixing underside...

Page 19: ...Any damage due to improper use is not covered by the warranty The warranty does not cover any modifications to the appliance or the use of non original Dometic parts the warranty does not apply if th...

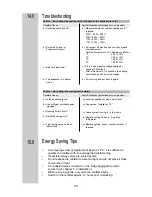
Page 20: ...is in defrost mode a Measure resistance replace heating shell if required 230V 65 W 800W 230V 80 W 650W 110V 65 W 186W 110V 80 W 150W b Pull sensor off electrics and check by means of measurement Ambi...

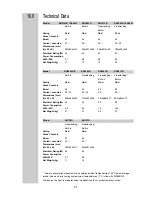
Page 21: ...x450x505 563x486x474 563x486x474 Electrical Rating W 65 65 80 80 Power Consuption kWh 24h 0 9 0 9 1 0 1 45 Net Weight kg 21 21 20 23 Freestanding Freestanding Built in Built in Casing Metal Metal Gros...

Page 22: ...er Consuption kWh 24h 0 9 0 9 1 0 1 45 Net Weight kg 21 21 20 23 Freestanding Freestanding Built in Built in Built in Built in Casing Metal Metal Metal Metal Gross Contents litres 30 40 30 40 Cooled u...

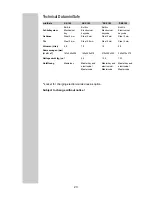
Page 23: ...teel 2 mm Steel 2 mm T r Steel 2 mm Steel 2 5 mm Steel 5 mm Steel 5 mm Volumen Liter 6 8 7 0 19 28 Abmessungen mm H x B xT 167x250x236 160x250x218 210x300x355 240x375x370 Nettogewicht kg ca 7 5 5 10 5...

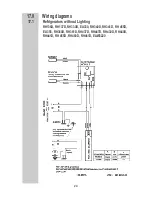
Page 24: ...Wiring diagrams 24 17 0 17 1 Refrigerators without Lighting RH136D RH137D RH330D EA330 RH340D RH341D RH 455D EA 355 RH360D RH361D RH437D RH447D RH430D RH440D RH441D RH 455D RH460D RH461D EAW3220...

Page 25: ...25 17 2 Refrigerators with Lighting RH330LD EA330L RH340LD RH341LD RH 355LD EA355L RH360LD RH361LD RH430LD RH440LD RH441LD RH 455LD RH460LD RH461LD EAW3220...

Page 26: ...26 17 3 Refrigerators with 55l 56l Capacity RH356LD RH356LDE RH456LD RH456LDE...

Page 27: ...ling replaceable less energy consumption HiPro Electronic After connecting the electronic with the main supply hard ware reset following actions take place initialization of the hardware values of res...

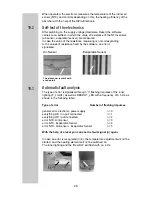
Page 28: ...lysis The type of error is signalised through n flashing impulses of the inner lighting P_LIGHT as well as REDDOT_LED with a frequency of 0 5 Hz as shown in the following table Type of error Number of...

Page 29: ...the evaporator sensor is determined every 40 minutes If after finishing the defrost phase the fridge does not reach a cool down of 4K within 40 min a system error exists and the fridge is switched off...

Page 30: ...ectronic contains an infra red reflecting light barrier for recognition fridge door was opened For resetting the REDDOT indicator use the remote control The reflecting light barrier is checked every 2...

Page 31: ...sunlight and do not place it close to a source of heat An unobstructed air circulation in the cooling unit must be ensured ref chapter 7 0 Installation When removing goods only open the miniBar briefl...

Page 32: ...nce kOhm 0 27 70 10 18 07 15 14 74 20 12 11 25 10 00 c Plug in and measure voltage at heating shell output X3 After max 5 seconds the heating shell will be driven by mains voltage 230V for 20 seconds...

Page 33: ...sumption measured at an average ambient temperature of 25 C as an average annual value and at a cooling compartment temperature of 7 C according to EN 153 We reserve the right to make technical change...

Page 34: ...Notes 34...

Page 35: ...35...

Page 36: ...Dometic GmbH In der Steinwiese 16 D 57074 Siegen Tel 49 0 271 692 0 Fax 49 0 271 692 300 www dometic de minibar www dometic com Dometic GmbH 2002 Subject to change without notice Printed in Germany...

Reviews: