background image

18

Warning: You need to get off the elliptical bike before moving it. 

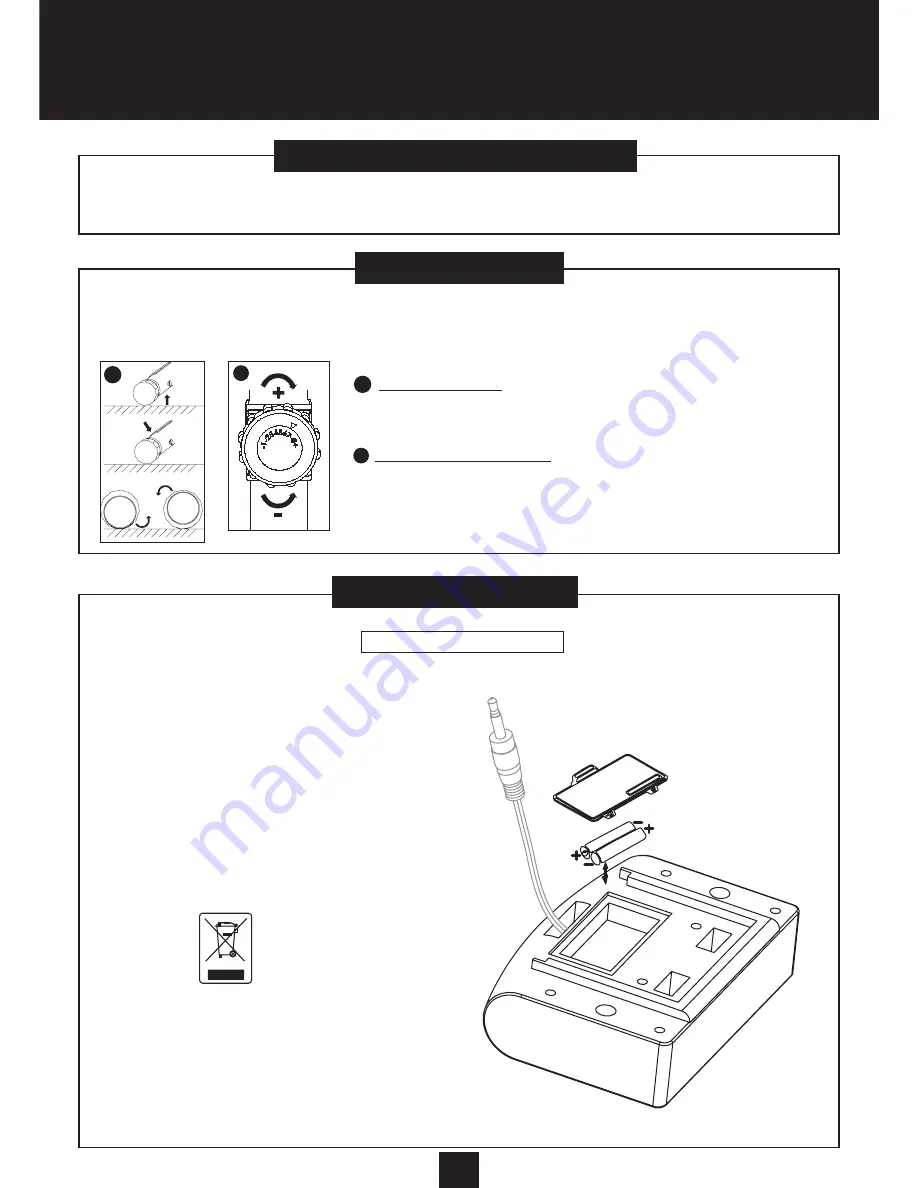
Stand facing the front of the bike, hold the handlebar and pull the bike towards you. Your bike now rests on the castors and you can move 
it. When you have fi nished moving it, hold on to it until the back feet are back on the ground.

MOVING YOUR PRODUCT

2


 LEVELLING THE BIKE

Warning: You need to get off the elliptical bike before levelling it.

In the event that the product becomes unstable during use, turn one of the level correc-
tors until it is stable again.


ADJUSTING THE RESISTANCE

Resistance is adjusted using the thumb wheel graded from 1 to 8.
Position 1 corresponds to the lowest resistance, and position 8 to the highest.
You can vary the resistance while pedalling.

1

2

FC100 CONSOLE 

ADJUSTMENTS

1.  Remove the console from its holder, remove the battery co-

ver at the rear of the product and insert two AA/UM-3 bat-
teries into the compartment at the back of the screen.

2.  Ensure that the batteries are inserted correctly and that they 

are in full contact with the springs.

3.  Replace the battery cover and the console, ensuring that 

they are correctly attached.

4.  If the display is unreadable or incomplete, remove the batte-

ries, wait for 15 seconds and then replace them.

5.  When you remove the batteries, the console memory is 

erased.

RECYCLING :
The “crossed-out wastebasket” symbol indicates that this pro-
duct and the batteries it contains cannot be thrown away with 
household waste. 
They are subject to a specifi c type of sorting. 
At the end of their lives, take your batteries and your electronic 
product to an approved collection site to recycle them.
This treatment of your electronic waste will protect the environ-
ment and your health. 

E

N

G

L

I

S

H

INSTALLING BATTERIES

1

According to EN defi nition, this product is a «speed independent product». You can adjust the braking torque not only through the pedal-
ling frequency, but also by choosing the resistance level manually (by turning the torque controller button on non-motorized products, by 
pressing the up/down buttons on motorized products). Nevertheless, if you keep the same resistance level, the braking torque will increase/
decrease as your pedalling frequency increases/decreases. 

Summary of Contents for VE 170

Page 1: ...UCTIONS MODO DE EMPLEO GEBRAUCHSANWEISUNG ISTRUZIONI PER L USO GEBRUIKSHANDLEIDING MANUAL DE UTILIZAÇÃO INSTRUKCJA UŻYTKOWANIA HASZNÁLATI ÚTMUTATÓ ИНСТРУКЦИЯПОИСПОЛЬЗОВАНИЮ Ο ΗΓΙΕΣ ΧΡΗΣΗΣ INSTRUCŢIUNI DE UTILIZARE NÁVOD NA POUŽITIE NÁVOD K POUŽITÍ ...

Page 2: ...ni da conservare Bewaar deze handleiding Instruções a conservar Zachowaj instrukcję Őrizze meg a használati útmutatót Сохранить инструкцию Οδηγίες χρήσης για φύλαξη Păstraţi instrucţiunile Návod je potrebné uchovať Návod je třeba uchovat Réalisation EVOLUTION 32 69 250 500 DECATHLON 4 Boulevard de Mons 59665 Villeneuve d Ascq France Made in China Hecho en China ...

Page 3: ...3 5 5 5 5 5 L R L R ...

Page 4: ...4 L R M8 40L 1 2 A x 8 B C D E x 1 F G x 1 x 6 x 1 M8 20L D24 20UNF 1 2 D24 20UNF x 2 M8 20L x 2 M8 65L M8 25L x 4 x 1 ...

Page 5: ...5 B A 1 x4 x2 2 1 44 1 2 1 1 A x4 B x2 MONTAGE ASSEMBLY MONTAJE MONTAGE MONTAGGIO AFWERKING MONTAGEM MONTAŻ SZERELÉS СБОРКА ΣΥΝΑΡΜΟΛΌΓΗΣΗ MONTARE MONTÁŽ MONTÁŽ ...

Page 6: ...6 A 4 2 4 1 2 1 2 3 2 2 A 2 A 3 49 3 48 50 49 47 1 x1 x1 50 A 1 2 MONTAGE ASSEMBLY MONTAJE MONTAGE MONTAGGIO AFWERKING MONTAGEM MONTAŻ SZERELÉS СБОРКА ΣΥΝΑΡΜΟΛΌΓΗΣΗ MONTARE MONTÁŽ MONTÁŽ 2 ...

Page 7: ...7 62 61 31 63 3 1 34 4R 3 7 7 34 7 39 3 3 6 39 6 3 3 C C F L L R D24 1 2 20UNF X1 D24 1 2 20UNF X1 3 C x2 E F MONTAGE ASSEMBLY MONTAJE MONTAGE MONTAGGIO AFWERKING MONTAGEM MONTAŻ SZERELÉS СБОРКА ΣΥΝΑΡΜΟΛΌΓΗΣΗ MONTARE MONTÁŽ MONTÁŽ ...

Page 8: ...8 M8 40L 4 A D x4 x4 6 20 4 1 4 3 4 2 A A A A D D D D MONTAGE ASSEMBLY MONTAJE MONTAGE MONTAGGIO AFWERKING MONTAGEM MONTAŻ SZERELÉS СБОРКА ΣΥΝΑΡΜΟΛΌΓΗΣΗ MONTARE MONTÁŽ MONTÁŽ ...

Page 9: ...9 X6 5 G 3 x2 5 1 8 77 5R 5L 5 3 5 2 L R L R L R R G x2 G x2 G MONTAGE ASSEMBLY MONTAJE MONTAGE MONTAGGIO AFWERKING MONTAGEM MONTAŻ SZERELÉS СБОРКА ΣΥΝΑΡΜΟΛΌΓΗΣΗ MONTARE MONTÁŽ MONTÁŽ ...

Page 10: ...llás állításához Колесико регулировки сопротивления Τροχίσκος ρύθµισης της αντίστασης Rotiţă canelată de reglare a rezistenţei Nastavovacia skrutka odporu Kolečko pro nastavení zátěže 阻力调节杆 Pédales Pedals Pedales Pedale Pedali Pedalen Pedais Pedały Pedálok Педали Πετάλια Pedale Pedále Pedály 踏板 Roulettes de déplacement Castors Ruedas de desplazamiento Transportrollen Rotelle di spostamento Transpo...

Page 11: ... è danneggia ta illeggibile o assente occorre sostituirla Non avvicinare mani piedi e capelli ai pezzi in movimento WAARSCHUWING Onjuist gebruik van dit product kan ernstige ve rwondingen veroorzaken Voordat u het product gaat gebruiken moet u de gebruiksaanwijzing lezen en alle waarschuwingen en instructies die hij bevat toepassen Deze machine niet door kinderen laten gebruiken en niet in de buur...

Page 12: ...mercial rental or institutional setting 5 Use the product indoors on a flat surface in an uncluttered place free from moisture and dust Ensure that you have enough space to safely access and move around the device Do not store or use the product outside 6 It is the user s responsibility to inspect and if necessary tighten all parts before using the product Immediately replace any worn or defective ...

Page 13: ...t they are in full contact with the springs 3 Replace the battery cover and the console ensuring that they are correctly attached 4 If the display is unreadable or incomplete remove the batte ries wait for 15 seconds and then replace them 5 When you remove the batteries the console memory is erased RECYCLING The crossed out wastebasket symbol indicates that this pro duct and the batteries it conta...

Page 14: ...ESETTING THE PRODUCT The product goes into standby mode after ten minutes of inactivity The indicators are reset to 0 when the product goes into standby mode the data is not saved 1 2 3 4 5 Speed This function indicates estimated speed either in km h or mph depending on the position of the switch on the rear of the product Distance This function displays the estimated distance covered during the t...

Page 15: ...ining Training on this apparatus will increase your cardiovascular capacity thereby improving your physical fitness and your endurance You will also burn calories a necessary step in losing weight in conjunction with a diet The elliptical trai ner also helps you to tone your legs buttocks and upper body chest back and arms The calf muscles and lower abdominals are also exercised You can consolidate...

Page 16: ...layed on your console is for information purposes and has no scientific value The numerical values are likely to vary depending on your palm position and the pressure exerted on the heart rate sensors If your hands are not in full contact with the heart rate sensors measurements will be affected This device is not designed to be used for a medical diagnosis or to prevent cardiac problems Consult a ...

Reviews: