Installation, Operation and Maintenance Manual
Unimaster Dust Collectors – Series UMA 40-750
15
INSTALLATION
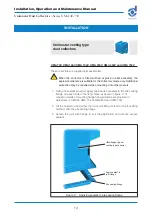
4 Using the sealant provided, apply two beads of sealant to the bottom
assembly joint flange, one each side of the fixing holes (see fig. 7).
5 Lift the combined fan and filter section, using either the four-point lifting
method or the fork lifting method, onto the bottom assembly.
6 Secure the two sections with the nuts and bolts provided and remove excess
sealant.
When the collector is fitted with an explosion relief assembly, an earthing
connection must be made between the bottom assembly and the upper
section using the earthing strap provided (see fig. 8).
If the contaminated air inlet requires repositioning, make sure sealant
is used when repositioning the inlet blanking plate, in order to ensure
an effective seal.
UMA 756
These collectors are supplied in two sections.
1 Using the four-point lifting method, lift the bottom assembly into position
using the lifting brackets provided.
2 Using plumb lines and spirit levels, line up the bottom assembly both
horizontally and vertically, using shims under legs where required.
3 Drill through base holes and insert and tighten suitable expandible bolts (if
required, details of foundation fixing positions are provided in dat
a
sheet
of UMA 750).
4 Remove lifting brackets from the joint flange.
5 Using the sealant provided, apply two beads of sealant to the bottom
assembly joint flange, one each side of the fixing holes (see fig. 7).
6 Lift the combined fan and filter section, using either the four-point lifting
method or the fork lifting method, onto the bottom assembly.
7 Secure the two sections with the nuts and bolts provided and remove excess
sealant.
When the collector is fitted with an explosion relief assembly, an earthing
connection must be made between the bottom assembly and the upper
section using the earthing strap provided (see fig. 8).
If the contaminated air inlet requires repositioning, make sure sealant
is used when repositioning the inlet blanking plate, in order to ensure
an effective seal.
When the UMA 756 is supplied with the optional secondary or absolute filter, the
acoustic diffuser is supplied separately and should be assembled as follows:
1 Remove lifting brackets from the combined fan and filter section.
2 With the aid of a colleague, lift the acoustic diffuser onto its back, taking care
not to damage the paintwork.


