background image

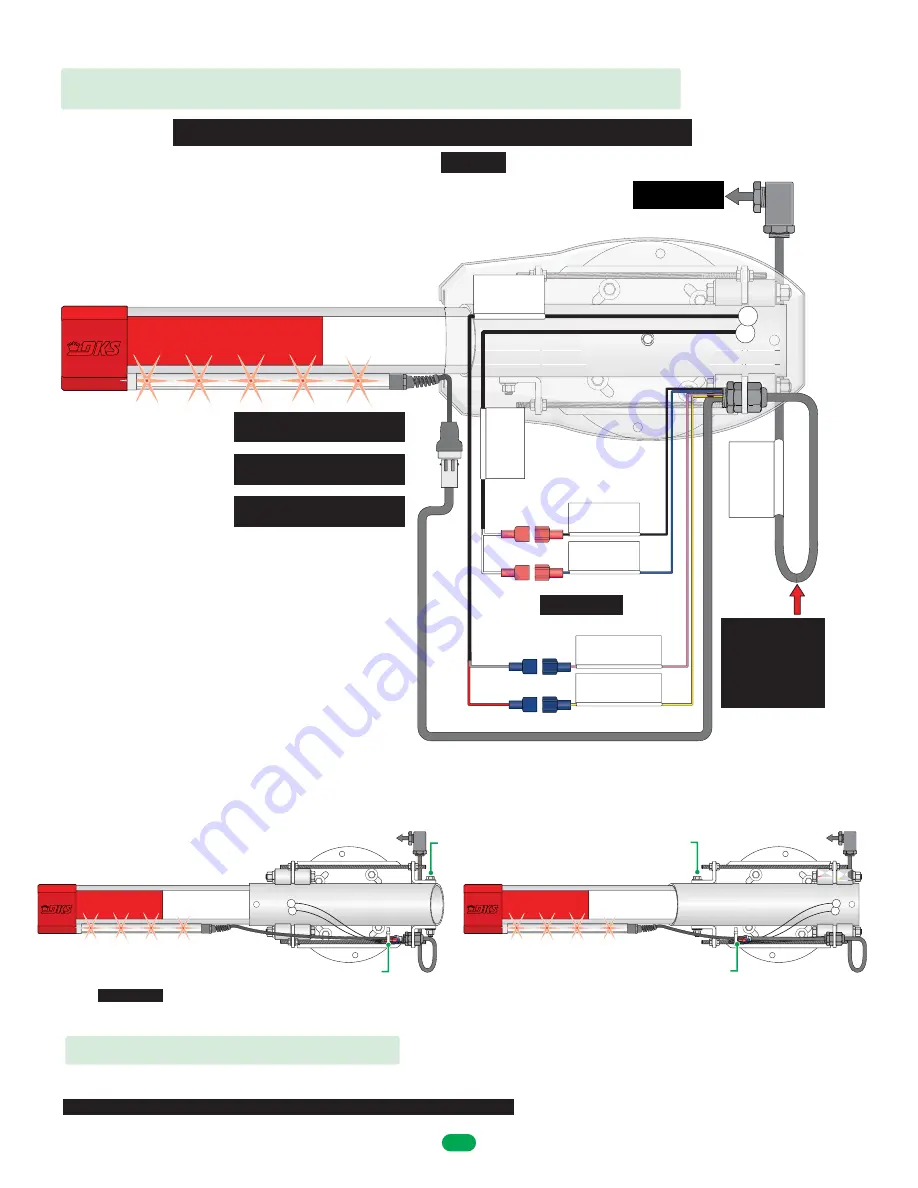
MAKE SURE ALL POWER IS TURNED OFF TO OPERATOR!

1601 Breakaway Bracket

1601 Octagon Arm

Breakaway Sensors

1601-356

Harness

Only wire your existing 

Optional 

components

1601 Octagon Breakaway Arm - Arm Connection

NO

Red

Breakaway Bracket

Breakaway Sensor

Red Connector

C7 L8

Breakaway Sensor

Red Connector

C6 L7

White

White

Blue

Black

To Operator

See next page

Blue

NC

Breakaway Sensor

Blue Connector

Battery BackUp C9 L10

Breakaway Sensor

Blue Connector

Battery Backup C8 L9

Red

Pink

Grey

Yellow

OPTIONAL

Convienence Open ONLY

1601-401

Magnetic Contact

Normally Close
Battery Backup

1601-400

Magnetic Contact

Normally Open

Breakaway

Option #2

Option #1

IMPORTANT:

  To secure wires to bracket, allow for some slack in the wires to account for the arm pivoting when arm “Breaks Away” from bracket. 

Test breakaway feature to 

make sure

 there is enough slack in the wires when securing wires.

Zip tie wires to secure near pivot point

Arm
Pivot
Bolt

Arm

Pivot

Bolt

Secure Wires to

Breakaway Bracket

Connect Arm to
Wire Harness

IMPORTANT:

 Allow 

slack in the wire 
harness between the 
cable grips of 

at 

least 13”

 or more 

for the rotating arm.

Cable Grip

Cable Grip

DoorKing Part Number

1601-295

Breakaway Arm Reset Procedure

If arm gets struck and breaks away, gate operator will automatically shut down (Breakaway sensors are tripped). Simply snap arm back into the 
release rollers. Make sure all wires are out of the way of the arm when snapping arm back in position. Normal operation can then continue.

DO NOT OPERATE ARM WITHOUT BREAKAWAY SENSORS FUNCTIONING.

OPTIONAL Red/Green LEDs

See page 10

OPTIONAL Reverse Edge

See page 10

OPTIONAL Rubber Bumper

See page 11

Zip tie wires to secure near pivot point

7

1601-269-G-7-21

Summary of Contents for 1601 Series

Page 1: ...alling bracket Copyright 2021 DoorKing Inc All rights reserved 120 S Glasgow Avenue Inglewood California 90301 U S A DoorKing Part Number 1601 295 1601 BREAK AWAY OCTAGON ARM INSTALLATION KIT This kit is designed for a 1601 barrier gate operator ONLY It CANNOT be used with 1602 or 1603 operators The kit provides a break away bracket assembly for a octagon arm with OR without reverse LED edge ONLY ...

Page 2: ...t page Insert reinforcing sleeve into the back of the octagon 14 ft 1 piece arm all the way until it is even with the back of the arm Optional Reverse Edge 14 Ft 1 Piece Arm Remove plastic cap Drawing NOT to scale DoorKing Part Number 1601 295 Install Reinforcing Sleeve on 14 ft 1 Piece Arm Reinforcing Sleeve 2 1601 269 G 7 21 ...

Page 3: ...t Angled End Optional Reverse Edge Arm Sleeve Option 1 Break Away Arm Bracket Angled End Release Rollers Arm Pivot Bolt Arm Sleeve Optional Reverse Edge Drawings NOT to scale Octagon Arm Optional Reverse LED Edge Spacer MUST be used or edge will slide in slot Optional Reverse LED Edge Spacer Required Cover DoorKing Part Number 1601 295 Potential arm bending and breaking point if reinforcing sleeve...

Page 4: ... more for the rotating arm IMPORTANT Allow slack in the wire harness between the cable grips of at least 13 or more for the rotating arm Near Side Option Cable Grip See page 7 for arm connection options See page 7 for arm connection options Cable Grip Cable Grip Cable Grip Wiring to operator See page 8 Option 2 Option 1 Breakaway Sensors Breakaway Sensors Attach wire harness connector on bottom of...

Page 5: ...t out of the existing cover Only one side of the cover will need to be cut out depending on which side of the operator the arm is mounted on Use this template as a guide to remove material from the cover Make sure your printer is set to 100 Older Covers X X 5 1601 269 G 7 21 ...

Page 6: ...e Existing Carriage Bolt 1 2 4 3 NEG POS Relay 1 3 Side of Electronic Box 75 2 5 Drill 213 Holes Power Supply Mounting Position Relay Mounting Plate Relay Mounting Plate Power Supply Mounting Plate Power Supply REVERSE SENSITIVITY TIME DELAY POWER 1 ON 2 3 4 5 6 7 8 1 ON 2 3 4 5 6 7 8 NC UP LOOP DOWN LOOP 1 2 3 4 5 6 7 8 9 10 11 12 13 14 SW 1 SW 2 NO NC C 115V NEU SUPPLY GROUND 115V HOT UP DOWN AU...

Page 7: ...ng when arm Breaks Away from bracket Test breakaway feature to make sure there is enough slack in the wires when securing wires Zip tie wires to secure near pivot point Arm Pivot Bolt Arm Pivot Bolt Secure Wires to Breakaway Bracket Connect Arm to Wire Harness IMPORTANT Allow slack in the wire harness between the cable grips of at least 13 or more for the rotating arm Cable Grip Cable Grip DoorKin...

Page 8: ...10 L11 Terminal 14 Main PCB Reverse Edge C4 L4 Terminal 1 Battery Backup PCB Breakaway Sensor NC C9 L15 Terminal 2 Battery Backup PCB Breakaway Sensor NC C8 L13 12V Negative Solid State Relay C6 L6 12V Positive Solid State Relay C3 L3 1 2 4 3 NEG POS Relay NO NC C V Transformer 8 5 amp L18 V Transformer 8 5 amp L17 Black White White Pink Blue Black Green Green Red Blue Grey Pink Grey Red Red Yello...

Page 9: ...o scale Pre drilled Hole Install End Cap Push a screwdriver through the hole in cap to release spring while pushing cap on Keep pushing cap on until a CLICK is heard locking it in place 120 S Glasgow Avenue Inglewood California 90301 U S A Self tapping screw Self tapping screw Slide coupler in arm all the way to the end of arm and secure with screws This protects arm from arm sleeve bending breaki...

Page 10: ...rewdriver through the hole in cap to release spring while pushing cap on Keep pushing cap on until a CLICK is heard which locks it in place Tip Liquid soap will help reverse edge slide on easier Reinstall End Cap Slide on Edge 3 Tip Liquid soap will help spacer slide on easier Slide on Spacer 2 3 Octagon Arm Reverse LED Edge Reverse LED Edge Spacer Remove End Cap Push a screwdriver through hole in...

Page 11: ... cap to release spring while pushing cap on Keep pushing cap on until a CLICK is heard which locks it in place Reinstall End Cap Tip Liquid soap will help rubber bumper slide on easier Slide on Rubber Bumper 2 3 Octagon Arm Rubber Bumper Rubber Bumper 3 Trim End 3 Trim End Remove End Cap Push a screwdriver through hole in bottom of end cap to release spring while pulling cap off 3 trim end MUST sl...

Reviews: