66
PERIODICAL INSPECTION AND MAINTENANCE
.
12/150_23136625
−
C en
Checking Tensioner Spring Tension
A belt tension gauge will not give an accurate measure of the belt
tension when automatic spring tensioner is used. Measure tensioner
spring tension using a torque wrench and procedure outlined below:
1. Release tension on belt using a breaker bar and socket on
tension arm. Remove belt from pulleys.
2. Release tension on tension arm and remove breaker bar.
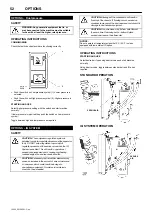
3. Put a mark on swing arm of tensioner as shown.
4. Measure 21 mm (0.83 in.) and put a mark on tensioner mounting
base.
5. Install torque wrench so that it is aligned with centers of pulley
and tensioner. Rotate the swing arm using a torque wrench until
marks are aligned.
6. Record torque wrench measurement and compare with
specification below. Replace tensioner assembly as required.
Specification
Spring Tension—Torque 18
−
22 N
•
m (13
−
16 lb
−
ft)
NOTE: Threads on belt tensioner roller cap screw are LEFT
−
HAND
threads.
Checking Engine Electrical Ground Connections
Keep all engine ground connections clean and tight to prevent
electrical arcing which can damage electronic components.
Replenishing Supplemental Coolant Additives (SCAs) Between
Coolant Changes
NOTE: If system is to be filled with coolant that does not contain
SCAs, the coolant must be precharged.
Through time and use, the concentration of coolant additives is
gradually depleted during engine operation. Periodic replenishment
of inhibitors is required. The cooling system must be recharged with
additional supplemental coolant additives available in the form of
liquid coolant conditioner.
Maintaining the correct coolant conditioner concentration (SCAs)
and freeze point is essential in your cooling system to protect
against rust, liner pitting and corrosion, and freeze
−
ups due to
incorrect coolant dilution.
DO NOT mix one brand of SCA with a different brand.
Recharge the system per instructions printed on label of the Coolant
Conditioner.
IMPORTANT: Always maintain coolant at correct level and
concentration. DO NOT operate engine without coolant even
for a few minutes.
If frequent coolant makeup is required, the glycol concentration
should be checked to ensure that the desired freeze point is
maintained. Follow manufacturer’s instructions provided with
Coolant/Battery Tester.
Add the manufacturer’s recommended concentration of
supplemental coolant additive. DO NOT add more than the
recommended amount.
The use of non
−
recommended supplemental coolant additives may
result in additive drop
−
out and gelation of the coolant.
If other coolants are used, consult the coolant supplier and follow the
manufacturer’s recommendation for use of supplemental coolant
additives.
Replacing Fan and Alternator Belts
Refer to CHECKING BELT TENSIONER SPRING TENSION AND
BELT WEAR in Lubrication and Maintenance / 500 Hour / 6 Month
Section for additional information on the belt tensioner.
1. Inspect belts for cracks, fraying, or stretched out areas. Replace
if necessary.
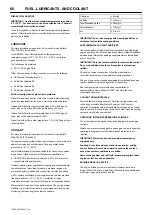
2. To replace belt with automatic tensioner, release tension on belt
using a breaker bar and socket on tension arm.
To replace belt with manual tensioner, release tension at belt
tensioner.
3. Remove poly
−
vee belt from pulleys and discard belt.
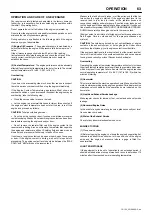
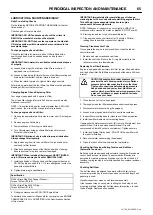
4. Install new belt, making sure belt is correctly seated in all pulley
grooves. Refer to belt routing at right for your application.
5. Apply tension to belt with tensioner. Remove socket.
6. Start engine and check belt alignment.
Bleeding the Fuel System
Bleed the Fuel System
CAUTION: Escaping fluid under pressure can penetrate the
skin causing serious injury. Avoid hazards by relieving
pressure before disconnec ing hydraulic or other lines. Tighten
all connections before applying pressure. Search for leaks with
a piece of cardboard. Protect hands and body from high
pressure fluids.
Any time the fuel system has been opened up for service (lines
disconnected or filters removed), it will be necessary to bleed air
from the system.
1. Operate primary fuel filter primer pump until backpressure is felt.
2. Start engine and check for leaks.
If engine still will not start, see your authorized servicing dealer or
engine distributor.
Do Not Modify Fuel System
IMPORTANT: Modification or alteration of the injection pump,
the injection pump timing, or the fuel injectors in ways not
recommended by the manufacturer will terminate the warranty
obligation to the purchaser.
In addition, tampering with fuel system which alters
emission
−
related equipment on engines may result in fines or
other penalties, per EPA regulations or other local emission
laws.
Do not attempt to service injection pump or fuel injectors
yourself. Special training and special tools are required. (See
your authorized servicing dealer).
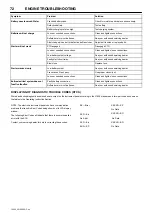
TROUBLESHOOTING
General Troubleshooting Information
Troubleshooting engine problems can be difficult.
In this section is a list of possible engine problems that may be
encountered accompanied by possible causes and corrections. The
illustrated diagrams and troubleshooting information are of a general
nature. See your engine distributor or servicing dealer if you are in
doubt.
A reliable program for troubleshooting engine problems should
include the following basic diagnostic thought process:
Know the engine and all related systems.
Study the problem thoroughly.
Relate the symptoms to your knowledge of engine and systems.
Diagnose the problem starting with the easiest things first.
Double
−
check before beginning the disassembly.
Determine cause and make a thorough repair.
After making repairs, operate the engine under normal conditions
to verify that the problem and cause was corrected.
NOTE: The engines covered in this manual have electronic control
systems which send diagnostic trouble codes to signal problems.

