background image

Attach the part 

D

 & 

E

 to 

J

 with the       ,

and       as shown.

X 4

X 8

X 4

Step 2

8

1

10

1

7

1

1

1

1

1

8

8

1

10

10

8

Summary of Contents for 2302359

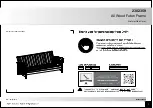
Page 1: ...Natural Oak Color 2302359 All Wood Futon Frame D H 25 04 2019 B34230235900 Weight Limit 600 lbs 272kgs 1...

Page 2: ...urniture com to view the limited warranty valid in the U S and Canada Call our toll free number if you need assistance Work in a spacious area and near where the unit will be used preferably on a carp...

Page 3: ...25050 Side Rail X 2 T625060 Right Back Deck Cross Rail X 1 T625070 Left Seat Deck Cross Rail X 1 T625100 Back Frame X 1 T625130 Left Back Deck Cross Rail X 1 T625080 Right Seat Deck Cross Rail X 1 T62...

Page 4: ...Bolt Cotter Pin Wood Dowel 1 4 x 2 3 4 1 4 x 2 1 4 x 1 1 2 1 8 5 16 x 3 4 1 2 1 4 x 1 1 8 Bolt Bolt Screw 2 3 5 6 7 8 1 4 4 X 4 X 12 X 12 X 4 X 8 X 2 X 6 X 12 Hardware Pack Hardware Pack T2302359 00 C...

Page 5: ...Locking Pin Spring Washer Flat Washer L Plate Allen Key Nut Plastic Washer 15 9 11 13 16 14 5 X 2 X 8 X 12 X 4 X 1 X 2 X 8 X 2 Hardware Pack Hardware Pack T2302359 00 Color Zinc 10 12...

Page 6: ...Attach the to the part D and E with as shown E D Step 1 X 4 X 4 12 4 4 4 4 12 12 12 6...

Page 7: ...Attach the part D E to J with the and as shown X 4 X 8 X 4 Step 2 8 1 10 1 7 1 1 1 1 1 8 8 1 10 10 8...

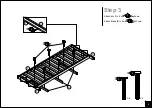
Page 8: ...Attach H x 3 to J with as shown Attach D and E to J with as shown H J E D D J X 4 X 6 Step 3 3 3 3 8 2 2 2...

Page 9: ...Front side F K G K X 8 X 4 X 8 Back side G Attach the part D E to J with the and as shown Step 4 8 1 1 1 1 9 1 8 8 1 1 10 10 10...

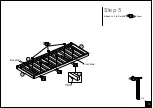
Page 10: ...Attach I x 3 to K with bolt as show Front Side I G K F Back Side X 6 Step 5 3 3 10 3...

Page 11: ...The Underneath of a frame K K Turn over the subassembly from previous step Attach the to the part K with as show X 6 X 2 Step 6 6 16 16 6 16 6 11...

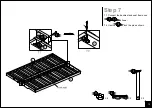
Page 12: ...7 1 Connect the backrest and seat frame use as shown 7 2 Use the to lock the pin as shown K J J K X 4 X 2 X 2 Step 7 7 9 11 11 7 7 11 9 12 11 9...

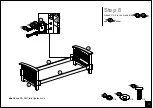
Page 13: ...Please DO NOT fully tighten bolts B A C C Attach C X 2 to the A and B with and as show C A X 8 X 8 X 8 Step 8 5 5 13 14 13 13 14 14 5 13...

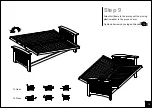
Page 14: ...Attach full frame to the arm by put the moving plastic washer to the grove on arm Tighten all screws by using an Allen key To Open To Close Step 9 15 14...

Page 15: ...15 14...

Page 16: ...as anteriormente Visite www dhpfurniture com para ver la garant a limitada v lida en los Estados Unidos y Canad Informaci n sobre la garant a Lea antes de comenzar a ensamblar Llame a nuestro n mero g...

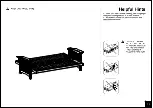
Page 17: ...e desmontar y volver a ensamblar en caso de mudanza Limpie el producto con un pa o suave NO utilice productos qu micos o abrasivos productos de limpieza Nota Por favor no apriete completamente las pie...

Page 18: ...d crites ci dessus Visitez www dhpfurniture com pour voir la garantie limit e valide aux tats Unis et au Canada Informations sur la garantie Avant de commencer l assemblage Si vous avez besoin d aide...

Page 19: ...ape par tape Les vis les boulons utilis s dans chaque tape sont pr sent s en taille r elle dans le coin inf rieur droit de la page D Traverse du pont arri re droit T625070 F Traverse du pont du si ge...

Reviews: