background image

DO NOT RETURN TO THE STORE !


4545429N (Gray Linen)

B344545429N00

Date of Purchase


Upholstered Bed with Storage Drawers

KT - 2020/6/24

If parts are missing or damaged, we will gladly ship your 
replacement parts free of charge.

Lot Number 

(TAKEN FROM CARTON)

Thank you for  purchasing from DHP!

THIS INSTRUCTION BOOKLET CONTAINS

 IMPORTANT

 SAFETY

INFORMATION. PLEASE READ AND KEEP FOR FUTURE REFERENCE.

©

 2014 Dorel Home Products All Rights Reserved

Full Size

Visi

www.dhpfurniture.com/eng/replacement-parts

or call Toll-Free 

1-800-267-1739 

Weight Limit:

Bed: 450Lb/204Kg
Drawer: 40Lb/18Kg

Summary of Contents for 4545429N

Page 1: ... replacement parts free of charge Lot Number TAKEN FROM CARTON Thank you for purchasing from DHP THIS INSTRUCTION BOOKLET CONTAINS IMPORTANT SAFETY INFORMATION PLEASE READ AND KEEP FOR FUTURE REFERENCE 1 2014 Dorel Home Products All Rights Reserved Full Size Visit www dhpfurniture com eng replacement parts or call Toll Free 1 800 267 1739 Weight Limit Bed 450Lb 204Kg Drawer 40Lb 18Kg ...

Page 2: ...se from authorized retailers This is solely limited to the repair or replacement of defective parts and assembly labor is not included This warranty does not apply to any product which has been improperly assembled subjected to misuse or abuse or which has been altered or repaired in any way The warranty does not cover wearing tearing fading or splitting of the fabric where applicable Liability fo...

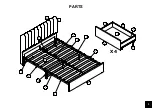
Page 3: ...3 PARTS C L S M N Q X 4 A1 A F K X E J I G E F B P Y ...

Page 4: ...ents and make sure you have received all the parts listed above PARTS LIST BOX 1 1 A E I Side Rail X 2 Side Rail X 2 Center Rail X 2 Support Rail X 1 F Bracket X 2 G B Footboard X 1 Fabric Back Panel X 1 A1 Headboard X 1 C Drawer Panel X 4 PART NUMBERS PART LABELS 4545429N Gray Linen A T991290 A1 T991300 B T991310 C T991320 E T953320 F T953330 G T926340 K T953480 I T953350 J T960430 K J Guide X 4 ...

Page 5: ...ll contents and make sure you have received all the parts listed above PARTS LIST BOX 1 1 L M N Drawer Bottom Panel X 4 Drawer Back Panel X 4 Drawer Side Panel X 4 S Q Drawer Side Panel X 4 Caster X 20 P Wooden Slats X 24 X Single Slat Cap X 24 PART NUMBERS PART LABELS 4545429N Gray Linen L T953380 M T953390 N T953400 S T953420 Q T953410 P T926770 X T926370 Y T926380 Y Double Slat Cap X 12 ...

Page 6: ...d at each step are shown in actual size in the lower right corner of the page HARDWARE LIST Hardware Pack HP T4546429 00 4545429N Gray Linen 7 8 9 5 3 2 1 6 4 1 4 X 3 4 Bolt Black X 20 4mm Allen Key X 1 1 4 Washer Black X 4 3 16 X 1 Bolt Zinc X 56 3 16 X 7 8 Bolt Zinc X 24 3 16 X 3 8 Bolt Zinc X 8 1 4 X 3 4 Bolt Black X 4 1 4 X 1 9 16 Bolt Black X 10 1 4 X 1 3 16 Bolt Black X 6 ...

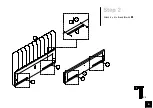
Page 7: ...7 Stick A1 to the back of A with Velcro as illustrated A A1 ...

Page 8: ...8 1 X 8 Attach J x 4 to A and B with A B J A B J J J J ...

Page 9: ...9 3 X 6 Attach G X 2 to K with Fully tighten all bolts in this Step K G G G K G K ...

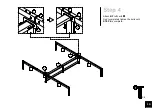
Page 10: ...10 Attach E F to G with Don t completely tighten the bolts until STEP 6 is complete X 8 1 G G E E F F E F K G G E F ...

Page 11: ...11 X 8 A E F E F E 4 A Attach E F to A B with B ...

Page 12: ...12 6 1 Attach I x 2 to A B with 6 2 Attach I x 2 to K with Then properly tighten all the bolts X 4 1 X 2 4 6 1 6 2 The slat holes should be oriented towards upside I A 1 K I I A B K I I 4 ...

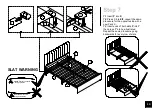
Page 13: ... with a new P and X 7 3 Insert ends of both slats P into Y then press Y into I as illustrated Repeat the same procedure going backwards for every row of slats 7 1 7 2 7 3 X P X P E Y P P I Correct Slat curve should be facing upwards Incorrect Slat curve facing downwards SLAT WARNING E F F E I ...

Page 14: ...th don t completely tighten the bolts until STEP 11 is complete X 16 M S N X 4 7 Note Make sure that these holes are all located on the top side before assembling Please orient the plastic sheet towards the inside of the drawer ...

Page 15: ...15 Attach Q to L with 6 Q L L 6 X 8 X 4 ...

Page 16: ...16 11 1 Attach Q X 4 and L to S and N with 11 2 Attach L to M with X 32 X 4 X 8 8 N L M S Q 11 1 11 2 8 Q L S 7 L M 7 ...

Page 17: ...17 Attach sub assembly L S N M from previous step to C with then properly tighten all the bolts X 24 X 4 C 8 ...

Page 18: ...18 Attach and to C X 4 2 X 4 X 4 C 9 C 9 2 ...

Page 19: ...19 Align Drawers with the bed frame and push them into the bed Lock drawers by slightly lifting drawer and inserting the Pin into the Slot Slot Pin Slot Pin ...

Page 20: ...available for replacement Check bolts and nuts periodically and tighten if necessary Clean the product with a soft damp cloth DO NOT use harsh chemicals or abrasive cleaners Helpful Hints Weight Limit Bed 450Lb 204Kg Drawer 40Lb 18Kg That s it You ve finished assembling your Upholstered Bed with Storage Drawers For safety reasons and to prevent injuries This bed is not intended for use by children...

Page 21: ...s durante el periodo original de la garantía Las partes defectuosas serán reparadas o reemplazadas sin cargo extra y sujetas a los términos y condiciones descritos anteriormente Visite www dhpfurniture com para ver la garantía limitada válida en E U y Canadá Llame a nuestro número gratuito si necesita asistencia Trabaje en un área espaciosa y cerca de donde su producto será utilizado preferiblemen...

Page 22: ...ara el ensamblaje al compararlos con la tabla de piezas indicadas en la sección en inglés Piezas de reemplazo visite www dhpfurniture com spa replacement parts Partes NÚMERO DE PIEZA ETIQUETAS DE PIEZAS DESCRIPCIÓN 4545429N Lino Gris A Cabecera T991290 A1 Tela adhesiva T991300 B Pie de cama T991310 C Frente del cajón T991320 E Riel lateral T953320 F Riel lateral T953330 G Soporte de esquina T92634...

Page 23: ...de A con el cierre mágico como se ilustra Paso 2 Una J x 4 con A y B con los Paso 3 Una G X 2 con K con los Apriete completamente todos los pernos en este Paso Paso 4 Una E F con G con los No apriete completamente los pernos hasta que el PASO 6 sea completado Paso 5 Una E F con A y B con los Paso 6 6 1 Una I x 2 con A y B con los 6 2 Una I x 2 con K con los luego apriete completamente todos los pe...

Page 24: ... la fin de la période de la garantie initiale uniquement Les composants défectueux seront réparés ou remplacés sans frais sous réserve des conditions décrites ci dessus Visitez www dhpfurniture com pour visionner la garantie limitée valide aux États Unis et au Canada Si vous avez besoin d aide appelez notre service à la clientèle sans frais Travaillez dans un endroit spacieux et près du lieu où l ...

Page 25: ...echange visitez www dhpfurniture com fre replacement parts de paquet T4546429 00 IMPORTANT La liste des références ci dessous est propre à votre produit Veuillez l avoir sous la main lorsque vous appelez pour des pièces de rechange LISTE DES PIÈCES ÉTIQUETTE DES PIÈCES DESCRIPCIÓN 4545429N Lin Gris A Tête de lit T991290 A1 Tissu adhésif T991300 B Pied de lit T991310 C Partie avant du tiroir T99132...

Page 26: ...A et B avec Étape 3 Attacher G X 2 à K avec Serrez complètement tous les boulons dans cette étape Étape 4 Attacher E F à G avec Ne serrez pas complètement les vis jusqu à ce que l Étape 6 soit terminée Étape 5 Attacher E F à A X 2 avec Étape 6 6 1 Attacher I x2 à A et B avec 6 2 Attacher I x 2 à K avec puis serrez correctement toutes les boulons Étape 7 7 1 Insérer P dans X 7 2 Presser X sur E F R...

Reviews: