background image

DA3008309 (French Gray)

B34DA300830900-218021

Date of Purchase

Open Shelf Storage Unit

V.C. – 20/05//2021

Lot Number 

(TAKEN FROM CARTON)

Thank you for purchasing from Dorel!

THIS INSTRUCTION BOOKLET CONTAINS

IMPORTANT

SAFETY  

INFORMATION. PLEASE READ AND KEEP FOR FUTURE REFERENCE.

1

© 2021 Dorel Home Products All Rights Reserved

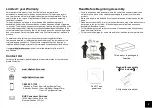
Weight Limit: 20 Lb / 9 Kg per shelf

Questions, concerns, missing parts?

CONTACT OUR CUSTOMER SERVICE DEPARTMENT 

BEFORE RETURNING PRODUCT TO THE RETAILER.

If parts are missing or damaged, we will gladly ship your 

replacement parts free of charge.

Visit www.dhpfurniture.com/eng/replacement-parts 

or call Toll-Free

1-800-267-1739.

You can also chat with us at www.dhpfurniture.com

Summary of Contents for DA3008309

Page 1: ...KEEP FOR FUTURE REFERENCE 1 2021 Dorel Home Products All Rights Reserved Weight Limit 20 Lb 9 Kg per shelf Questions concerns missing parts CONTACT OUR CUSTOMER SERVICE DEPARTMENT BEFORE RETURNING PR...

Page 2: ...ssembly labor is not included This warranty does not apply to any product which has been improperly assembled subjected to misuse or abuse or which has been altered or repaired in any way The warranty...

Page 3: ...PARTS 3...

Page 4: ...4 PARTS LIST TOP PANEL 1 PC LEFT SIDE PANEL 1 PC RIGHT SIDE PANEL 1 PC SHELF 2 PCS BACK PANEL 2 PCS FRONT TOP RAIL 1 PC BACK TOP RAIL 1 PC BACK BOTTOM RAIL 1 PC BOTTOM PANEL 1 PC B C D E F G H I...

Page 5: ...customer service for replacement parts Before throwing any packaging please verify all contents and make sure you have received all the parts listed above 6 PART NUMBERS PART LABELS DA3008309 French...

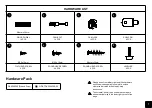
Page 6: ...8 PCS ROUND HEAD SCREW 4 PCS LEVELLER 4 PCS 1 2 3 4 5 6 7 8 Please do not completely tighten all the hardware until the entire assembly is complete unless otherwise indicated in the step by step instr...

Page 7: ...lnsert cam bolts into the left and right side panels B C Step 1 8 x 10 2...

Page 8: ...ront top rail F back top rail G back bottom rail H and bottom panel I Attach side panels B C to front top rail F back top rail G back bottom rail H and bottom panel I as shown Use screwdriver to tight...

Page 9: ...lnsert cam bolts into the top panel A Step 3 9 A 2 x 4 2...

Page 10: ...panel A to side panels B C Use screwdriver to tighten all cam locks Secure the top panel A to rails G F with round head screws Use screwdriver to tighten all screws Insert shelf pins into the desired...

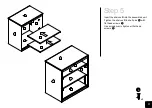
Page 11: ...Insert the shelves D into the assembled unit Tighten the shelves D to shelf pins with flat head screws Use screwdriver to tighten all flat head screws Step 5 11 x 8 5...

Page 12: ...Step 6 12 Attach back panels E to the unit using round head screws Use screwdriver to tighten all round head screws x 28 6...

Page 13: ...Attach levelers to the unit as shown Step 7 13 x 4 8...

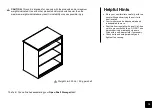
Page 14: ...h two people lifting and carrying the unit to its new location Your furniture can be disassembled and reassembled to move Dust this item regularly with a soft lint free cloth to prevent soil build up...

Page 15: ...icas para ensamblar su mueble Este tipo de herramientas pueden rasgar o da ar las partes ES ESTE INSTRUCTIVO CONTIENE INFORMACION IMPORTANTE DE SEGURIDAD POR FAVOR LEA Y GUARDE PARA SU REFERENCIA FUTU...

Page 16: ...de deshacerse de las cajas de cart n aseg rese de que est n vac as Tambi n confirme que ha recibido todos los componentes necesarios para el ensamblaje al compararlos con la tabla de piezas indicadas...

Page 17: ...o 4 Inserte y en B y C Una A con B y C Utilice un destornillador para apretar todos los Fije A a G y F con Utilice un destornillador para apretar todos los tornillos Inserte en la ubicaci n deseada en...

Page 18: ...t la r paration ou au remplacement des pi ces d fectueuses La main d oeuvre n cessaire l assemblage n est pas incluse Cette garantie ne s applique pas aux produits qui ont t mal assembl s qui ont t so...

Page 19: ...tion en anglais Remarque Sauf indication contraire dans les instructions ne pas resserrer compl tement les vis et les boulons jusqu ce que l assemblage soit termin Les vis et boulons utilis s durant c...

Page 20: ...ns A tape 4 Ins rez et dans B C Joindre A B C Utilisez un tournevis pour serrer tous les Fixez A G et F avec Utilisez un tournevis pour serrer toutes les vis Ins rez l emplacement souhait dans B C tap...

Reviews: