background image

The warranty DOES NOT cover:

* Damages caused by flooding or standing water from leaky pipes, faucets and/or household appliances.

* Damages to the cabinet, sink or countertop resulting from improper plumbing installation.

The engineered stone top is resilient, but care needs to be taken to preserve it's appearance. Do not
place hot appliances, such as curling irons and hot hair dryers directly on the counter top. Wipe spills
immediately. For tougher stains, use a non-abrasive Granite/Stone cleaner.

1-YEAR LIMITED WARRANTY

Dust regularly with a soft, lint-free cloth to prevent soil build-up.  A damp cloth may be used occasionally to
clean surface.  Dry immediately.  Do not use any abrasives that may damage finish. Excessive exposure to
sunlight and extreme changes in temperature and moisture can damage wood furniture.
Use coasters to prevent the formation of moisture rings and trivets to protect from hot items. Cover extension
leaves (if applicable) with a soft protective fabric before storing. Do not slide objects across the surface -
always lift them. Check all bolts, screws and fasteners periodically and tighten them if necessary.

Dorel warrants its product to be free from defects in material and workmanship and agrees to remedy any
such defect.  This warranty covers 1 year from the date of original purchase from authorized retailers.  This
warranty is valid only upon presentation of proof of purchase. This is solely limited to the repair or replacement
of defective furniture components and no assembly labor is included.  This warranty does not apply to any
product which has been improperly assembled, subjected to misuse or abuse or which has been altered or
repaired in any way. The warranty does not cover wearing, tearing, fading or splitting of the fabric (where
applicable).  This warranty gives you specific legal rights and you may also have other rights which vary from
State to State or Province to Province.

CARE, CLEANING AND MAINTENANCE

* Carefully read instructions before starting the installation.
* Ensure all parts and components are present before beginning assembly.
* Faucet, Drain, Silicone and all other plumbing components, tools & hardware are not included.
* Handling will require two people.
* Estimated installation time is 30 minutes (excluding plumbing work).

* Ensure the vanity is installed on a level floor. Unevenness can cause the vanity to become
misaligned, resulting in twisting of the cabinet. Repair any uneven areas with shims.

* Ensure all building & plumbing codes are respected. We highly recommend the use of a licensed plumber to
install the faucet and plumbing.

          WARNING: Should this product become damaged, and/or components

are broken or missing,  DO NOT USE.

* Vanities installed with obvious visual defects. Any manufacturing defects or damages from shipping must be
reported prior to installation.

CUSTOMER SERVICE

You can also contact us by writing to the address listed below.  Please include the product model number,

color and a detailed description of your enquiry.

DHP Consumer Services

Canada, H1G 3L1

 NOTES AND INSTALLATION

Montreal, Quebec

12345 Albert-Hudon Boulevard, Suite 100

Summary of Contents for 0-65857-20870-2

Page 1: ...venience and style in mind We trust it will provide you with many years of exceptional comfort and service Before beginning assembly we encourage you to familiarize yourself with your new furniture pi...

Page 2: ...acement of defective furniture components and no assembly labor is included This warranty does not apply to any product which has been improperly assembled subjected to misuse or abuse or which has be...

Page 3: ...hes BACK VIEW BACKSPLASH 30 Bathroom Vanity DL8853 B DL8853G B DL8853W B VANITY FOOT Part A 1 PC Part C 4 PCS PARTS LIST Part B 1 PC Cut out for plumbing 762 30 280 11 882 34 3 4 45 1 3 4 406 16 210 8...

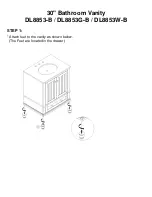
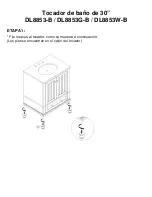
Page 4: ...STEP 1 30 Bathroom Vanity DL8853 B DL8853G B DL8853W B Attach feet to the vanity as shown below The Feet are located in the drawer...

Page 5: ...ity in the desired location Ensure the vanity is level Shim legs if necessary Locate the studs behind the wall and secure the vanity to the wall using wood screws not provided 30 Bathroom Vanity DL885...

Page 6: ...hroom Vanity DL8853 B DL8853G B DL8853W B With the vanity in its location and all plumbing in place apply a bead of silicone to the bottom edge of the backsplash and secure it to the vanity Wipe away...

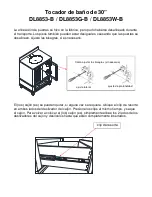
Page 7: ...also be uneven causing doors to be misaligned Adjust the hinges if required The drawer s can be removed if ever required Locate the spring clip on both sides on the drawer glide At the same time press...

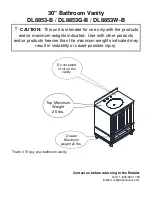
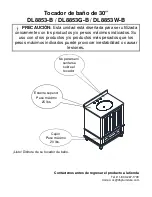
Page 8: ...products and or products heavier than the maximum weights indicated may result in instability or cause possible injury 30 Bathroom Vanity DL8853 B DL8853G B DL8853W B Contact us before returning to th...

Page 9: ...idados para que su mueble siempre conserve su apariencia de nuevo Para obtener m s ideas de muebles inspirantes visite nuestro sitio web en www dorelliving com Tambi n puede mantenerse informado de to...

Page 10: ...l trabajo de plomer a Aseg rese de que se respeten todos los c digos de construcci n y plomer a Recomendamos encarecidamente el uso de un plomero con licencia para instalar el grifo y la plomer a Aseg...

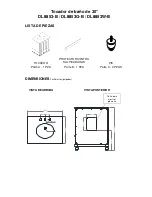
Page 11: ...R DIMENSIONES millimetros pulgadas TOCADOR Parte A 1 PZA PROTECTOR CONTRA SALPICADURAS Tocador de ba o de 30 DL8853 B DL8853G B DL8853W B LISTA DE PIEZAS Corte para mostrar plomer a 762 30 280 11 882...

Page 12: ...ETAPA 1 Tocador de ba o de 30 DL8853 B DL8853G B DL8853W B Fije los pies al tocador como se muestra a continuaci n Los pies se encuentran en el caj n del tocador...

Page 13: ...853G B DL8853W B Coloque el tocador en la ubicaci n deseada Aseg rese que el tocador est nivelado Ajuste con cu as si es necesario Ubique los travesa os de la pared y fije el tocador a la pared con to...

Page 14: ...linea de silicona en el borde inferior del protector contra salpicaduras y f jela al tocador Limpie todo exceso de silicona inmediatamente NOTA Espere 24 horas para que la silicona se seque completam...

Page 15: ...sagras si es necesario El los caj n es se pueden quitar si alguna vez se requiere Ubique el clip de resorte en ambos lados del deslizador del caj n Presione los clips al mismo tiempo y saque el caj n...

Page 16: ...uctos y o pesos m ximos indicados Su uso con otros productos y o productos m s pesados que los pesos m ximos indicados puede provocar inestabilidad o causar lesiones Cont ctenos antes de regresar el p...

Page 17: ...arantie et des conseils d entretien pour vous assurer de garder votre meuble aussi beau qu aux premiers jours Pour trouver d autres id es inspirantes veuillez visiter notre site web www dorelliving co...

Page 18: ...nutes excluant les travaux de plomberie S assurer que tous les codes du b timent et de la plomberie sont respect s Nous recommandons fortement l utilisation d un plombier autoris pour installer le rob...

Page 19: ...AVABO Partie A 1 PCE VUE DE DESSUS VUE DERRI RE DIMENSIONS millim tres pouces Meuble lavabo de 30 po DL8853 B DL8853G B DL8853W B LISTE DE PI CES D coupe pour la plomberie 762 30 280 11 882 34 3 4 45...

Page 20: ...TAPE 1 Meuble lavabo de 30 po DL8853 B DL8853G B DL8853W B Fixez les pieds au mueble lavabo comme indiqu ci dessous Les pieds sont situ s dans le tiroir du meuble...

Page 21: ...8853G B DL8853W B Placez le mueble lavabo l endroit d sir Assurez vous que la vanit est de niveau Ins rez des cales pour corriger si n Localisez les montants derri re le mur et y fixez le meuble lavab...

Page 22: ...quez un cordon de silicone sur le bord inf rieur du dosseret et fixez le au mueble lavabo Essuyez tout exc s de silicone imm diatement NOTE Attendre 24 heures pour que le silicone s che compl tement a...

Page 23: ...es Ajustez les charni res si n cessaire Le s tiroir s peuvent tre enlev s si n cessaire Localisez le clip ressort des deux c t s sur la glissi re du tiroir En m me temps appuyez sur les clips et sorte...

Page 24: ...oids maximum indiqu s L utilisation avec d autres produits et ou des produits plus lourds que les poids maximum indiqu s peut entra ner de l instabilit et causer des blessures Contactez nous avant de...

Reviews: