background image

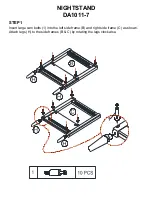
STEP 1

NIGHTSTAND

DA1011-7

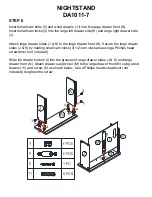
Insert large cam bolts (1) into the left side frame (B) and right side frame (C) as shown.
Attach legs (H) to the side frames (B & C) by rotating the legs clockwise.

Summary of Contents for DA1011-7

Page 1: ...are tips to keep your furniture looking as good as new Customer satisfaction is important to us at Dorel Asia Our agents are available Monday to Friday 8am to 5pm EST to answer any question you may ha...

Page 2: ...e other rights which vary from State to State Dust regularly with a soft lint free cloth to prevent soil build up A damp cloth may be used occasionally to clean surface Dry immediately Do not use any...

Page 3: ...E 1 PC 5 32 7 8 13 10 mm SMALL CAM LOCK 8 PCS 4 25 mm SCREW 12 PCS 4 30 mm 6 25 mm 6 37 mm 8 32 mm 15 12 mm 6 36 mm LARGE CAM LOCK 18 PCS WOOD DOWEL 18 PCS LARGE CAM BOLT 18 PCS SCREW 12 PCS BOLT 2 PC...

Page 4: ...RTS LIST A B C D E F G H I FRONT RAIL 2 PCS LEG 4 PCS DRAWER BOTTOM 2 PCS BOTTOM PANEL 1 PC BACK RAIL 2 PCS BACK PANEL 1 PC NIGHTSTAND DA1011 7 TOP PANEL 1 PC LEFT SIDE FRAME 1 PC RIGHT SIDE FRAME 1 P...

Page 5: ...E 1 PC SMALL DRAWER BACK 1 PC SMALL DRAWER FRONT 1 PC TOP BACK RAIL 1 PC DRAWER SUPPORT RAIL 2 PCS LARGE DRAWER FRONT 1 PC SMALL RIGHT DRAWER SIDE 1 PC NIGHTSTAND DA1011 7 LARGE RIGHT DRAWER SIDE 1 PC...

Page 6: ...STEP 1 NIGHTSTAND DA1011 7 Insert large cam bolts 1 into the left side frame B and right side frame C as shown Attach legs H to the side frames B C by rotating the legs clockwise...

Page 7: ...o the rails E S G Insert wood dowels 2 into the left side frame B and right side frame C Secure rails E S G to the left side frame B and right side frame C by rotating the large cam locks 4 1 2 turn c...

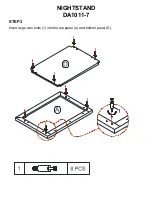
Page 8: ...STEP 3 NIGHTSTAND DA1011 7 Insert large cam bolts 1 into the top panel A and bottom panel D...

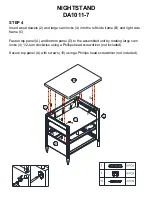
Page 9: ...left side frame B and right side frame C Fasten top panel A and bottom panel D to the assembled unit by rotating large cam locks 4 1 2 turn clockwise using a Phillips head screwdriver not included Se...

Page 10: ...STEP 5 NIGHTSTAND DA1011 7 Attach back panel F to the assembled unit with screws 7 Use a Phillips head screwdriver not included to tighten the screws...

Page 11: ...o the large drawer front N Secure the large drawer sides J K by rotating small cam locks 3 1 2 turn clockwise using a Phillips head screwdriver not included Slide the drawer bottom I into the grooves...

Page 12: ...support rail M Attach large drawer back L to the large drawer sides J K and drawer support rail M with screws 6 using a Phillips head screwdriver not included Attach handle 9 to the large drawer fron...

Page 13: ...l drawer front R Secure the small drawer sides P O by rotating small cam locks 3 1 2 turn clockwise using a Phillips head screwdriver not included Slide the drawer bottom I into the grooves of small d...

Page 14: ...11 7 Insert wood dowels 11 into the drawer support rail M Attach small drawer back Q to the small drawer sides P O and drawer support rail M with screws 6 Use a Phillips head screwdriver not included...

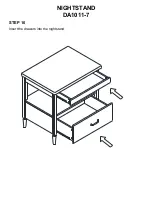
Page 15: ...STEP 10 NIGHTSTAND DA1011 7 Insert the drawers into the nightstand...

Page 16: ...may result in instability or cause possible injury DO NOT RETURN PRODUCT TO THE STORE If a part is missing or damaged contact our customer service department We will replace the part FREE of charge Te...

Page 17: ...e Name Shipping Address Street Number City State Zip Code Day Time Phone Number including area code Date Place of Purchase Part s description and quantity Please be sure to list model number or SKN nu...

Page 18: ...mportancia a Dorel Asia a la satisfacci n de nuestros clientes Nuestros representantes est n disponibles de lunes a viernes de 8 h a 17 h hora del este para responder a todas sus preguntas Con el fin...

Page 19: ...l ctricas No use la unidad si est da ado o roto CUIDADO Y LIMPIEZA L mpiela regularmente con un pa o suave para evitar la acumulaci n de suciedad Ocasionalmente se puede usar un pa o h medo para limpi...

Page 20: ...ZAS 3 5 15 mm 5 32 7 8 TORNILLO 12 PZAS PERNO 2 PZAS MANIJA 1 PZA 15 12 mm 6 36 mm 4 25 mm SEGURO DE LEVA GRANDE 18 PZAS PERNO DE LEVA PEQUE O 8 PZAS TORNILLO 12 PZAS MESA DE LUZ DA1011 7 6 37 mm 8 32...

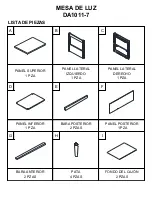
Page 21: ...G H I BARA ANTERIOR 2 PZAS PATA 4 PZAS FONDO DEL CAJ N 2 PZAS PANEL INFERIOR 1 PZA BARA POSTERIOR 2 PZAS PANEL POSTERIOR 1 PZA MESA DE LUZ DA1011 7 PANEL SUPERIOR 1 PZA PANEL LATERAL IZQUIERDO 1 PZA...

Page 22: ...PEQUE O 1 PZA LADO POSTERIOR CAJ N PEQUE O 1 PZA FRENTE CAJ N PEQUE O 1 PZA BARRA DE SOPORTE CAJ N 2 PZAS FRENTE CAJ N GRANDE 1 PZA LADO DERECHO CAJ N PEQUE O 1 PZA MESA DE LUZ DA1011 7 LADO DERECHO...

Page 23: ...SA DE LUZ DA1011 7 Inserte pernos de leva grandes 1 en el panel lateral izquierdo B y en el panel lateral derecho C como ilustrado Coloque las patas H a paneles laterales B y C de las agujas del reloj...

Page 24: ...serte clavijas de madera 2 en el panel lateral izquierdo B y en el panel lateral derecho C Una los barras E G y S con el panel lateral izquierdo B y el panel lateral derecho C girando los seguros de l...

Page 25: ...ETAPA 3 MESA DE LUZ DA1011 7 Inserte pernos de leva grandes 1 en el panel superior A y panel inferior D...

Page 26: ...panel lateral derecho C Coloque el panel superior A y panel inferior D sobre la unidad ya armada girando los seguros de leva grandes 4 1 2 vuelta en sentido horario utilizando un destornillador Phill...

Page 27: ...ETAPA 5 MESA DE LUZ DA1011 7 Una el panel posterior F al marco ya armado con tornillos 7 Utilice un destornillador Phillips no incluido para ajustar los tornillos...

Page 28: ...rente caj n grande N Fije los lados del caj n grandes K y J girando los seguros de leva peque os 3 1 2 vuelta en sentido horario con un destornillador Phillips no incluido Deslice el fondo del caj n I...

Page 29: ...e caj n M Una el lado posterior caj n grande L con los lados del caj n grande K y J y barra de soporte caj n M utilizando tornillos 6 y destornillador Phillips no incluido Instale una manija 9 en el f...

Page 30: ...eque o R Fije los lados del caj n peque os P y O girando los seguros de leva peque os 3 1 2 vuelta en sentido horario con un destornillador Phillips no incluido Deslice el fondo del caj n I en las ran...

Page 31: ...de madera 11 en la barra de soporte caj n M Una el lado posterior caj n peque os Q con los lados del caj n peque os P y O y barra de soporte caj n M utilizando tornillos 6 Utilice un destornillador Ph...

Page 32: ...ETAPA 10 MESA DE LUZ DA1011 7 Inserte todos los cajones en la mesa de luz...

Page 33: ...puede provocar inestabilidad y causar heridas NO DEVUELVA EL PRODUCTO A LA TIENDA Si falta una pieza o est da ada contacte nuestro departamento de servicio a la clientela Reemplazaremos la pieza SIN c...

Page 34: ...Descripci n de pieza s y cantidad Por favor aseg rese de incluir n mero de modelo o n mero SKN Servicio a la Clientela POR FAVOR CONTACTE LOS REPRESENTANTES DEL SERVICIO A LA CLIENTELA A LOS SIGUIENTE...

Page 35: ...uble aussi beau qu aux premiers jours La satisfaction de nos clients est important pour nous chez Dorel Asia Nos repr sentants sont disponibles du lundi au vendredi de 8 h 17 h heure de l est pour r p...

Page 36: ...er si il est endommag ou bris e Deux personnes peuvent tre n cessaires pour l assemblage et la manipulation Le temps d assemblage estim est de 60 minutes ENTRETIEN ET NETTOYAGE poussetez r guli rement...

Page 37: ...12 PCES 3 5 15 mm 5 32 7 8 VIS 12 PCES BOULON 2 PCES POIGN E 1 PCE 15 12 mm 6 36 mm 4 25 mm VERROUILLAGE CAME GRAND 18 PCES BOULON CAME PETIT 8 PCES VIS 12 PCES TABLE DE NUIT DA1011 7 6 37 mm 8 32 mm...

Page 38: ...I BARRE AVANT 2 PCES PATTE 4 PCES FOND DU TIROIR 2 PCES PANNEAU INF RIEUR 1 PCE BARRE ARRI RE 2 PCES PANNEAU POST RIEUR 1 PCE TABLE DE NUIT DA1011 7 PANNEAU DU DESSUS 1 PCE PANNEAU LAT RAL GAUCHE 1 P...

Page 39: ...OIR GAUCHE PETIT 1 PCE C T ARRI R TIROIR PETIT 1 PCE DEVANT TIROIR PETIT 1 PCE BARRE DE SUPPORT TIROIR 2 PCES DEVANT TIROIR GRAND 1 PCE C T TIROIR DROIT PETIT 1 PCE TABLE DE NUIT DA1011 7 C T TIROIR D...

Page 40: ...DA1011 7 Ins rez des boulons came grands 1 dans le panneau lat ral gauche B et le panneau lat ral droit C comme illustr Attachez les pattes H aux panneaux lat ral B et C en tournant dans le sens des a...

Page 41: ...goujons de bois 2 dans le panneau lat ral gauche B et dans le panneau lat ral droit C Fixez les barres E G et S au panneau lat ral gauche B et au panneau lat ral droit C en tournant les verrouillages...

Page 42: ...TAPE 3 TABLE DE NUIT DA1011 7 Ins rez des boulons came grands 1 dans le panneau du dessus A et panneau inf rieur D...

Page 43: ...anneau lat ral droit C Placez le panneau du dessus A et panneau inf rieur D sur l unit d j assembl e en tournant les verrouillages came grands 4 1 2 tour dans le sens des aiguilles d une montre en uti...

Page 44: ...TAPE 5 TABLE DE NUIT DA1011 7 Fixez le panneau post rieur F au cadre d j assembl avec des vis 7 Utilisez un tournevis cruciforme non compris pour serrer les vis...

Page 45: ...che grand N Fixez les c t s du tiroir grands K et J en tournant les verrouillages came petits 3 1 2 tour dans le sens des aiguilles d une montre l aide d un tournevis cruciforme non compris Glissez le...

Page 46: ...tiroir M Attachez le c t arri r tiroir grand L aux c t s du tiroir grands K et J et barre de support tiroir M avec des vis 6 en utilisant le tournevis cruciforme non compris Attachez une poign e 9 au...

Page 47: ...les c t s du tiroir petits P et O en tournant les verrouillages came petits 3 1 2 tour dans le sens des aiguilles d une montre l aide d un tournevis cruciforme non compris Glissez le fond du tiroir I...

Page 48: ...des goujons de bois 11 dans la barre de support tiroir M Attachez le c t arri r tiroir petit Q aux c t s du tiroir petits P et O et barre de support tiroir M avec des vis 6 Utilisez un tournevis cruc...

Page 49: ...TAPE 10 TABLE DE NUIT DA1011 7 Ins rez tous les tiroirs dans la table de nuit...

Page 50: ...iqu s peut entra ner de l instabilit et causer des blessures NE PAS RETOURNER LE PRODUIT AU MAGASIN Si une pi ce est manquante ou endommag e contactez notre Service la client le Nous remplacerons la p...

Page 51: ...ince Code Postal No de t l phone jour incluant le code r gional Date Nom du Magasin Description quantit de pi ce s S V P ne pas oublier le num ro de mod le ou de SKU Service la Client le No de t l pho...

Reviews: