background image

*

*

*

*

*

*

*

*
*

*

*

*

*

*

*
*

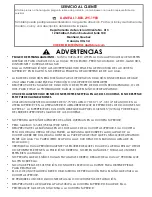
SIEMPRE UTILICE LA ESCALERILLA PARA SUBIR A LA CUCHETA SUPERIOR O BAJAR DE ELLA.
PROHIBA QUE MÁS DE UN NIÑO SUBA A LA CUCHETA SUPERIOR.

SIEMPRE UTILICE LAS BARANDAS EN LOS DOS LADOS DE LA CUCHETA SUPERIOR. SI LA CUCHETA 
ESTÁ COLOCADA CERCA DE UNA PARED, LA BARANDA QUE CUBRE EL LADO LARGO DE LA 
CUCHETA DEBE SER COLOCADA CONTRA LA PARED PARA EVITAR QUE EL NIÑO QUEDE ATRAPADO 
ENTRE LA CAMA Y LA PARED (ESTO SE APLICA A LAS CUCHETAS CON BARANDA LARGA DE UN 
SOLO LADO).
VERIFIQUE LA CAMA PERIÓDICAMENTE Y ASEGÚRESE DE QUE EL CUADRO, LA ESCALERILLA Y OTROS 
COMPONENTES ESTÉN EN LA POSICIÓN CORRECTA, NO ESTÉN DAÑADOS Y TODAS LAS UNIONES 
ESTÉN BIEN AJUSTADAS.
NO PERMITA QUE LOS NIÑOS HAGAN PAYASADAS SOBRE O DEBAJO DE LA CAMA Y PROHIBA QUE 
SALTEN SOBRE ELLA.
NO UTILICE PIEZAS DE SUSTITUCIÓN. CONTACTE EL SERVICIO AL CLIENTE PARA OBTENER PIEZAS 
PARA REMPLAZAR.

EL USO DE UNA VELADORA SIRVE COMO MEDIDA DE PRECAUCIÓN PARA EL NIÑO QUE UTILIZA LA 
CUCHETA SUPERIOR.
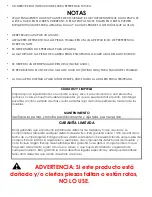
SE PROHIBE EL USO DE COLCHONES DE AGUA O COLCHONETAS DE FLOTACIÓN.

LA BASE DEL COLCHÓN ESTÁ DISEÑADA PARA SOPORTAR UN COLCHÓN SIN NECESIDAD DE USAR 
UNA TABLA PARA MANTENER LA POSICIÓN O UN SOPORTE CON RESORTES.
SIEMPRE UTILICE EL TAMAÑO DE COLCHÓN O DE SOPORTE DE COLCHÓN RECOMENDADO, O LOS 
DOS, PARA EVITAR LA POSIBILIDAD DE CAÍDAS O QUE EL NIÑO QUEDE ATRAPADO.

UTILICE SOLAMENTE COLCHONES CON RESORTES EN ESPIRAL EN LAS DOS CUCHETAS. EL NO RESPETAR 
ESTO PUEDE CAUSAR LESIONES.
UTILIZAR ÚNICAMENTE COLCHONES DE 74"-75" DE LARGO Y DE 37 1/2" - 38 1/2" DE ANCHO EN LA 
LITERA SUPERIOR Y EN LA LITERA INFERIOR. ASEGÚRESE DE QUE EL ESPESOR DE LOS COLCHONES NO 
SUPERE 6".  LA SUPERFICIE DEL COLCHÓN DEBE QUEDAR POR LO MENOS 5" (127MM) POR DEBAJO 
DEL BORDE SUPERIOR DEL MARCO DE LAS CUCHETAS.

NO PERMITA QUE NIÑOS MENORES DE 6 AÑOS DUERMAN EN LA CUCHETA SUPERIOR.

PESO MÁXIMO: 165 LBS (75 KGS) POR NIVEL.

Montreal, Quebec

Canada, H1G 3L1

CORREO ELECTRÓNICO: das@dorel.com

   ADVERTENCIAS

PELIGRO DE ESTRANGULAMIENTO - NUNCA CUELGUE O ATE EN LA CAMA ARTÍCULOS QUE NO ESTÉN 
DISEÑADOS PARA USARLOS CON LA CAMA; POR EJEMPLO, PERO NO LIMITADO A ESTO, GANCHOS, 
CINTURONES Y CUERDAS DE SALTAR.
SIGA LA INFORMACIÓN DE LAS ADVERTENCIAS INSCRITAS EN LA ESTRUCTURA DE LA CUCHETA 
SUPERIOR Y EN EL CARTÓN. NO RETIRE LA ETIQUETA DE ADVERTENCIAS DE LA CAMA.

SERVICIO AL CLIENTE

Si faltan piezas o si tiene alguna pregunta sobre este producto, ¡comuníquese con nuestro representante de 
servicio!

LLAME AL 1-800-295-1980 

También puede pedir piezas escribiendo a la siguiente dirección. Por favor incluya el número de 
modelo, color y una descripción detallada de la pieza.

Departamento de Servicio al Cliente No. 413

12345 Albert-Hudon Boulevard, Suite 100

Summary of Contents for DL7891

Page 1: ...T RETURN PRODUCT TO THE STORE If a part is missing or damaged contact our customer service department We will replace the part FREE of charge NOTE THIS INSTRUCTION BOOKLET CONTAINS IMPORTANT SAFETY IN...

Page 2: ...BUNKS ENSURE THICKNESS OF MATTRESS DOES NOT EXCEED 6 SURFACE OF MATTRESS MUST BE AT LEAST 5 127MM BELOW THE UPPER EDGE OF GUARDRAILS DO NOT ALLOW CHILDREN UNDER 6 YEARS OF AGE TO USE THE UPPER BUNK AL...

Page 3: ...does not apply to any product which has been improperly assembled subjected to misuse or abuse or which has been altered or repaired in any way This warranty gives you specific legal rights and you m...

Page 4: ...X HEAD BARREL NUT 6 5mm x 100mm 4mm x 35mm 10mm x 100mm 4mm x 30mm WOOD JOINT CONNECTOR 4mm HEX HEAD 24 PCS FLAT HEAD SCREW 24 PCS JOINT CONNECTOR 4mm HEX HEAD 16 PCS WOOD JOINT CONNECTOR 4mm HEX HEAD...

Page 5: ...B C D E F BOTTOM POST TWIN BUNK BED HEADBOARD TOP CROSS 2 PCS 2 PCS 4 PCS TOP POST 1 PC TOP POST 2 PCS TOP POST 1 PC BOTTOM POST A B B C D D E E F F F F G G G H I J K G L L L L L L L L L N N O P Q Q Q...

Page 6: ...PCS 1 PC RIGHT LADDER END LADDER STEP GUARDRAIL LEG 1 PC 3 PCS 2 PCS 1 PC HEADBOARD BOTTOM CROSS 4 PCS TOP FRONT SIDE RAIL 1 PC SLAT WITHOUT WOOD DOWEL BACK SIDE RAIL BOTTOM BACK SIDE RAIL 2 PCS 2 PC...

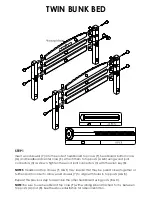
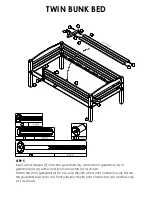
Page 7: ...1 Insert wood dowels 7 into the ends of headboard top cross F headboard bottom cross G and headboard center cross S Attach them to top posts A B using wood joint connectors 3 as shown Tighten the wood...

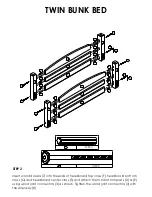
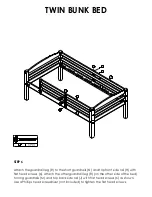
Page 8: ...s of headboard top cross F headboard bottom cross G and headboard center cross S and attach them to bottom posts D E using wood joint connectors 3 as shown Tighten the wood joint connectors 3 with the...

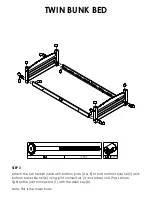
Page 9: ...lower bunk Attach the two headboards with bottom posts D E to bottom front side rail I and bottom back side rail K using joint connectors 1 and barrel nuts 9 as shown Tighten the joint connectors 1 w...

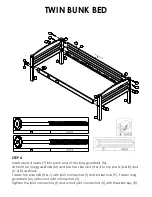
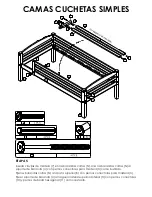
Page 10: ...two long guardrails M and two top side rails H J to top posts A B and C B as shown Fasten top side rails H J with joint connectors 1 and barrel nuts 9 Fasten long guardrails M with wood joint connecto...

Page 11: ...3 Fasten the guardrail post U to top front side rail H with joint connectors 10 and hex cap 11 as shown TWIN BUNK BED Insert wood dowels 7 into short guardrails N Attach short guardrails N to guardra...

Page 12: ...top front side rail H with flat head screws 6 Attach the other guardrail leg R on the other side of the bed to long guardrails M and top back side rail J with flat head screws 6 as shown Use a Phillip...

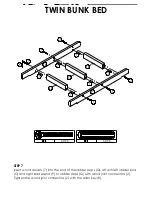
Page 13: ...BED Insert wood dowels 7 into the end of the ladder steps Q Attach left ladder end O and right ladder end P to ladder steps Q with wood joint connectors 2 Tighten the wood joint connectors 2 with the...

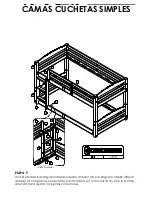
Page 14: ...STEP 8 TWIN BUNK BED insert the metal dowels 5 into the holes in the bottom posts D and E Stack the top bunk onto the bottom bunk with the help of another person 5 5 5 5 A B B C E D D H I...

Page 15: ...D Attach the ladder to the top front side rail H and bottom front side rail I with wood joint connectors 2 as shown Use Allen key 8 to tighten the joint connectors A H I O P D N U A D P O H I N U 8 2...

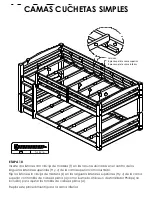
Page 16: ...th wood dowel T into the center slots of the top side rails H J of the upper bunk as shown Attach slats without wood dowel L onto top side rails H J of the upper bunk with flat head screws 4 as shown...

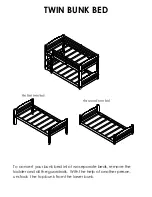
Page 17: ...TWIN BUNK BED To convert your bunk bed into two separate beds remove the ladder and all the guardrails With the help of another person unstack the top bunk from the lower bunk...

Page 18: ...CH ARE 74 75 LONG AND 37 1 2 38 1 2 WIDE ON UPPER AND ON LOWER BUNKS ENSURE THICKNESS OF MATTRESS DOES NOT EXCEED 6 DO NOT ALLOW CHILDREN UNDER 6 YEARS OF AGE TO USE THE UPPER BUNK BED IS DESIGNED FOR...

Page 19: ...Street Number City State Zip Code Day Time Phone Number including area code Date Place of Purchase Part s description and quantity Please be sure to list model number or SKN number Customer Service R...

Page 20: ...preguntas Con el fin de acelerar el servicio por favor tenga a mano el n mero de modelo cuando llame a nuestro n mero sin coste 1 800 295 1980 o por correo electr nico a das dorel com Para obtener m...

Page 21: ...RECOMENDADO O LOS DOS PARA EVITAR LA POSIBILIDAD DE CA DAS O QUE EL NI O QUEDE ATRAPADO UTILICE SOLAMENTE COLCHONES CON RESORTES EN ESPIRAL EN LAS DOS CUCHETAS EL NO RESPETAR ESTO PUEDE CAUSAR LESION...

Page 22: ...ue haya sido mal armado sujeto a mal uso o abuso o que haya sido alterado o reparado de cualquier manera Esta garant a le da las derechas legales espec ficas y usted puede tambi n tener otras derechas...

Page 23: ...S PERNO CONECTOR MADERA 4MM CABEZA HEXAGONAL 10 PCS CAMAS CUCHETAS SIMPLES 1 4 x 100mm 6 5mm x 48mm 6 5mm x 100mm 4mm x 35mm 10mm x 100mm 4mm x 30mm PERNO CONECTOR MADERA 4MM CABEZA HEXAGONAL 24 PCS T...

Page 24: ...INFERIOR CAMAS CUCHETAS SIMPLES TRAVESA O SUPERIOR CABECERA 2 PCS 2 PCS 4 PCS PATA SUPERIOR 1 PC PATA SUPERIOR 2 PCS PATA SUPERIOR 1 PC PATA INFERIOR A B B C D D E E F F F F G G G H I J K G L L L L L...

Page 25: ...C 1 PC POSTERIOR 1 PC 12 PCS 1 PC TRAVESA O INFERIOR CABECERA 4 PCS LARGUERO LATERAL SUPERIOR ANTERIOR 1 PC LIST N SIN CLAVIJA DE MADERA LARGUERO LATERAL POSTERIOR LARGUERO LATERAL INFERIOR 2 PCS 2 PC...

Page 26: ...mos del travesa o superior de la cabecera F del travesa o inferior de la cabecera G y del travesa o central de la cabecera S nalos con las patas superiores A y B con pernos conectores para madera 3 co...

Page 27: ...perior de cabecera F del travesa o inferior de cabecera G y del travesa o central de cabecera S y nalos con las patas inferiores D y E con pernos conectores para madera 3 como ilustrado Ajuste los per...

Page 28: ...las dos cabeceras con las patas inferiores D y E al larguero lateral inferior anterior I y al larguero lateral inferior posterior K con pernos conectores 1 y tuercas barrilete 9 como ilustrado Ajuste...

Page 29: ...largueros laterales superiores H y J con las patas superiores A y B y C y B como ilustrado Fije los largueros laterales superiores H y J con pernos conectores 1 y tuercas barrilete 9 Fije las baranda...

Page 30: ...U al larguero lateral superior anterior H con pernos conectores 10 y pernos de brida hexagonal 11 como ilustrado CAMAS CUCHETAS SIMPLES Inserte clavijas de madera 7 en las barandas cortas N Una las ba...

Page 31: ...erior H con tornillos de cabeza plana 6 Una el otro soporte de baranda R del otro lado de la cama con las barandas largas M y el larguero lateral superior posterior J con tornillos de cabeza plana 6 c...

Page 32: ...as de madera 7 en los extremos de los escalones Q Una el lado izquierdo de la escalera O y el lado derecho de la escalera P a los escalones Q con pernos conectores para madera 2 Ajuste los pernos cone...

Page 33: ...TAS SIMPLES Inserte las clavijas de metal 5 en los agujeros de las patas inferiores D y E Con la ayuda de otra persona coloque la cama superior sobre la cama inferior 5 5 5 5 A B B C E D D H I Agujero...

Page 34: ...ro lateral superior anterior H y al larguero lateral inferior anterior I con pernos conectores para madera 2 como ilustrado Utilice la llave Allen 8 para ajustar los pernos conectores A H I O P D N U...

Page 35: ...les superiores H y J de la cama superior como ilustrado Fije los listones sin clavija de madera L en los largueros laterales superiores H y J de la cama superior con tornillos de cabeza plana 4 como i...

Page 36: ...Para convertir las camas cuchetas en dos camas simples separadas retire la escalera y todas las barandas Con la ayuda de otra persona retire la cama superior de la cama inferior La primera cama simple...

Page 37: ...CAMA EST DISE ADA PARA NI OS DESDE 6 A OS HASTA LA ADOLESCENCIA TEMPRANA UTILICE SOLAMENTE COLCHONES CON RESORTES EN ESPIRAL EN LAS DOS CUCHETAS EL NO RESPETAR ESTO PUEDE CAUSAR UTILICE NICAMENTE COLC...

Page 38: ...digo postal N mero de tel fono horario diurno incluyendo c digo de regi n Fecha y lugar de compra Descripci n de pieza s y cantidad Por favor aseg rese de indicar el n mero de modelo o n mero SKN Serv...

Page 39: ...vos questions Afin d acc l rer le service ayez toujours en main le num ro de mod le lorsque vous contacterez notre num ro sans frais 1 800 295 1980 ou par courriel das dorel com Pour trouver d autres...

Page 40: ...E D PASSE PAS 6 LA SURFACE DE MATELAS DOIT TRE AU MOINS DE 5 127MM CI DESSOUS DE LA BANDE SUP RIEURE DE GUARDRAILS NE PAS PERMETTRE AUX ENFANTS DE MOINS DE 6 ANS D UTILISER LE LIT SUP RIEUR TOUJOURS U...

Page 41: ...qui a t alt r ou r par d une fa on quelconque Cette garantie vous donne des droits l gaux sp cifiques et vous pouvez galement avoir d autres droits qui varient d une province l autre MISE EN GARDE Si...

Page 42: ...BOULON DE RACCORDEMENT BOIS 4MM T TE HEXAGONALE 10 PCS LITS SIMPLES SUPERPOS S 1 4 x 100mm 6 5mm x 48mm 6 5mm x 100mm 4mm x 35mm 10mm x 100mm 4mm x 30mm BOULON DE RACCORDEMENT BOIS 4MM T TE HEXAGONAL...

Page 43: ...IEUR LITS SIMPLES SUPERPOS S TRAVERSE SUP RIEURE T TE DE LIT 2 PCS 2 PCS 4 PCS PIED SUP RIEUR 1 PC PIED SUP RIEUR 2 PCS PIED SUP RIEUR 1 PC PIED INF RIEUR A B B C D D E E F F F F G G G H I J K G L L L...

Page 44: ...1 PC 1 PC 1 PC 12 PCS 1 PC TRAVERSE INF RIEURE T TE DE LIT 4 PCS BARRE LAT RALE SUP RIEURE AVANT 1 PC LATTE SANS GOUJON DE BOIS BARRE LAT RALE ARRI RE BARRE LAT RALE INF RIEURE ARRI RE 2 PCS 2 PCS C...

Page 45: ...de la traverse sup rieure de la t te de lit F dans la traverse inf rieure de la t te de lit G et dans la traverse centrale de la t te de lit S Fixez les aux pieds sup rieurs A et B avec des boulons de...

Page 46: ...de lit F dans la traverse inf rieure de t te de lit G et dans la traverse centrale de t te de lit S et fixez les aux pieds inf rieurs D et E avec des boulons de raccordement pour bois 3 tel qu illust...

Page 47: ...t tes de lit aux pieds inf rieurs D et E la barre lat rale inf rieure avant I et la barre lat rale inf rieure arri re K avec des boulons de raccordement 1 et des crous transversaux 9 tel qu illustr Se...

Page 48: ...sup rieures H et J aux pieds sup rieurs A et B et C et B tel qu illustr Fixez les barres lat rales sup rieures H et J avec des boulons de raccordement 1 et des crous transversaux 9 Fixez les barri re...

Page 49: ...lat rale sup rieure avant H avec des boulons de raccordement 10 et des vis t te hexagonale creuse 11 tel qu illustr LITS SIMPLES SUPERPOS S Ins rez des goujons de bois 7 dans les barri res courtes N F...

Page 50: ...e sup rieure avant H avec des vis t te plate 6 Fixez l autre support de barri re R de l autre c t du lit aux barri res longues M et la barre lat rale sup rieure arri re J avec des vis t te plate 6 tel...

Page 51: ...jons de bois 7 dans les extr mit s des marches Q Fixez le c t gauche de l chelle O et le c t droit de l chelle P aux marches Q avec des boulons de raccordement pour bois 2 Serrez les boulons de raccor...

Page 52: ...IMPLES SUPERPOS S Ins rez des goujons de m tal 5 dans les trous des pieds inf rieurs D et E Avec l aide d une autre personne placez le lit sup rieur sur le lit inf rieur 5 5 5 5 A B B C E D D H I Trou...

Page 53: ...rale sup rieure avant H et la barre lat rale inf rieure avant I avec des boulons de raccordement pour bois 2 tel qu illustr Servez vous de la cl Allen 8 pour serrer les boulons de raccordement A H I O...

Page 54: ...s lat rales sup rieures H et J du lit sup rieur tel qu illustr Fixez les lattes sans goujons de bois L aux barres lat rales sup rieures H et J du lit sup rieur avec des vis t te plate 4 tel qu illustr...

Page 55: ...S S Pour convertir les lits superpos s en deux lits simples retirez l chelle et toutes les barri res Avec l aide d une autre personne s parez le lit sup rieur du lit inf rieur Le premier lit simple Le...

Page 56: ...DONT L GE SE SITUE PARTIR DE 6 ANS JUSQU JEUNES ADOS UTILISEZ SEULEMENT DES MATELAS RESSORTS SUR LES LITS SUP RIEUR ET INF RIEUR D FAUT DE QUOI DES BLESSURES PEUVENT SE PRODUIRE UTILISEZ SEULEMENT DES...

Page 57: ...Code postal Num ro de t l phone de jour incluant le code r gional Date Lieu d achat Description de la des pi ce s et quantit S V P assurez vous d inscrire le num ro de mod le ou le num ro de produit S...

Reviews: