background image

31

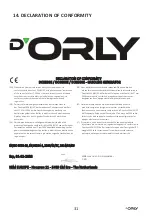
14. DECLARATION OF CONFORMITY

DDEECCLLAARRAATTIIO

ON

N O

OFF CCO

ON

NFFO

ORRM

MIITTYY

DDO

O55550000EE // DDO

O66000000EE // DDO

O88550000EE -- G

GAASSO

OLLIIN

NEE G

GEEN

NEERRAATTO

ORR

EErrpp,, 0011--0022--22002233

Willem van den Crommenacker
C.E.O

KKEEM

M EEU

URRO

OPPEE -- H

Hooooggvveenn 1111 -- 55446699 EEM

M EErrpp -- TThhee N

Neetthheerrllaannddss

EENN IISSOO 88552288--1133,, EENN 6600220044--11,, 22000066//4422//EECC,, 22001144//3355//EEUU

(EN)  We declare under our sole responsibility that this product is in 

conformity with directive 2006/42/EC of the European parliament and 
of the council of May 17, 2006 on the restriction of the use of certain 
hazardous substances in electrical and electronic equipment is in 
conformity and accordance with the following standards and 
regulations:

(DE)  Der Hersteller erklärt eigenverantwortlich, dass dieses Produkt 

der Direktive 2006/42/EC des Europäischen Parlaments und des Rats 
vom 17. Mai 2006 über die Einschränkung der Anwendung von 
bestimmten gefährlichen Stoffen in elektrischen und elektronischen 
Geräten entspricht. den folgenden Standards und Vorschriften 
entspricht:

(NL)  Wij verklaren onder onze volledige verantwoordelijkheid dat dit 

product voldoet aan de conform Richtlijn 2006/42/EC van het Europees 
Parlement en de Raad van 17 juni 2006 betreffende beperking van het 
gebruik van bepaalde gevaarlijke stoffen in elektrische en elektronische 
apparatuur en in overeenstemming is met de volgende standaarden en 
reguleringen:

(FR)  Nous déclarons sous notre seule responsabilité que ce produit 

est conforme aux standards et directives suivants: est conforme à la 
Directive 2006/42/EC du Parlement Européen et du Conseil du 17 mai 
2006 concernant la limitation d’usage de certaines substances 
dangereuses dans l’équipement électrique et électronique.

(ES)    Declaramos bajo nuestra exclusiva responsabilidad que este 

producto cumple con las siguientes normas y estándares de 
funcionamiento: se encuentra conforme con la Directiva 2006/42/EC 
del Parlamento Europeo y del Consejo de 17 de mayo de 2006 sobre 
la restricción del uso de determinadas sustancias peligrosas en los 
equipos eléctricos y electrónicos.

(IT)  Dichiariamo, sotto la nostra responsabilità, che questo prodotto 

è conforme alle normative e ai regolamenti seguenti: è conforme alla 
Direttiva 2006/42/EC del Parlamento Europeo e del Consiglio dell’17 
maggio 2006 sulla limitazione dell’uso di determinate sostanze 
pericolose nelle apparecchiature elettriche ed elettroniche.

Summary of Contents for DO5500E

Page 1: ...genera tors OWNERS Manual DO5500E DO6000E DO8500E EN EN...

Page 2: ...ng the generator to ensure it is used safely and responsibly Always make sure that everybody who operates the generator has read the manual and is aware of its operation requirements Failing to do so...

Page 3: ...ARTING THE GENERATOR 10 4 GENERATOR OPERATION 13 5 PRE OPERATION CHECK 16 6 STARTING THE ENGINE 18 7 STOPPING THE ENGINE 19 8 MAINTENANCE 20 9 STORAGE 26 10 TROUBLESHOOTING 27 11 WIRING DIAGRAM 28 12...

Page 4: ...efore operating your generator You can prevent accidents by being familiar with your generator s controls and by observing safe operating procedures Do not use indoors Do not connect directly to a hom...

Page 5: ...should match with the generator equipment Do not operate the generator before grounding When using extension cords do not exceed a length of 60m for 1 5mm cable and a length of 100m for 2 5mm cable K...

Page 6: ...tector Environmental temperature could trigger the overcurrent protector Change the overcurrent protector with one that fits the local environment if neccessary Do not switch the output voltage while...

Page 7: ...ROUND TERMINAL TERMINAL BATTERY BATTERY DC TERMINAL DC TERMINAL POSTS POSTS OIL DIPSTICK OIL DIPSTICK RECOIL STARTER GRIP RECOIL STARTER GRIP AIR CLEANER AIR CLEANER FUEL VALVE FUEL VALVE CHOKE LEVER...

Page 8: ...ND TERMINAL TERMINAL BATTERY BATTERY DC TERMINAL DC TERMINAL POSTS POSTS OIL DIPSTICK OIL DIPSTICK RECOIL STARTER GRIP RECOIL STARTER GRIP AIR CLEANER AIR CLEANER FUEL VALVE FUEL VALVE CHOKE LEVER CHO...

Page 9: ...9 2 Engine type serial number MODEL NUMBER MODEL NUMBER SERIAL NUMBER SERIAL NUMBER FINISHED FINISHED PRODUCT PRODUCT NUMBER NUMBER...

Page 10: ...eturn it gently to prevent damage to the starter 3 Fuel valve The fuel valve controls fuel flowing from the fuel tank to the carburetor Switch on the fuel valve before starting the engine Make sure to...

Page 11: ...unning slowly put turn the lever into the default open position Depending on your generator type 5 AC Circuit breaker Overload current will automatically switch OFF the circuit breaker to avoid short...

Page 12: ...is especially designed to prevent engine damage caused by an insufficient amount of oil in the crankcase When the oil level in the crankcase falls below the safe limit the oil alert system will autom...

Page 13: ...Connecting to a home power supply When connecting the generator to a home power supply the connection must be made by a qualified electrician After installing the connection must be carefully checked...

Page 14: ...l combined loads resistive capacitive and inductive does not exceed the rated power of the generator Overload operation will greatly shorten generator service life When connecting multiple loads or ap...

Page 15: ...ide a power supply for lower power DC loads and charging other batteries The terminals are colored as such red to identify the positive terminal and black to identify the negative terminal Load connec...

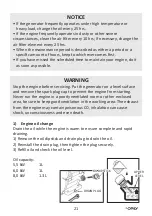
Page 16: ...d engine oil until oil level can reach the upper mark on the dipstick After adding the oil do not forget to refinsert the dipstick and screw it in tight 1 Engine oil Engine oil is a major factor affec...

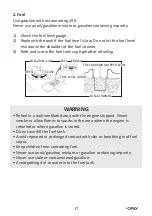
Page 17: ...PTY FUEL MAXIMUM UPPER LEVEL FUEL MAXIMUM UPPER LEVEL FUEL STRAINER FUEL STRAINER FUEL LEVEL GAUGE FUEL LEVEL GAUGE Refuel in a well ventilated area with the engine stopped Never smoke or allow flames...

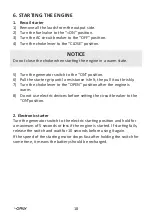
Page 18: ...switch for some time it means the battery should be recharged NOTICE 1 Recoil starter 1 Remove all the loads from the output side 2 Turn the fuel valve to the ON position 3 Turn the AC circuit breake...

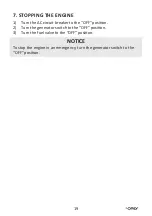
Page 19: ...reaker to the OFF position 2 Turn the generator switch to the OFF position 3 Turn the fuel valve to the OFF position To stop the engine in an emergency turn the generator switch to the OFF position NO...

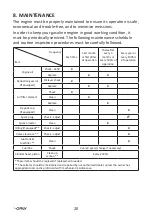
Page 20: ...00hrs of operation Engine oil Check Refill x Replace x x Reduction gear oil if equipped Oil level check x Replace x x Air filter element Check x Clean x Replace x Deposit cup if equipped Clean x Spark...

Page 21: ...e generator on a level surface and remove the spark plug cap to prevent the engine from starting Never run the engine in a poorly ventilated room or other enclosed area be sure to keep good ventilatio...

Page 22: ...still advisable to thoroughly wash your hands with soap and water as soon as possible after handling used oil WARNING Please dispose of used engine oil in a manner that is compatible with the environm...

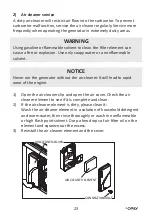
Page 23: ...ently when operating the generator in extremely dusty areas 1 Open the air cleaner clip and open the air cover Check the air cleaner element to see if it is complete and clean 2 If the air cleaner ele...

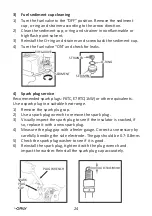
Page 24: ...suitable heat range 1 Remove the spark plug cap 2 Use a spark plug wrench to remove the spark plug 3 Visually inspect the spark plug to see if the insulator is cracked if so replace it with a new spa...

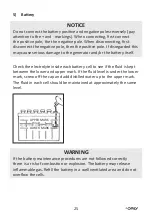
Page 25: ...ry maintenance procedures are not followed correctly there is a risk of combustion or explosion The battery may release inflammable gas Refill the battery in a well ventilated area and do not overflow...

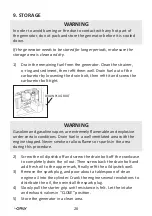
Page 26: ...ator Clean the strainer o ring and sediment then refit them well Drain fuel out of the carburetor by loosening the drain bolt then refit it and screw the carburetor bolt tight 2 Screw the oil dipstick...

Page 27: ...nough oil in the engine Is there a spark from the spark plug Is the fuel reaching the carburetor If the engine still does not start take the generator to an authorized dealer No power supply Is the AC...

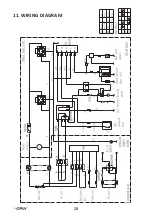
Page 28: ...28 11 WIRING DIAGRAM...

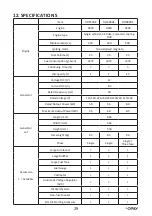
Page 29: ...y L 1 1 1 3 Generator Voltage DC V 12 Current DC A 8 3 Rated Frequency Hz 50 Rated Voltage V 110 120 220 230 240 110 220 115 230 Rated Output Power kW 5 0 5 5 8 0 Maximum Output Power kW 5 5 6 0 8 5 G...

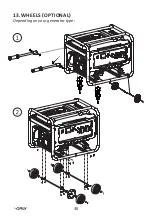
Page 30: ...30 Depending on your generator type 13 WHEELS OPTIONAL...

Page 31: ...andards und Vorschriften entspricht NL Wij verklaren onder onze volledige verantwoordelijkheid dat dit product voldoet aan de conform Richtlijn 2006 42 EC van het Europees Parlement en de Raad van 17...

Page 32: ...e actual parts due to revision and other changes Our company reserves the right to make changes at any time without notice and without incurring any obligation No part of this publication may be repro...

Reviews: