06.2 Changing the Blade
Changement
du
couteau
Cambio de cuchilla · Mudança da lâmina
You must regularly check the condition of the
blade and o
C QEB Ø?
re grommets. You may
proceed with their sharpening is necessary.
QQBKQFLK K
ever assemble an unbalanced blade.
In case o
CALR?Q >
ssemble a new blade.
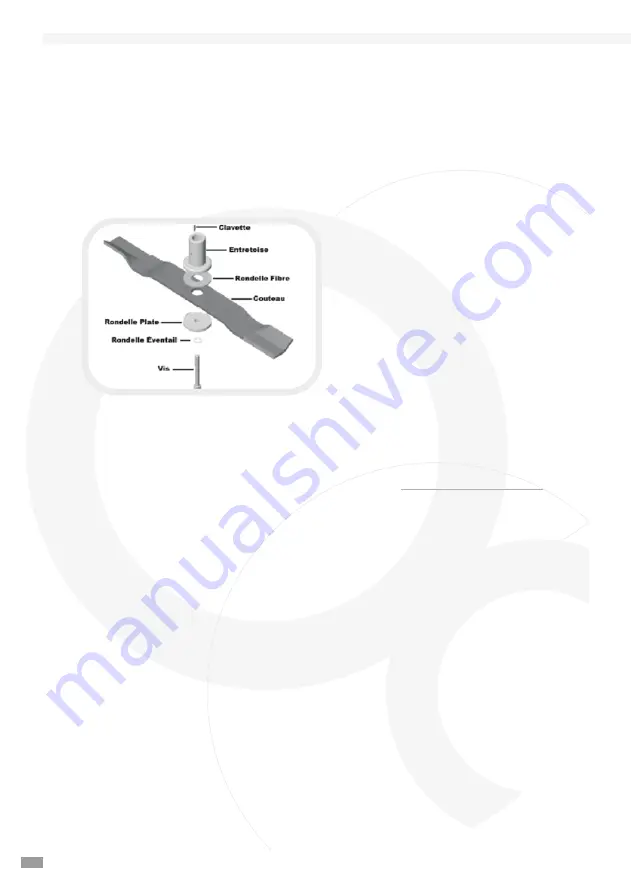
Changing the Blade
• When as
PBJ?IFKD QEB ?I>AB
follow the
order of assembly of the parts to the letter
according to the schematics.
• Place the conical grommet in the
appropriate place (with the conical shape
facing upwar
AP BKPROFKD QE>Q FQ
works
properly in the same surface level. Afterwards
place another conical grommet (with the
conical shape facing down).
• Place a sheeting gr
LJJBQ >Ø?
re gr
LJJBQ
QEB ?I>AB QEBK QEB PRMMLOQ D
rommet
BNRFMMBATFQE>Ø?
re grommet (the “ferodo”
oriented against the blade).
• Make sure the whole ensemble is well
centred after tightening the screw.
Devr
>FQSOFØBOODRIF
rement l'état du couteau et
des r
LKABIIBPABI>Ø?
re. Il peut fair
BP>ØKB
sse pour
être nécessaire.
QQBKQFLK KB G>J>FP FKPQ>IIBO RK
couteau
APNRFIF?O BK@>PABALRQB FKPQ>IIBORKKLR
veau
couteau.
Changement de la lame:
• Quand de l'as
PBJ?IB AB I>JB
respecter
consciencieusement l'ordre d'assemblée des
morceaux comme le schéma.
• Introduire la goupille demi-lune dans la veine du
JLQBRO MIRPQ>
rd mettre supporte de lame.
• Mettre une r
LKABIIB AB Ø?
r
B IB I>JB BQ
ØK>IBJBKQI>
rondelle de plate.
• Assurer du bon centre du gr
LRMB MIRPM
resser la
SFP
avec une rondelle éventail.
Deberá v
BOFØ@>O
regularmente el estado de la
@R@EFII>VABI>P>KFII>PABØ?
ra. Podrá efectuar su
>ØI>JFBKQLBK@R>KQLPB>KB
cesario.
Atención nunca montar una cuchilla desequilibr
>A>
en caso de duda montar una cuchilla nueva.
Montaje de la cuchilla.
• Dur
>KQB BI JLKQ>GB AB I> @R@EFII>
respetar
detalladamente el orden de montaje de las piezas
conforme el esquema.
• Introducir la anilla cónica en el sitio indicado ( la
forma cónica arriba) y asegurándose el buen
CRK@FLK>JFBKQLBKBIJFPJLMI>KLABPRMBOØ@FBP
en se
DRFA>
coloque la otra anilla cónica ( con la
forma cónica por abajo).
• C
LIL@>ORK>>KFII>AB@E>M> RK>>KFII>ABØ?
r
>
I>@R@EFII> VMLO¨IQFJLI>>KFII>AB>M
oyo equipada
MLOI>>KFII>ABØ?
ra ( o ferodo orientado contra la
cuchilla).
• Asegúrese que este centrado todo el c
LKGRKQL
después apretar el tornillo.
1


