background image

dormakaba 8900 SIS, SISJ, SISH, SISJH Installation Instructions

08279451

09-2019

8900 Surface Applied Closers

6

Top jamb mount

Fig.5 

Fig.6 

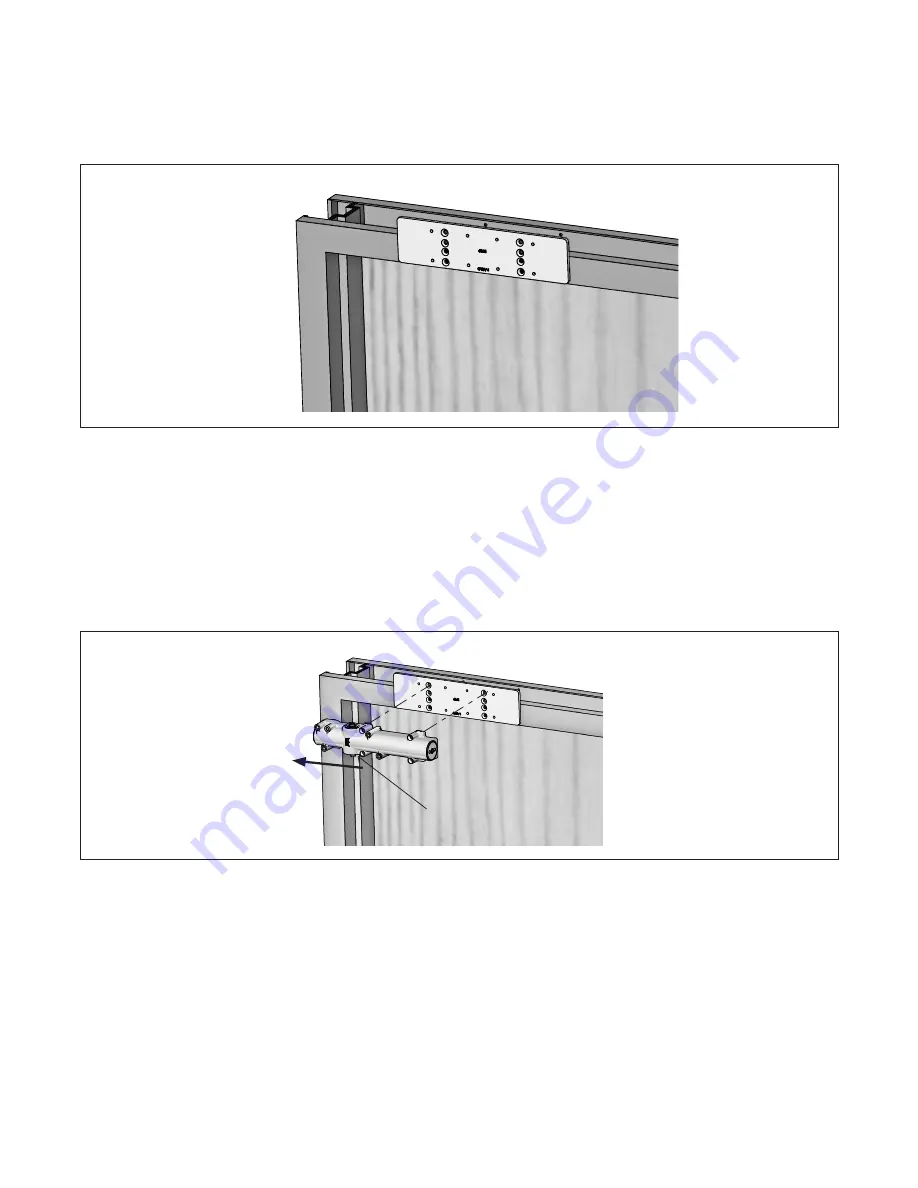
3.1  Mounting backplate/top plate (BP89)

3.2  Installing the surface closer

Instructions - top jamb mount

Left hand door 

shown

NOTE:  Backplate is required for frames under 3” in 
height.

1

Toward 

the hinge

Pinion

Left hand 

door shown

NOTE: Orient pinion toward the hinge.

3.1.1 

Secure plate to frame.

• 

Use four 1/4-20 x 5/8” flat head screws [#14 x 
1-1/2 Phillips flat head wood screws] provided.

3.2.1 

Secure closer body to plate.

• 

Use four 1/4-20 x 1-3/4” Phillips flat head 
screws provided with the plate itself.

Summary of Contents for 8900 SIS

Page 1: ...8900 SIS SISJ SISH SISJH Spring stop arm for regular and top jamb mount with hold open SISH SISJH Installation instructions 08279451 09 2019 EN ...

Page 2: ... mount 4 2 1 Installing the surface closer 4 1 4 Surface closer components 4 2 2 Securing main arm to door frame 5 2 3 Securing main arm to closer 5 3 Instructions top jamb mount 6 3 1 Mounting backplate top plate BP89 6 3 2 Installing the surface closer 6 3 3 Securing main arm to door frame 7 3 4 Securing main arm to closer 7 4 Adjustments 8 4 1 Adjust closing speeds sweep latch backcheck delayed...

Page 3: ... listings Maximum door opening degree is 180 Maximum 4 1 2 reveal on top jamb mounts for 110 degree openings Know the swing of the door which is being installed prior to installation Verify closer spring size prior to installation Make sure door efficiently operates prior to installing closer Drill bits 3 phillips screwdriver Metal 7 32 drill bit 1 4 20 tap 1 2 or 13mm box wrench Wood 5 32 bit 10 ...

Page 4: ...elayed action adjustment 4 Latch speed adjustment 5 Closer body 6 Closing sweep speed adjustment 7 Backcheck adjustment 8 Optional backplate 9 Damper assembly 10 Main arm 11 Connecting arm 12 Backcheck positioning Fig 2 1 4 Surface closer components Toward the hinge Closer Right hand door shown Pinion NOTE Orient pinion toward the hinge 2 1 1 Secure closer body to door Use four 1 4 20 x 2 Phillips...

Page 5: ... 8 x 1 2 torx head shoulder bolt provided 2 2 2 Secure damper assembly to frame Use two 5 16 x 2 flat head screws 20 x 2 flat head wood screws provided 2 2 3 Secure main arm to operator pinion 2 2 4 Use a torque wrench 25 ft lbs and provided pinion screw M8 x 30 socket head cap screw NOTE To disassemble hold open plate 2 2 5 Remove both screws from bottom of plate using a 3 16 hex key 2 2 6 Keepin...

Page 6: ...ructions top jamb mount Left hand door shown NOTE Backplate is required for frames under 3 in height 1 Toward the hinge Pinion Left hand door shown NOTE Orient pinion toward the hinge 3 1 1 Secure plate to frame Use four 1 4 20 x 5 8 flat head screws 14 x 1 1 2 Phillips flat head wood screws provided 3 2 1 Secure closer body to plate Use four 1 4 20 x 1 3 4 Phillips flat head screws provided with ...

Page 7: ...ng all washers in place flip plate over to orient as per image above Re secure plate with both screws 3 4 Securing main arm to closer Fig 8 3 4 1 Slide end of connecting arm into end of damper assembly 3 4 2 Secure connecting arm and bar shoe assembly 3 4 3 Use provided fastener 5 16 18 x 3 8 hex bolt Damper Damper assembly Main connecting arm assembly Pinion Pinion screw Adjusting tube Left hand ...

Page 8: ... from 110 70 Increase resistance Turn valve clockwise Decrease resistance Turn valve counter clockwise 4 1 4 Adjusting Backcheck positioning will advance approximately 15 in the ON position Shipped from factory fully ON Turn OFF Rotate counter clockwise Turn ON Rotate clockwise 4 1 5 Adjust Delayed Action for the are from 75 110 Increase delay Turn valve counter clockwise Decrease delay Turn valve...

Page 9: ...www dormakaba com dormakaba DORMA USA Inc 1 Dorma Drive Drawer AC Reamstown PA 17567 USA T 717 336 3881 F 717 336 2106 ...

Reviews: