background image

Product description

Technical Manual

14

HAC Standard fixing - 02/2018

dormakaba c-lever pro

3.3

Scope of delivery

1 inside unit

1 antenna cable

1 external fitting

2 batteries, AA lithium

1 coupling unit

1 drilling template

1 direction pin

Screws and elongations depending on
variant

1 spindle

Crimping tool (option)

1 inside lever handle

Adapter for programmer 1355-42B (op-
tion)

1 outside lever handle

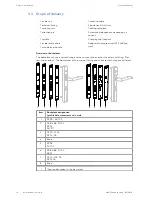
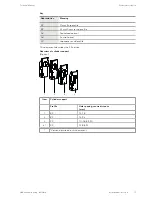
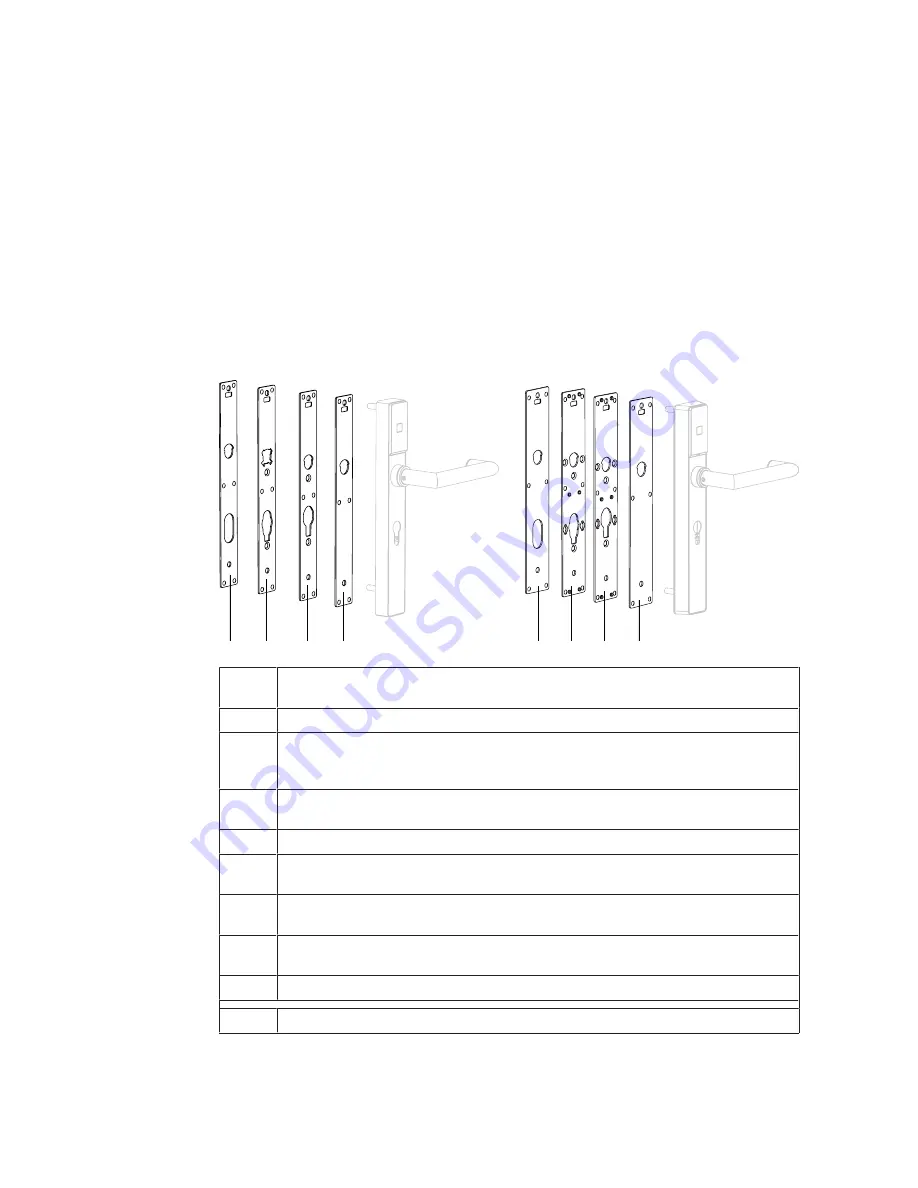
Overview of backplates

The backplates of the internal fitting are the same as the ones for the external fitting. “Nar-
row-wide variant”: The backplates of the internal fitting and the external fitting are different.

1

2

3

4

6

5

7

8

Item

Backplate designation
(profile hole measurement in mm)

1

PZ 98 / SK 105

2*

PZ 85, 88, 90, 92
RZ 94
AU 90

3

PZ 70, 72, 78 
RZ 74, 78

4

Blind

5

PZ 98,
SK 105

6*

PZ 85, 88, 90, 92
RZ 94

7

PZ 70, 72R, 78
RZ74, 78

8

Blind

*

*Version described in this document

Summary of Contents for c-lever pro

Page 1: ...dormakaba c lever pro Option TouchGo HAC Standard fixing 02 2018 EN Technical Manual ...

Page 2: ...e 3 78056 Villingen Schwenningen Germany T 49 7720 60 30 www dormakaba com Registered in Heiligenhaus Copyright dormakaba 2018 All rights reserved No part of this document may be reproduced or used in any form or by any means without prior written permis sion of dormakaba Schweiz AG All names and logos of third party products and services are the property of their respective owners Subject to tech...

Page 3: ... 4 1 Installation requirements 19 4 1 1 General 19 4 1 2 Door thickness 19 4 1 3 Mortise lock 19 4 2 Replace c lever with c lever pro 19 4 3 Spindle standoff 20 4 4 Drilling fixing holes 20 4 4 1 With drill jig door side 1 21 4 4 2 With drill jig door side 2 22 4 4 3 With drilling template door side 1 23 4 4 4 With drilling template door side 2 24 4 5 Installing the cylinder support 25 4 5 1 Remov...

Page 4: ... with user media 53 7 Maintenance 55 7 1 Maintenance table 55 7 2 Cleaning 55 8 Service 56 8 1 Serial number 56 8 2 Replacing batteries 56 8 3 Replacing the TouchGo media battery 58 8 4 Connecting the programmer 59 8 5 Configuration and traceback 60 8 6 Reset INI reset 60 8 6 1 Reset with programmer 1460 60 8 6 2 Reset using tweezers 62 8 7 Firmware update 64 8 8 Emergency opening 65 8 8 1 Opening...

Page 5: ...ut by skilled persons in accordance with EN 62368 1 Audio Video Information and Communication Technology Equipment Part 1 Safety Requirements Skilled person is the designation for people who have the appropriate technical training and experience in setting up the equipment Skilled persons are expected to use their training and experience to identify any risks to themselves and others that may aris...

Page 6: ... choose either the Access Management or Workforce Management product division 4 In the top right hand corner of the screen click on the following symbol 5 Enter your email address and password to log in or create a new account see below ð The technical manuals can be found under Downloads Creating an account 1 Click Create account 2 Fill in the data fields and confirm your entries ð A confirmation...

Page 7: ...ations are used for the product designations as well as the following symbols Short designation Product designation c lever c lever pro Product c lever pro Device c lever pro Actuator c lever pro Programmer Programmer 1460 S module S module for c lever pro KEM Kaba evolo Manager MRD Multi RFID device HAC Handle above cylinder HBC Handle below cylinder Symbols Acoustic signal Visual signal ...

Page 8: ... dangerous situation that could lead to minor injury NOTICE Important information on the correct use of the product Failure to comply with these instructions could lead to malfunctions The product and or ob jects in the local vicinity could be damaged 1 8 Notes Information is denoted by this symbol Tips on using the product are useful pieces of information They help to make best use of the product...

Page 9: ...bly and installation Check the device for visible damage caused by transport or wrong storage Do not start up any damaged device Assembly and installation of the product may only be done by skilled personnel see chapter 1 Target group When installing inserting the product in end use equipment all requirements of the men tioned test standards must be fulfilled The product should only be installed i...

Page 10: ...ing electronic components Connect the end of the strap to a discharge box or a non painted earthed metal component This way static discharges are channelled away from your body safely and effectively Handle a PCB along its edges only Do not touch the PCB or connectors Place dismantled components on an anti static surface or in an anti static shielded con tainer Avoid contact between PCBs and cloth...

Page 11: ...eries with batteries of the same type Do not open drill through or squash lithium batteries Do not burn lithium batteries or expose them to high temperatures Do not short circuit lithium batteries Do not recharge lithium batteries 2 7 Escape doors fire protection mortise locks Make sure that the regulations for emergency exits and escape routes are observed Make sure that local regulations are obs...

Page 12: ... authorised medium the door can be opened manually The access authorisation is signalled visually but also acoustically if this option is required TouchGo option The TouchGo option allows you to unlock doors without having to hold a key or user medium in your hand Touching the door handle by hand will enable the fitting to detect whether the individual is carrying an authorised user media Followin...

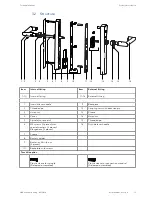
Page 13: ...r handle 11 Backplate 2 Threaded pin 12 Coupling unit with direction pin 3 Union nut 13 Frame 4 Cover 14 Union nut 5 Spindle square pin 15 Threaded pin 6 M5 screws 2 pieces with special washers 2 pieces Elongations 2 pieces 16 Outside lever handle 7 Frame 8 Battery holder 9 Batteries AA lithium 2 pieces 10 Backplate with screws TouchGo option Plastic sleeve for spindle Delivered assembled Plastic ...

Page 14: ...dle Adapter for programmer 1355 42B op tion 1 outside lever handle Overview of backplates The backplates of the internal fitting are the same as the ones for the external fitting Nar row wide variant The backplates of the internal fitting and the external fitting are different 1 2 3 4 6 5 7 8 Item Backplate designation profile hole measurement in mm 1 PZ 98 SK 105 2 PZ 85 88 90 92 RZ 94 AU 90 3 PZ...

Page 15: ...ofile RZ 22 mm Swiss round profile SK Scandinavian oval AU Australia oval JP Japanese round profile This document describes the PZ version Overview of cylinder support Option 1 2 3 4 Item Cylinder support Profile Hole spacing centre distance mm 1 RZ 72 78 2 RZ 74 94 2 PZ 70 78 85 90 4 PZ 72 88 92 Version described in this document ...
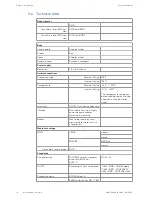
Page 16: ...l fitting 25 C 70 C Internal fitting 0 C 50 C The temperature range can be reduced based on the spe cification of the batteries used Humidity 0 95 rH non condensing Climate Unsuitable for use in highly corrosive atmospheres chlorine ammonia Rooms Not to be used in environ ments where there is a risk of explosion Media technology RFID LEGIC advant prime MIFARE DESFire classic TouchGo c lever versio...

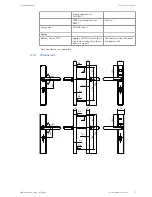
Page 17: ... with B5351 Austria Usage class EN1906 class 4 Cycles Battery life at 20 C approx 150 000 cycles con figuration whitelist without acoustic signal The configuration influences the battery life Certification not yet complete 3 4 1 Dimensions 102 91 162 298 LM 40 25 Ø 8 Ø 8 M5 21 21 1 21 1 21 1 21 1 42 42 102 91 162 298 LM 54 25 Ø 8 Ø 8 M5 21 ...

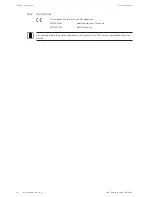
Page 18: ...ixing 02 2018 dormakaba c lever pro 3 4 2 Conformity This product conforms to the EU directives 2014 53 EU Radio Equipment Directive 2011 65 EU RoHS Directive You can download the original declaration of conformity in PDF format at www kaba com con formity ...

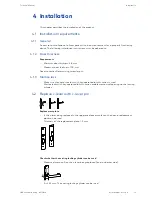
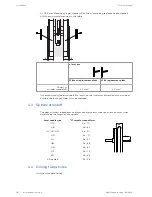
Page 19: ...r thickness 100 mm See also section Determining screw length 4 1 3 Mortise lock Make sure that a mortise lock with key operated latch function is used Mortise locks with key operated latch function enable mechanical opening via the locking cylinder 4 2 Replace c lever with c lever pro Replacement plate If the c lever being replaced in the upper area leaves marks on the door a replacement plate can...

Page 20: ...andoff B 2 7 mm 4 2 mm If the measured cylinder standoff B is less than the minimum dimension of the inside or outside the locking cylinder must be replaced 4 3 Spindle standoff The door thickness backplates and lever handle type must be taken into account when determining the length of the spindle Lever handle type A spindle standoff mm HA 46 70 A HB 46 63 HC HO HQ 46 50 HD 46 71 HL 46 92 HM 46 6...

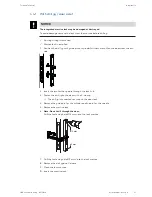
Page 21: ...inder without mount on the door from the out side 2 Insert the pin for the spindle through the lock hub 3 Fasten the drill jig to the door with a C clamp ð The drill jig is connected securely to the door leaf 4 Remove the guide pin for the cylinder and the pin for the spindle 5 Remove the mortise lock 6 Note Do not drill through the door Drill the fastening hole Ø13 mm up to the lock mortise ø9 mm...

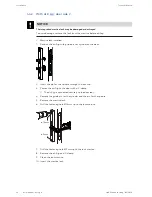
Page 22: ...guide pin for cylinder on the door 2 Insert the pin for the spindle through the lock hub 3 Fasten the drill jig to the door with a C clamp ð The drill jig is connected securely to the door leaf 4 Remove the guide pin for the cylinder and the pin for the spindle 5 Remove the mortise lock 6 Drill the fastening hole Ø13 mm up to the lock mortise ø9 mm ø13 mm 7 Drill the fastening hole Ø9 mm up to the...

Page 23: ...m ø9 ø9 ø13 Bohrschablone c lever pro Version HAC 11 2016 1220020104 100 90 80 70 60 50 40 30 20 100 90 80 70 60 50 40 30 20 1 Place the spindle through the lock hub 2 Position the drilling template over the spindle and align it parallel to the forend 3 Mark the drill holes ð Drill holes for the fastening holes are marked on the door leaf 4 Remove the mortise lock 5 Note Do not drill through the d...

Page 24: ... 8 ø25 mm ø9 ø9 ø13 20 30 40 50 60 70 80 90 100 20 30 40 50 60 70 80 90 100 1 Place the spindle through the lock hub 2 Position the drilling template over the spindle and align it parallel to the forend 3 Mark the drill holes ð Drill holes for the fastening holes are marked on the door leaf 4 Remove the mortise lock 5 Drill the fastening hole Ø13 mm up to the lock mortise ø13 mm ø9 mm 6 Drill the ...

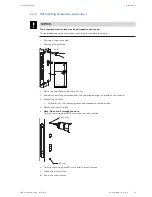
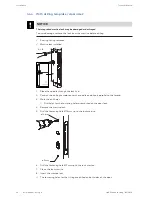
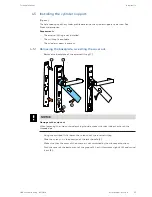
Page 25: ... 1 Removing the backplate swivelling the cover out Remove the backplate of the external fitting 1 2 3 4 5 1 NOTICE Damage to the union nut When loosening the union nut and pushing it aside make sure that it does not touch the threaded pin Using the multitool fully loosen the union nut of the internal fitting Slide the union nut in the direction of the lever handle 2 Make sure that the cover of the...

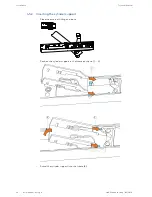
Page 26: ...6 HAC Standard fixing 02 2018 dormakaba c lever pro 4 5 2 Inserting the cylinder support Place the external fitting on a base Position the cylinder support in the frame as shown 1 2 1 2 3 Swivel the cylinder support into the frame 3 ...

Page 27: ...ved hole spacing figures 1 1 Procedure With one hand hold the internal fitting and the cylinder support and rotate them so that the marked hole spacings are visible Lift the cylinder support slightly 1 move it 2 and insert it into the lug blue at the de sired position 3 2 1 3 3 Example for a hole spacing of 88 mm 4 5 4 Fitting the cover Make sure that the cover of the antenna is not scratched by t...

Page 28: ...n 2 press it against the frame 3 and at the same time insert it into the groove 4 1 2 4 3 5 6 NOTICE Damage to the union nut When moving and tightening the union nut make sure that it does not touch the threaded pin Slide the union nut in the direction of the frame Tighten the union nut using the multitool ...

Page 29: ...turns right 1 2 3 1 2 3 1 Align the direction pin as per the figure 1 Align the direction pin as per the figure 2 Turn the spindle to the right as far as it will go and hold in this position 2 Turn the spindle to the left as far as it will go and hold in this position 3 Insert the direction pin 3 Insert the direction pin 4 Align the spindle according to the lever handle direction and insert it int...

Page 30: ...ard fixing 02 2018 dormakaba c lever pro 4 4 4 4 5 Screw the spindle in place with the threaded pin 5 Screw the spindle in place with the threaded pin TouchGo option Ensure that there is no groove present on the side of the spindle marked with ...

Page 31: ... components are handled incorrectly damage may oc cur which leads to their complete breakdown or sporadic faults When installing and repairing the product the general ESD protective measures are to be observed Guide the spindle into the square of the outside lever handle and insert the coupling unit into the external fitting TouchGo Maximum torque 1 0 Nm Press the coupling unit lightly against the...

Page 32: ...Installation Technical Manual 32 HAC Standard fixing 02 2018 dormakaba c lever pro Guide the antenna cable through the backplate Attach the backplate ...

Page 33: ...ly damage may oc cur which leads to their complete breakdown or sporadic faults When installing and repairing the product the general ESD protective measures are to be observed 4 9 1 Standard fixing HAC version lever handle above the cylinder Requirements The existing fitting is removed The drill holes are present The mortise lock is installed If present the locking cylinder is inserted into the m...

Page 34: ...rewed together If necessary the screws are extended with elongations Determine the screw length and the number of elongations using the table Clamping length mm Screw length M5 x Number of elongations from to 38 54 40 mm 54 64 50 mm 64 72 60 mm 72 80 40 mm 1 80 90 50 mm 1 90 100 60 mm 1 Clamping length door thickness thickness of the replacement plate s ...

Page 35: ...ng the multitool loosen the union nut from the internal fitting 360 360 With locking cylinder If necessary loosen the forend locking stud Push the cover out of the groove 1 pull it forwards slightly 2 and turn 3 1 2 3 If the c lever pro is already programmed the clock settings are lost approx 45 seconds after the battery is removed Push the battery holder in the direction shown 1 and at the same t...

Page 36: ...Installation Technical Manual 36 HAC Standard fixing 02 2018 dormakaba c lever pro Align the lever handle ...

Page 37: ...lation or routing Ensure that the cables are routed in such a way that there is no risk of crushing or shearing in juries 4 12 1 c lever standard variant Prerequisites The drill holes are present The external fitting has been placed on the door The antenna cable has been guided to the inside of the door The mortise lock is installed With locking cylinder The locking cylinder is inserted into the m...

Page 38: ...contact protection film Installing the cover Align the cover 1 Move the cover in the sequence shown 2 3 and insert it into the groove 4 The cover protrudes on the side opposite the groove Press the protruding cover against the frame 5 and hold down 1 2 3 4 5 Tighten the union nut using the multitool Let go of the cover Tighten the threaded pin on the lever handle Option TouchGo Maximum torque 1 0 ...

Page 39: ...Installation Technical Manual 39 HAC Standard fixing 02 2018 dormakaba c lever pro Remove the protective film on the external fitting ...

Page 40: ...arry out the following checks after the installation and after service and maintenance activ ities Make sure that the device and the mortise lock have been correctly installed mechanically Make sure that the device and the mortise lock are working properly After programming Carry out a function check see Operation 6 ...

Page 41: ...nion nut make sure it does not touch the threaded pin Using the multitool loosen the union nut from the internal fitting 360 360 With locking cylinder If necessary loosen the forend locking stud Push the cover out of the groove 1 pull it forwards slightly 2 and turn 3 1 2 3 Push the battery holder in the direction shown 1 and at the same time swivel it for wards 2 1 2 Unplug the antenna cable ...

Page 42: ...ssembly may lead to a risk of pinching or shearing of cables Remove the cables in such a way that there is no risk of pinching or shearing Loosen the screws and remove them along with the special washers Remove the internal fitting from the spindle and locking cylinder The internal fitting is dismantled ...

Page 43: ... of crushing or shearing in juries Remove the external fitting from the door 1 and at the same time guide the antenna cable through the fixing hole in the door 2 2 1 4 3 Remove the backplate 3 Pull the antenna cable out of the backplate 4 Remove coupling Pull the coupling unit plug out of the white socket 1 1 2 Remove the antenna cable from the black socket 2 Loosen the threaded pin in the outside...

Page 44: ...ouchGo E110 RCID See dormakaba c lever TouchGo operating instructions Programming TouchGo products with RFID Products with RFID Firmware Transmission technology c lever proTouchGo E310 RCID and RFID See next Chapter 5 2 Initial programming of MRD components When first used multi RFID MRD components are set to the technology in which the com ponents are used with a master LEGIC or MIFARE The compon...

Page 45: ...ver pro NOTICE Lost User media should be immediately blocked and deleted from all components Delete lost User media in the system software in the whitelist add CardLink to the blacklist or delete all User media with the corresponding master and then re program all User media ...

Page 46: ...d in an A structure Separate access authorisations to User media can be issued with each B master User media can be programmed with different B masters but not with the same components Each component can be programmed with up to 4000 User media These can be distributed across the various B masters as required For example a B1 master only manages 50 users whilst another master B2 manages up to 3950...

Page 47: ... 1 s Beep Launch programming mode Master B approx 1 s hold in front of the antenna 1 x short 2 1 s Beep Program User media User media approx 1 s hold in front of the antenna 1 x short 3 1 s Beep Additional User media approx 1 s hold in front of the antenna 1 x short 4 Beeeep 1 s To complete Master B approx 1 shold in front of the antenna Note If no master medium is held up within 20 seconds progra...

Page 48: ...ead Deleting User media Action 1 1 s Beep Launch programming mode Master B approx 1 s hold in front of the antenna 1 x short 3 s 2 Beep Beep Delete User media User media approx 3 s hold in front of the antenna 2 x short 3 Beeeep 1 s To complete Master B approx 1 shold in front of the antenna Note If no master medium is held up within 20 seconds program ming mode ends automatically and one long aco...

Page 49: ...ox 1 s 1 short signal sounds 1 x short 10 s 2 Beep Beep Remove Master B and all user me dia from the component Hold Master B in front of the an tenna until two short signals sound Green illuminates for as long as Master B is in the antenna field and is being read 2 x short 3 Beeeep 1 s Disable programming mode Hold Master A in front of the an tenna briefly approx 1 s 1 long signal sounds Note If n...

Page 50: ...be in programming mode In this case the light ring glows green for as long as the medium is located within the antenna field and is read Deleting user media Action 10 s 1 Beep Beep hold in front of the antenna Mas ter B approx 10 s All User media under the Master B are deleted 2 x short 1 x long1 1 x short Key 1 Firmware version 42xx ...

Page 51: ...g mode INI reset for whitelist In this case the light ring glows green for as long as the medium is located within the antenna field and is read INI reset with master Action 15 s 1 Beep Beep Master B structure Master B approx 15 s hold in front of the antenna The INI reset will be executed after 15 s After 10 s 1 x long 1 x short after 15 s 2 x short 15 s 1 Beep Beep Master A B structure Master A ...

Page 52: ... long as the medium is located within the antenna field and is read INI reset with master Action 15 s 1 Beep Beep B master Master B approx 15 s hold in front of the antenna The INI reset will be executed after 15 s 2 x short 15 s 1 Beep Beep Master A Master A approx 15 s hold in front of the antenna The INI reset will be executed after 15 s 2 x short ...

Page 53: ...ion used TouchGo c lever pro E310 RFID See next Chapter 6 2 Opening with user media Before being used for the first time access authorisations for the relevant system software must be transmitted to the User media 2 1 2 Beep 1 Hold authorised user medium in front of the antenna of the fitting The acoustic and visual signals1 confirm access authorisation Note The c lever s opening time is limited a...

Page 54: ...pro Beep Beep Beep Beep If there is an attempt to gain access using unauthorised user media the acoustic1 signal will sound four times and the red1 light will briefly flash four times Key 1 If the function s have been activated using the programmer 1460 or the system soft ware ...

Page 55: ...nents Measures Interval All components Function check in accordance with instruc tions 12 months Replacing the batteries 24 months1 Clock components Check and set clock time with the system software 12 months Firmware update To modify functionality See the system description as required Key 1 With lithium batteries 7 2 Cleaning Only disinfection agents that are explicitly formulated for cleaning d...

Page 56: ...ich leads to their complete breakdown or sporadic faults When installing and repairing the product the general ESD protective measures are to be observed Whilst the battery is being changed all the data access authorisations configurations and traceback is retained in the battery independent memory The clock settings are lost after 45 seconds Procedure NOTICE Damage to the union nut When loosening...

Page 57: ...in the direction shown 1 and at the same time swivel it for wards 2 1 2 Remove the spent batteries Insert the new batteries observing the polarity Insert the battery holder 1 push it towards the lever handle 2 and at the same time swivel it into the frame 3 1 2 3 If present Remove the contact protection film ...

Page 58: ...ert it into the groove 4 The cover protrudes on the side opposite the groove Press the protruding cover against the frame 5 and hold down 1 2 3 4 5 Tighten the union nut using the multitool Let go of the cover Carry out a function check see Operation 6 8 3 Replacing the TouchGo media battery See dormakaba c lever TouchGo operating instructions ...

Page 59: ...nical Manual 59 HAC Standard fixing 02 2018 dormakaba c lever pro 8 4 Connecting the programmer Connect the c lever and programmer using the programming cable and the adapter 1355 42B for the programmer cable grey ...

Page 60: ...NOTICE Loss of data The INI reset deletes all settings and data saved on the device A reset can be performed in the following ways With master media See INI reset with master media for whitelist and CardLink 5 11 With programmer 1460 see Reset with programmer 1460 With tweezers see Reset using tweezers Also see about this 2 5 11 INI reset with master media for whitelist and CardLink 51 8 6 1 Reset...

Page 61: ... 61 HAC Standard fixing 02 2018 dormakaba c lever pro Select Actuator Select INI reset Select Yes Two signals will sound following a successful reset A detailed description can be found in the programmer operating instructions ...

Page 62: ...hen installing and repairing the product the general ESD protective measures are to be observed Requirements The multitool is available Electrically conductive tweezers are available The batteries are inserted Procedure NOTICE Damage to the union nut When loosening the union nut make sure it does not touch the threaded pin Using the multitool loosen the union nut from the internal fitting 360 360 ...

Page 63: ... breakdown or malfunctions of the device Adhere to and use the general ESD protective measures when handling electronic com ponents Connect the contacts shown here with electrically conductive tweezers for 3 seconds Two signals will sound following a successful reset Align the cover 1 Move the cover in the sequence shown 2 3 and insert it into the groove 4 The cover protrudes on the side opposite ...

Page 64: ...Service Technical Manual 64 HAC Standard fixing 02 2018 dormakaba c lever pro Tighten the union nut using the multitool Let go of the cover 8 7 Firmware update See Programmer 1460 user manual ...

Page 65: ...ogramming cable is available Adapter is available for the programming cable There is an authorised user medium New batteries are available for the device The multitool is available Procedure Connect the device and external power supply using the programming cable and the ad apter see Connecting the Programmer chapter With battery emergency opening device With programmer Press the button for approx...

Page 66: ...crushing or shearing injuries from cables as a result of improper installation or routing Ensure that the cables are routed in such a way that there is no risk of crushing or shearing in juries Remove antenna Dismantle the internal fitting 4 14 1 Dismantle the external fitting the coupling must not be removed 4 14 2 Push the two middle clips outwards and at the same time lift the board On one side...

Page 67: ...ess the antenna board against the antenna Ensure that the antenna board snaps into place on the antenna Insert the coupling unit plug into the white socket 1 1 2 Insert the antenna cable into the black socket 2 Guide the antenna cable through the backplate Attach the backplate Install the external fitting 4 9 1 Install the internal fitting 4 12 1 ...

Page 68: ...hor isation by an authorised user medium is confirmed via acoustic and visual signals 8 x short 8 x short red Self test could not be com pleted Check or replace the coup ling unit Door does not open author isation by an authorised user medium is confirmed via acoustic and visual signals 4 x short 4 x short red Medium not programmed Outside the time window Program medium Check time profiles Door do...

Page 69: ...d Faulty coupling unit Deactivate TimePro func tion Replace coupling unit The use of a master or user medium is not confirmed by the component Antenna connection error or faulty electronics Check connection between antenna and electronics Door is always open door does not open or close at programmed time Time is missing on e mod ule or is not correctly set Incorrect programming Set time check prog...

Page 70: ...grammed Program medium 1 x very long Battery in the device is empty Use the emergency open ing and replace the device s battery Medium or device bat tery completely empty Replace medium and or device battery 8 x short 8 x red Faulty device coupling Operating the device again If the fault recurs call a qualified technician and use the emergency open ing 1 x short 1 x green Device faulty Door is alw...

Page 71: ...he administrator for the door Use the programming master with an administrator right or Carry out a reset and program the programming master as the administrator Device battery or Program ming master empty Replace battery User medium cannot be programmed Medium battery empty Replace battery 1 x long Green perman ently as long as medium in range then 1 x red Maximum number of pro grammable media re...

Page 72: ...e Electrical and Electronic Equipment Act ElektroG in Germany dic tates that facility operators are obliged to return electrical and electronic devices to their manufacturer point of purchase or designated public collection points at the end of their life cycle Disposal in Germany dormakaba EAD GmbH will take responsibility for correct disposal of supplied goods once they are no longer in use as p...

Page 73: ...g Use dust free environmentally friendly fill material 11 3 Electronic component assemblies ESD sensitive electronic component assemblies such as PCBs and readers should be stored transported and shipped in suitable anti static packaging Electronic component assemblies must be packed at ESD protected workstations This should be carried out by persons who are familiar with and comply with general E...

Page 74: ...nical Manual 74 HAC Standard fixing 02 2018 dormakaba c lever pro Accurate description of fault Returns from countries outside the EU also require a customs invoice with an accurate cus toms value and customs tariff number ...

Reviews: