dormakaba Header Installation Instructions with EML310/320 and 371/372
For use with DRS Rails and Patching Fittings (4-1/8”, 4-1/2”, 6” Headers)
933903
07-2019
EML Header Shim
20
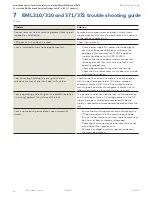
EML troubleshooting
Problem
Solution
Cannot remove the lock mounting bracket from top of
magnet for installation.
Remove anti-tamper screw and cavity screw. Insert
supplied hex key into mounting bolt holes in the bottom
of the lock housing and turn.
LED goes out when door is locked.
Check input polarity.
Lock is installed but has no holding force at all.
•
Check power supply. DC power should be slightly
over the voltage specifications outlined on the
packaging. (for example: for 12VDC operation
supply should be set at 12VDC-13VDC.)
•
Check connections at power supply, connected
releasing devices, lock terminals, and lock circuit
board to magnet core.
•
Check delayed relock wiring and time setting.
•
Check that the momentary switch does not include
a shunted light option.
Lock has enough holding force to lightly hold a
screwdriver or set of pliers but door will not lock.
Check to see that armature plate is correctly aligned
with the electromagnetic lock. If there is improper
alignment, make a 1/4” turn of the armature plate
mounting bolt and check for alignment. Make sure to
follow the armature plate mounting instructions.
Lock is operating and locking but the armature plate is
“humming” against the surface of the lock.
This generally indicates that the lock is either operating
on AC voltage or there is AC voltage present in the DC
supply. A properly filtered and regulated DC power
supply is required to achieve optimal operation from the
lock.
Lock is not releasing immediately upon removal of
power.
•
Ensure that switching devices are interrupting the
DC power and not the AC power supply voltage.
•
Ensure rubber washer on armature plate mounting
bolt has not been removed or damaged.
•
Check that switching device interrupts the positive
wire and not the negative wire.
•
Remove any diodes or other suppression devices
that may be installed.
7
EML310/320 and 371/372 trouble shooting guide
Table 3


