Saflok RT/RT Plus Installation Guide
PK3720_T 04-19 9
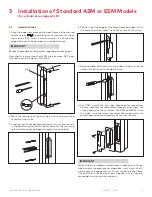
4. Position the strike against the door frame and align it with
the mounting screw holes. Trace the outline of the strike.
5. Remove material from within the strike outline so that the
strike will be flush with the door frame.
6. For ASM, install the dust box (optional for wood door
frames, required for metal door frames), and check the
strike handing on the template. For ASM and ESM install
the strike using the screws provided. Use wood screws for
wood frames and machined screws for steel frames.
CAUTION
WARNING
IMPORTANT
When strike is installed on wood frames under one inch thick,
wood screws supplied are not adequate. use screws of effi-
cient length to engage the structural stud behind the frame.
Use only the strike and dust box supplied. Use of non-ap-
proved parts may void the warranty.
3 Installation of Standard ASM or ESM Models
(for cylindrical see Appendix B)
3.2
Install the Strike
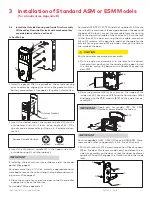
1. Align the paper template on the door frame at the desired
handle height (
), and along the vertical center line of
the mortise (CL), which is also the center line of the door
edge, allowing for any bumpers on the door frame.
CAUTION
WARNING
IMPORTANT
Respect applicable building codes regarding handle height.
Note that the centerline of an ESM mortise does NOT pass
through the screw holes on the strike.
(CL)
2. Mark the locations of the dust box cutout and mounting
screws for the strike.
3. Create the dust box pocket and chisel out the strike contour
in the door frame, and drill the pilot holes for the mounting
screws (dimensions and depths marked on template).

