background image

24

www.doro.com

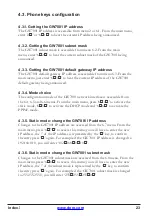
4.3.7. Static mode: change the IP of the GW7001 default gateway

C��n��e� to t�e ��� ������e�� o� t�e G�7001 ��e����t ���te��� ��e �cce��e�� ��o� 

the 6.9 menu. From the main menu, press ‘6

*

9

*

�� to �cce�� t��� �en�; �o� 

���� ���e to ente� t�e ne� ��� ������e��, t�e �.�� o� t�e ��� ������e�� �� �e��e�ente�� 

�� t�e �

*

’ key, to confirm the entry press ’

*

�� �����n. Fo� ex����e �� t�e ��� 

address of the GW7001 default gateway is changed to 192.168.0.1, you will enter 

‘192

*

168

*

0

*

1

*

��.

4.3.8. Change DNS configuration

�t �� �o�����e to o�t��n t�e ��� ������e��e� �o� ��S1 �n�� ��S� �e��ect��e�� 

from the 6.10 and 6.12 menus. The IP addresses are accessed respectively from 

the 6.11 and 6.13 menus. To change the DNS1 from the main menu, press 

‘6

*

11

*

��, �o� ���� ���e to ente� t�e ne� ��� ������e��, t�e �.�� o� t�e ��� ������e�� �� 

�e��e�ente�� �� t�e �

*

’ key, to confirm the entry press ’

*

�� �����n. Fo� ex����e 

if the IP address of the GW7001 DNS1 is changed to 194.2.0.20, you will enter 

‘194

*

*

0

*

�0

*

��.

4.3.9. Validation and activation

�n� c��n��e� ���� on�� �e �n�t���e�� ��te� �o� �e�oot t�e G�7001.

This can be done from the main menu by pressing ‘5

*

�� 

(��e��e �e�e� to t�

�S��e/�x�t/Re�oot��

 �ect�on).

Index

Summary of Contents for GW7001

Page 1: ...Manual ...

Page 2: ......

Page 3: ...doro GW7001 SIP H 323 ...

Page 4: ...upplied transformer 2 Connect the Ethernet port WAN to your Internet access by using the supplied standard Ethernet wire 3 Connect the telephone port TEL with the supplied cable RJ11wire to your telephone 4 Connect the LAN port 1 3 to your additional IP communication devices computer using a standard Ethernet wire optional ...

Page 5: ...ssword 14 1 2 9 Router 14 1 2 10 Save Exit Reboot 14 2 Configuration methods 15 2 1 HTTP configuration 15 2 1 1 General 15 2 1 2 Configuration Web Interface 15 2 2 Console configuration 16 2 2 1 Telnet 16 2 2 2 Console configuration menu 17 2 3 Phone keys configuration 17 2 2 1 Main menu and configuration menus accesses 17 2 3 2 Password 17 2 3 3 Change a parameter 18 2 3 4 Phone keys configuratio...

Page 6: ...atic mode change the GW7001 subnet mask 23 4 3 7 Static mode change the IP of the GW7001 default gateway 24 4 3 8 Change DNS configuration 24 4 3 9 Validation and activation 24 5 VoIP settings 25 5 1 HTTP Configuration SIP 25 5 1 1 Registration mode SIP 25 5 1 2 Primary Server Settings SIP 26 5 1 3 Secondary Server Settings SIP 26 5 1 4 Port 0 Settings SIP 26 5 2 HTTP Configuration H 323 27 5 2 1 ...

Page 7: ... 33 8 Phone settings 34 8 1 HTTP Configuration 34 8 1 1 Volumes 34 8 1 2 Country Preset 34 8 1 3 Ring Back Tone 35 8 1 4 CallerID 35 8 1 5 End Of Dial 36 8 2 Console configuration Phone command 36 8 3 Phone keys configuration 36 8 3 1 Set the microphone volume 36 8 3 2 Set the speaker volume 36 9 Dial Plan management 37 9 1 HTTP Configuration 37 9 1 1 Global Prefix 37 9 1 2 Conditional Prefix Sett...

Page 8: ...ay switch usage 42 11 1 2 Router Basic Settings 43 11 1 3 DHCP Settings 43 11 1 4 Advanced settings 43 11 1 5 Status 44 11 2 Console configuration Router command 44 11 3 Phone keys configuration Router command 44 12 Save Exit Reboot 45 12 1 HTTP configuration 45 12 1 1 Commit 45 12 1 2 Exit 45 12 1 3 Save Reboot 45 12 1 4 Reboot 45 12 2 Console configuration reboot command 46 12 3 Phone keys confi...

Page 9: ... 10 Media settings configuration Web page 23 Figure 11 DTMF mode configuration 24 Figure 12 Codec choice 24 Figure 13 Rtp Payload size configuration 24 Figure 14 Service settings configuration Web page 26 Figure 15 Regional settings configuration Web page 28 Figure 16 Country Preset list 29 Figure 17 CallerID type 29 Figure 18 Dial Plan settings 31 Figure 19 Global prefix example 31 Figure 20 Cond...

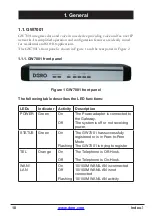
Page 10: ...anel Figure 1 GW7001 front panel The following table describes the LED functions LEDs Indicator Activity Description POWER Green On Off The Power adapter is connected to the Gateway The system is off or not receiving power STATUS Green On Flashing The GW7001 has successfully registered or is in Peer to Peer Mode The GW7001 is trying to register TEL Orange On Off The Telephone is Off Hook The Telep...

Page 11: ...nnects to your Internet access by using a standard Ethernet wire Ethernet port LAN 1 3 connects to your IP communication devices computer using a standard Ethernet wire Analogue telephone port TEL connects via the supplied cable RJ11wire Guaranteed to support one telephone but could possibly support additional telephones Once correctly installed and configured the GW7001 is ready to use There is a...

Page 12: ...A VAD Voice Activity Detection CNG Comfort Noise Generation G 168 165 compliant adaptive echo cancellation Dynamic Jitter Buffer Bad Frame Interpolation Voice Gain Settings Remote Firmware Upgrade You can use FTP TFTP to perform firmware upgrade for the GW7001 from a remote location Security Password protection for system management Three authorization levels Interface Four 10 100 Base T Ethernet ...

Page 13: ...work section 1 2 2 VoIP parameters You can select a SIP server registration mode and ports to be used Account details are also configured here Please refer to the VoIP section 1 2 3 Media Settings for transmission specifications like RTP ports DTMF transmission Codecs Fax transmission and comfort settings GW7001 supports G723 1 G729 Annex A G711A and G711U codecs the user can choose which codec to...

Page 14: ...on 1 2 7 Update the firmware You can update GW7001 firmware through the Web interface or from a console The update consists of a download in firmware form from a TFTP or FTP server Please refer to the System settings management section 1 2 8 Login password To access the GW7001 configuration you have to enter a login and a password The default login is owner and there is no default password althoug...

Page 15: ...ess this from a remote machine the GW7001 IP address has to be entered from the remote machine and a first configuration may be needed please refer to the First configuration section 2 1 2 Configuration Web Interface To access the Web interface of the GW7001 you must enter a login and password when requested Figure 3 Login password window The default login is owner and there is no password Having ...

Page 16: ...7001 IP address with the GW7001 2 2 1 Telnet A login and password are needed to access the GW7001 console the default login is owner and there is no default password Once the login and password entered it is possible to configure the features Type help to get the list of available commands Type help thecommandiwant to get help on a specific command Once the configuration is done the commit command...

Page 17: ...rs 2 2 1 Main menu and configuration menus accesses To access the main menu just lift the telephone handset and press All available configuration menus will be announced after pressing in the password Each configuration menu is associated to a number from the higher menu To access a configuration menu press the key associated to it and confirm the choice by pressing the key This is available even ...

Page 18: ...192 168 0 1 Please note that all commands must be executed by dialing the 2 3 4 Phone keys configuration menu Main menu 2 get ip address 3 set microphone volume 00 40 4 set speaker volume 00 40 5 reboot device 6 network menu 0 return to main menu 1 get ip address 2 get network mask 3 get default network route 4 set ip mode to static 5 set ip mode to dhcp 6 set ip mode to pppoe 7 set new ip address...

Page 19: ...ddress in static mode is 192 168 0 150 the default gateway IP is 192 168 0 1 and the sub network mask is 255 255 255 0 It is possible to modify the network parameters from a remote machine by using a direct link to a computer and make the GW7001 the default gateway of this computer This method is described next 3 1 Hardware connection Firstly connect the network cable between the computer and the ...

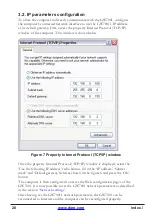
Page 20: ... window Once the property Internet Protocol TCP IP window is displayed select the Use the following IP address radio button fill in the IP address Subnet mask and Default gateway fields as shown in the figure 6 and press the OK button The computer is then configured to access the Web configuration pages of the GW7001 It is now possible to set the GW7001 network parameters as described in the secti...

Page 21: ... 8 GW7001 network parameters The GW7001 network parameters are set from the Web page of the Figure 8 From this page it is possible to set those parameters to static IP to DHCP mode or to PPPoE mode 4 1 1 Static configuration To manually set these parameters select the Static radio button set the IP address WAN IP subnet mask WAN Mask default gateway WAN Gate primary DNS and secondary DNS optional ...

Page 22: ... server configuration The GW7001 can synchronize with a time server NTP This section shows the time servers address It is possible to enter the server name If no server is entered the GW7001 sets the time to the 1st January of 1970 It is also possible to activate deactivate the NTP service by selecting the Disabled or Enabled radio button Remember to set the correct time zone and note that the tim...

Page 23: ...from the 6 4 6 5 and 6 6 menus From the main menu press 6 4 to activate the static mode 6 5 to activate the DHCP mode and 6 6 to activate the PPPoE mode 4 3 5 Static mode change the GW7001 IP address Changes to the GW7001 IP address are accessed from the 6 7 menu From the main menu press 6 7 to access this menu you will have to enter the new IP address the of the IP address is represented by the k...

Page 24: ...ge DNS configuration It is possible to obtain the IP addresses for DNS1 and DNS2 respectively from the 6 10 and 6 12 menus The IP addresses are accessed respectively from the 6 11 and 6 13 menus To change the DNS1 from the main menu press 6 11 you will have to enter the new IP address the of the IP address is represented by the key to confirm the entry press again For example if the IP address of ...

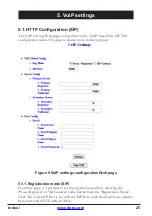
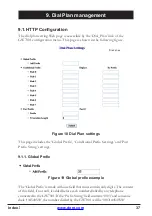
Page 25: ...hown in the following figure Figure 9 VoIP settings configuration Web page 5 1 1 Registration mode SIP From this page it is possible to set the registration mode by selecting the Proxy Registrar or Sip Gateway radio button from the Registration Mode label The Local SIP Port is set with the SIP Port and should contain a number between 0 and 655535 default 5060 Index ...

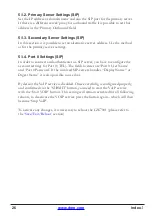
Page 26: ...e to a SIP server you have to configure the account settings for Port 0 TEL The fields to enter are Port 0 User Name and Port 0 Password If the involved SIP servers handles Display Name or Digest Name it is also possible to use that By default the VoIP service is disabled Once everything is configured properly and confirmed via the SUBMIT button you need to start the VoIP service with the Start VO...

Page 27: ... Fast Start enabled it is faster to establish a call If the system supports Fast Start leave this option enabled The item H323 Nat Settings makes it possible to configure the behavior of the GW7001 when it is behind a NAT The possible choices are the automatic configuration disabled or the manual configuration enabled When using manual configuration it is necessary to set the outside IP address of...

Page 28: ...n you need to start the VoIP service with the Start VOIP button This setting will remain activated for all following reboots to deactivate the VOIP service press the button again which will then have become Stop VoIP To activate any changes it is necessary to reboot the GW7001 please refer to the Save Exit Reboot section 5 3 Console configuration VoIP Once connected and authenticated to a GW7001 v...

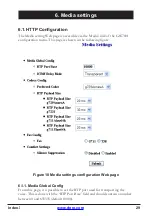
Page 29: ...1 configuration menu This page is shown in the following figure Figure 10 Media settings configuration Web page 6 1 1 Media Global Config From this page it is possible to set the RTP port used for transporting the voice This is done with the RTP Port Base field and should contain a number between 0 and 655535 default 10000 Index ...

Page 30: ...c choice is accessed via the Preferred codec combo box The user can choose the preferred codec between G7231 G729 Annex A G711A law and G711μ law as shown in the following figure Figure 12 Codec choice Figure 13 Rtp Payload size configuration The RTP Payload Size option allows the user to choose the payload size of the RTP packet for the respective codec The size is defined in milliseconds speech ...

Page 31: ...ener from getting the impression that the line has gone dead This may not reduce sending of packets if the phone is used in a noisy environment 6 2 Console configuration Media Once connected and authenticated to a GW7001 via telnet it is possible to configure the Media parameters The configuration tasks can be performed via the configuration engine which is accessed with the conf command 6 3 Phone...

Page 32: ... one phone It also allows the user to transfer or initiate a new call during a communication While in communication Place the call on hold by pressing R To retrieve the call press R again Dual call management R1 R2 Call Waiting 1 If you receive a new call while already on line a tone will be heard repetedly 2 Answer the second incoming call by pressing R 3 To switch between the 2 calls press R and...

Page 33: ...is provided the call will not be forwarded Activate the call forwarding by clicking the corresponding radio button followed by Submit 7 1 4 On No Answer Forward If this service is enabled all unanswered incoming calls will be forwarded after a specified number of rings The number of rings before forwarding is specified in the No Answer Forward Rings section The forward numbers are specified in the...

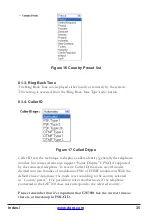
Page 34: ...ct a country preset and to set the way the Caller ID is presented 8 1 1 Volumes The speaker volume is accessed from the Speaker Volume field and the microphone volume is accessible within the Microphone Volume field These fields can be set between 0 and 40 0 is minimum and 40 is the maximum volume Normally these settings should not be changed 8 1 2 Country Preset The country preset is accessed fro...

Page 35: ...ber but some systems also support Name Display CPND if supported by the connected telephone To receive Caller ID there are several modes divided into two families of modulation FSK or DTMF modulation With the default choice Automatic the mode is set according to the country selected in Country preset It is possible to select another mode if the telephone connected to the GW7001 does not correspond...

Page 36: ...r special demands Possible options is default or none The Interdigit Digit Time states the time span in seconds between 2 digits before the device considers the dialing to be complete This is especially useful to adjust if End Of Dial is set to none 8 2 Console configuration Phone command Once connected and authenticated to a GW7001 via telnet it is possible to configure the Phone parameters These...

Page 37: ...udes the Global Prefix Conditional Prefix Settings and Port Prefix String settings 9 1 1 Global Prefix Figure 19 Global prefix example The Global Prefix is made with one field that must contain only digits The content of this field if not null is added before each number dialled by any telephone connected to the GW7001 If the Prefix String field contains 0033 and someone dials 144540550 the number...

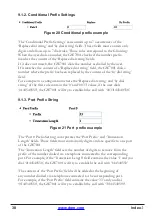
Page 38: ... of the first rule contain the 0 and 0033 values if the user dials 0144540550 the GW7001 will try to establish the call with 0033144540550 9 1 3 Port Prefix String Figure 21 Port prefix example The Port 0 Prefix Setting incorporates the Port Prefix and Truncation Length fields Those fields must contain only digits and are specific to one port of the GW7001 The Truncation Length field sets the numb...

Page 39: ...difications are then directly effective no reboot of the GW7001 is necessary 9 2 Console configuration dial plan command Once connected and authenticated to a GW7001 via telnet it is possible to configure the dial plan parameters This is accessible from the dial plan command just enter help dial plan in the telnet to display help and an example on how to use the command These configuration tasks c...

Page 40: ...cessed from the System link of the GW7001 configuration menu This page is shown in the following figure Figure 22 System settings configuration page 10 1 1 Factory Defaults Please note that all your settings will be reset to factory default values The GW7001 restores the default settings when the Reset Settings button is pressed When the Confirm button is pressed a reboot will automatically start ...

Page 41: ...firmware file on the server The firmware file must be in the root directory of the TFTP FTP server The default GW7001 login password is bloophone bloophone when downloading from a FTP server A Reboot is necessary after a firmware update 10 2 Console configuration factory passwd and rom command WARNING care should be taken using this command it is reserved to advanced users only as it can make your...

Page 42: ...configuration The router configuration page offers basic routing possibility It is accessible by the Router link of the GW7001 configuration menu This page is shown in the following figure Figure 23 Basic router settings page 11 1 1 Gateway switch usage The Gateway switch usage section configures the behaviour of the LAN ports of the GW7001 Two modes are available for the user Switch or Router Whe...

Page 43: ... time in seconds The default setting is 1 which means that there is no time limit Basic routing settings and DHCP settings are only effective in router mode To activate any changes it is necessary to validate the configuration by pressing the SUBMIT button Then save the new data in the device flash memory and reboot please refer to the Save Exit Reboot section 11 1 4 Advanced settings If necessary...

Page 44: ...ocol to route between TCP UDP or both of them The checkbox in the column Enable allows the user to activate or de activate the forwarding rule To have those changes taken into account it is necessary to validate the changes by pressing the SUBMIT button The modifications are then directly effective no reboot of the GW7001 is necessary 11 1 5 Status When Status is pressed it s possible to view any ...

Page 45: ...to store any configuration changes to flash memory 12 1 2 Exit The EXIT button allows disconnection from the web configuration page Once disconnected the configuration page presents the authentication banner 12 1 3 Save Reboot Press the SAVE REBOOT button to save configuration reboot device and exit current configuration session It will take about 1 minute for the system to be up and ready 12 1 4 ...

Page 46: ...guration with commit command exit current configuration session with the logout command and reboot with the reboot command 12 3 Phone keys configuration It is possible to reboot the GW7001 from main menu Press 5 in the main menu 12 4 Reset button It is possible to reboot the GW7001 by pressing the reset button at the rear of the GW7001 Index ...

Page 47: ...ä laite GW7001 vastaa vaatimuksiltaan Direktiiviä 1999 5 EC Kopio tästä lausunnosta Declaration of Conformity löytyy www doro com dofc Declaration of conformity Doro declares that the apparatus GW7001 complies with the essential requirements and other relevant positions of Directive 1999 5 EC A copy of the Declaration of Conformity can be found at www doro com dofc Declaration de conformité Doro c...

Page 48: ...English Version 1 0 ...

Page 49: ......

Page 50: ......

Reviews: