doerr-outdoor.de
7
02
|
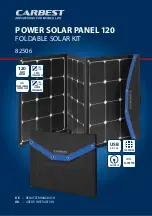
PRODUCT DESCRIPTION
•
Foldable solar panel with
3 efficient solar cells 21W and
incorpo-
rated powerbank
•
Powerful, incorporated
10,000 mAh lithium polymer battery
•
2 USB ports
for charging two devices simultaneously
•
Intelligent Smart IC technology:
✓
Detects your mobile device for faster charging times
✓
Protects against overcharging, deep discharging and over-
loading
•
Micro USB input
for quick charging of the powerbank
•
Spread-waterproof
polyester cover with
stand
and
metal eyelets
•
Supplied with
USB charging cable
03
|
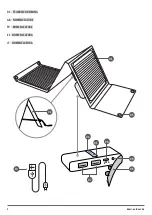
NOMENCLATURE
01
Solar cells
02
Stand with adjustable cord
03
Fastening eyelets
04
LED capacity indicator (4 blue LEDs)
05
On/Off button
06
Rubber cover
07
USB ports (Output)
08
Micro USB port (Input)
09
LED charging indicator (1 red LED)
10
Micro USB charging cable
04
|
CHARGING THE SOLAR PANEL
Before first use, please fully charge the built-in battery.
04.1 Charging via USB
Open the rubber cover (06). Insert the Micro USB plug of the supplied
USB charging cable (10) into the 5V 2A Micro USB port (08) and con-
nect the solar panel with a USB charging source (e.g. PC, Laptop). With
a totally empty battery, the charging time by PC is
approx. 4 hours.
After charging, please remove the solar panel from the USB char-
ging source.
04.2 Charging via solar cells
Place the Solar Panel into sunlight, with the solar cells (01) facing to
the sun.
CAUTION:
•
Protect the device from extreme temperatures over +45° which
may occur e.g. in cars.
•
To avoid overheating of the built-in battery and to prevent
damage to the solar cell, do not place the Solar Panel in the
blazing sun if it is almost fully charged (75% or more).
For best alignment of the solar cells, use the stand (02) and change the
stand angle with the adjustable cord. To charge the solar cells on the
go, the solar panel can be attached using the fastening eyelets (03) -
for example to fix the solar panel to a backpack.
With full sunlight conditions, the charging time of an empty solar pa-
nel is
approx. 6 hours.
While charging, the LED capacity indicator (04) flashes blue and the
LED charging indicator (09) lights red. The solar panel is fully charged
when all 4 LEDs of the LED capacity indicator (04) light blue cons-
tantly.
04.3 LED capacity indicator
Press the On/Off button (05) to show the remaining power of the solar
panel. The blue LED charging indicator (04) displays remaining power
as follows:
1 LED
0 – 25%
capacity
2 LEDs
25 – 50%
capacity
3 LEDs
50 – 75%
capacity
4 LEDs
75 – 100%
capacity
05
|
CHARGING EXTERNAL DEVICES
Connect the device you want to charge, with one of the two USB ports
(07) using the USB charging cable (*).
(*) For Apple
®
series products please use the original USB cord of your Apple
®
device.
With the PB-10000 XL you can also charge 2 devices at the same
time.
Press the On/Off button (05). The LED capacity indicator (04) lights
blue and the charging process starts.
After charging is completed, turn off the solar panel pressing the On/
Off button (05). Disconnect the charged device from the solar panel.


