background image


doerr-outdoor.de 


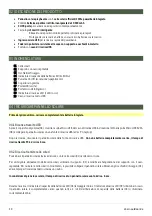
03 | NOMENCLATURE 


01


Solar cells 

02


Stand with adjustable cord 

03


Fastening eyelets 

04


LED capacity indicator (4 blue LEDs) 

05


On/Off button 

06


Rubber cover 

07


USB ports (Output) 

08


Micro USB port (Input)  

09


LED charging indicator (1 red LED) 

10


Micro USB charging cable 


04 | CHARGING THE SOLAR PANEL 


Before first use, please fully charge the built-in battery. 


04.1 Charging via USB 

Open the rubber cover (06). Insert the Micro USB plug of the supplied USB charging cable (10) into the 5V 2A Micro USB port (08) 
and connect the solar panel with a USB charging source (e.g. PC, Laptop).  
 
After charging, please remove the solar panel from the USB charging source. With a is totally empty battery, the charging time by 
PC is about 4 hours. 
 

04.2 Charging via solar cells 

Place the Solar Panel into sunlight, with the solar cells (01) facing to the sun. 
 
For best alignment of the solar cells, use the stand (02) and change the stand angle with the adjustable cord. 
To charge the solar cells on the go, the solar panel can be attached using the fastening eyelets (03) - for example to fix the solar 
panel to a backpack. 
 

With full sunlight conditions, the charging time of an empty solar panel is approx. 6 hours. 

 
While charging, the LED capacity indicator (04) flashes blue and the LED charging indicator (09) lights red. The solar panel is fully 
charged when all 4 LEDs of the LED capacity indicator (04) light blue constantly.  
 

04.3 LED capacity indicator 

Press the On/Off button (05) to show the remaining power of the solar panel. The blue LED charging indicator (04) displays 
remaining power as follows: 
 

1 LED 


0 – 25% capacity   

2 LEDs  


25 – 50% capacity 

3 LEDs 


50 – 75% capacity 

4 LEDs  


75 – 100% capacity 


Summary of Contents for PB-10000

Page 1: ...BANK BEDIENUNGSANLEITUNG SEITE 3 6 GB SOLAR PANEL WITH INCORPORATED POWERBANK INSTRUCTION MANUAL PAGE 7 10 FR PANNEAU D NERGIE SOLAIRE NOTICE D UTILISATION PAGE 11 14 ES PANEL DE ENERG A SOLAR MANUAL...

Page 2: ...2 doerr outdoor de DE TEILEBESCHREIBUNG GB NOMENCLATURE FR NOMENCLATURE ES NOMENCLATURA IT NOMENCLATURA...

Page 3: ...Lebensdauer Werfen Sie das Solar Panel nicht ins Feuer schlie en Sie es nicht kurz und nehmen Sie es nicht auseinander Explosionsgefahr Tauchen oder werfen Sie das Solar Panel nicht ins Wasser Benutz...

Page 4: ...u vor dem ersten Gebrauch vollst ndig auf 04 1 Aufladen ber USB ffnen Sie die Gummiabdeckung 06 Stecken Sie den Micro USB Stecker des Ladekabels 10 in den 5V 2A Micro USB Anschluss 08 und verbinden Si...

Page 5: ...Sie das Solar Panel mit der An Aus Taste 05 aus Trennen Sie das aufgeladene Ger t vom Solar Panel 06 REINIGUNG UND AUFBEWAHRUNG Reinigen Sie das Ger t nicht mit Benzin oder scharfen Reinigungsmitteln...

Page 6: ...ichtlinie ist die Vermeidung von Elektroschrott bei gleichzeitiger F rderung der Wiederverwendung des Recyclings und anderer Formen der Wiederaufbereitung um M ll zu reduzieren Das abgebildete WEEE Lo...

Page 7: ...rotect the device against impacts Do not use the device if it has been dropped In this case a qualified electrician should inspect the device before you use it again Do not attempt to repair the devic...

Page 8: ...rs 04 2 Charging via solar cells Place the Solar Panel into sunlight with the solar cells 01 facing to the sun For best alignment of the solar cells use the stand 02 and change the stand angle with th...

Page 9: ...r benzine to clean the device We recommend a soft slightly damp microfiber cloth to clean the outer parts of the device Make sure to take the device off power before cleaning Store the device in a dus...

Page 10: ...to reduce waste The symbol trash can on the product and on the packing means that used electrical and electronic products should not be disposed of with general household waste It is your responsibili...

Page 11: ...a dur e de vie Ne jetez pas le panneau solaire au feu ne le court circuitez pas et ne le d montez pas risque d explosion Ne plongez pas et ne jetez pas le panneau solaire dans l eau Veuillez ne pas ut...

Page 12: ...r int gr 04 1 Chargement au moyen d une connexion USB Veuillez ouvrir la couverture en caoutchouc 06 Branchez le connecteur Micro USB du c ble de chargement 10 dans la connexion 5V 2A Micro USB 08 et...

Page 13: ...e en appuyant sur la touche marche arr t 05 D branchez l appareil charg du panneau d nergie 06 NETTOYAGE ET STOCKAGE Ne nettoyez pas l appareil avec de l essence ou avec d autres agents nettoyants agr...

Page 14: ...de d chets Le symbole DEEE poubelle sur le produit et sur l emballage attire l attention sur le fait que le produit ne doit pas tre trait avec les d chets m nagers Vous tes responsable de remettre tou...

Page 15: ...namiento de un acumulador completamente descargado o completamente cargado disminuye la vida til No lance el panel solar al fuego No lo cortocircuito y no lo desmonte riesgo de explosi n No sumerja ni...

Page 16: ...por medio de una conexi n USB Quisiera Ud abrir la cubierta de poli ster 06 Conecte el conector Micro USB del cable de carga 10 con la conexi n Micro USB 5V 2A 08 y conecte el panel de energ a solar...

Page 17: ...a tecla encendido apagado 05 Desconecte el dispositivo cargado desde el panel solar 06 LIMPIEZA Y ALMACENAMIENTO No limpie el aparato con gasolina ni con otros productos agresivos Nosotros recomendamo...

Page 18: ...ntidad de residuos El s mbolo RAEE cubo de basura en el equipo y en el embalaje advierte que el presente producto no debe ser tratado como residuo dom stico Usted es responsable de entregar todos los...

Page 19: ...o completamente carica riduce la durata della batteria Non gettare il pannello solare nel fuoco non fatte l andare in corto circuito e non smontatele pericolo di esplosione Non immergere o gettare il...

Page 20: ...ta 04 1 Ricarica tramite USB Aprire il coperchio di gomma 06 Inserire la spina Micro USB del cavo di ricarica USB in dotazione 10 nella porta Micro USB 5V 2A 08 e collegare il pannello solare con una...

Page 21: ...l pulsante On Off 05 Scollegare il dispositivo carico dal pannello solare 06 PULIZIA E STOCCAGGIO Non utilizzare detergenti aggressivi o benzina per pulire il dispositivo Si consiglia un panno in micr...

Page 22: ...re incoraggiati per ridurre gli sprechi Il simbolo del cestino sul prodotto e sulla confezione significa che i prodotti elettrici ed elettronici usati non devono essere smaltiti con i rifiuti domestic...

Reviews: