DOSPEL fans are universal. They are widely used in the
ventilation of bathrooms, kitchens, toilets as well as
offices or apartments. There are four standard sizes of fans
produced for ventilation ducts, diameters of 100, 120, 150,
200 mm. Fan casings are made of high quality ABS with an
anti-static additive, which prevents the accumulation of
dust. Most models are made with an IP x4 protection
class. DOSPEL fans use motors with ball bearings and
plain bearings. The ball bearing motors extend the life of
the fan, reduce noise, and can be installed in any position.
ZEFIR f
ans with plain bearings can only be installed in the
vertical position.
The fans do not require frequent and detailed
inspections (depends on the conditions where the
fan operates). They are designed for continuous use.
The fan should be disassembled and cleaned of dirt
at least once a year, and the engine should be
inspected.
After unpacking, check the condition of the fan casing
(cracks, irregularities — the propeller should not rub
against the sides). It is recommended to perform the
above actions to determine if any possible damage
occurred during transportation.
Fans may not be used in areas that are potentially
explosive. In areas with a small condensation of
moisture in the air, the fan should be installed with
its axis in the horizontal position so that draining of
the condensate is possible.
Installation
Caution! Before installation of the device,
turn off the electrical power!
Fans may be installed:
— directly in the wall of the building,
— on the inlets of ventilation ducts.
Fans with plain bearings are designed for wall
installations. Ball bearings can be installed in both,
vertical or horizontal positions.
The technical specification on the rating plate must
correspond to the electrical installation specification.
The fan should be installed at a height of no less than 2.3
m from the floor. Avoid installations near heat sources, or
in wet and steamy areas.
If there are no visible defects, you can proceed to install
the fan in its designated place:
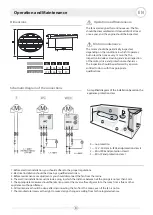
1. Prepare the electrical connection for the fan,
2. Mark the positions for the installation holes,
3. Insert the fan into the ventilation duct,
4. Mark the positions of the installation holes,
5. Take the fan out of the ventilation duct,
6. Drill holes for the plugs, take the fan out of the
ventilation duct.
7. Install the fan in the designated place, tighten the
screws,
8. Connect the fan to the electrical installation.
Symbols used in the fans
S-
Standard Version
Description of the appliance installation
EN
Description and Designation
In order to remove dirt from the inside of the fan:
disconnect the fan from the electrical installation,
dismount the fan by unscrewing the screws, wash all
the elements with a damp cloth and a small amount
of detergent. Do not wet the engine. After drying all
the elements, the fan should be installed at the
designated place and connected to the electricity.
AZ -
Automatic shutter. Version is equipped with
an automatic shutter that opens when the fan is
on and closes when the fan is off. The shutter
prevents the outside air from entering, which is
especially important in the winter.
WP -
Version with a pull switch and a power cord
WC -
Timer (settings of 2 to 23 min.)
PIR -
The motion sensor — the fan turns on after
a movement is registered in a particular area and
continues to work within the time specified by
the timer (from 2 to 23 min.).
Ball bearing — the ball bearing motor extends
the working life of the fan, reduces noise, and
can be installed in any position.
WCH -
Timer with a humidistat — this version is
equipped with a timer and a humidity sensor
called a humidistat. Depending on the setting,
the humidistat will activate the fan when the
humidity in the room reaches a certain level.
7


