background image

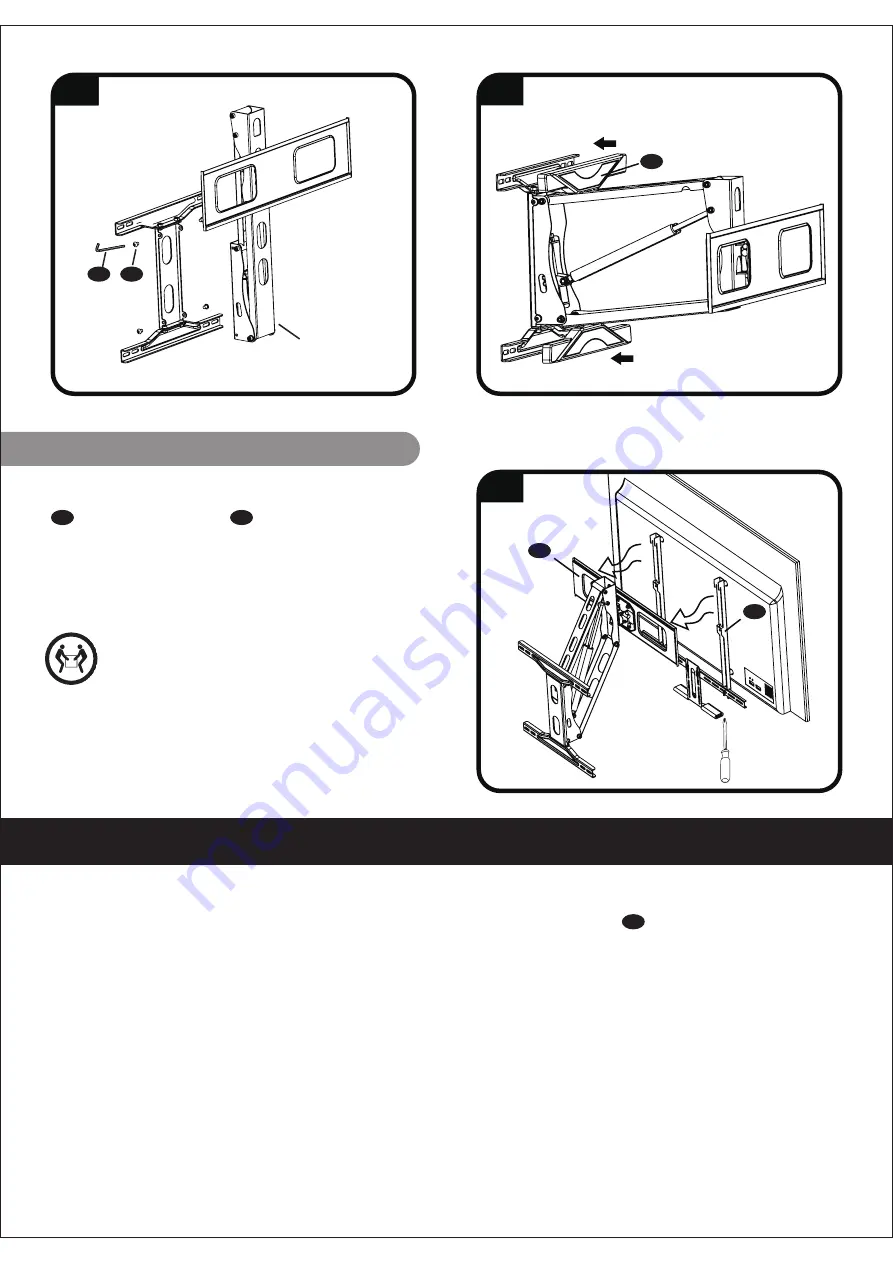
STEP 6: Hang TV onto Bracket Part A

HEAVY!  You may need  assistance with this step.

16

05

04

05

04

09

08

part A

4.1

6.1

6.2

7.1

Two people lift the TV and hang the bracket
      on the front panel     . Then use a Philips
screwdriver to tighten the two locking screws, 
which secures the bracket to the front panel
(fig 7.1)

TV ADJUSTMENTS

17

Adjust the spring pressure to balance the weight of the display so that it can be easily moved and
will maintain its position using either a ratchet wrench or the hex key      provided. (fig 8.1)

Tilt adjustment
Loosen the tilt lock knob on side,  adjust the TV to desired view angle. Then tighten the knob 
Horizontal level adjustment
Slightly loosen the four nuts counterclockwise. Hold TV and gently turn to desired position. 
When level, re-tighten the nuts to lock in the position.
(fig 8.2)

Summary of Contents for 43136336

Page 1: ...be capable of supporting five times the weight of the TV and mount combined Do not use this product for any purpose not explicitly specified by manufacturer Manufacturer is not responsible for damage or injury caused by incorrect assembly or use The temperature at the front of the fireplace mantle must never exceed 45 113 IMPORTANT SAFETY INSTRUCTOPNS TOOLS NEEDED FOR ASSEMBLY W ood S tud Instal l...

Page 2: ...parts NOTE Not all hardware included will be used Parts for assembly Hardware 01 02 03 04 05 x2 09 M8x10mm x4 14 M6 Nut x4 18 M8x45mm x4 23 6mm washer x4 27 M8x60 Lag Bolts x4 28 8 washer x4 29 Plastic wall Anchor x4 24 5mm washer x4 25 5 plastic spacer x4 26 8 plastic spacer x4 19 M8x22mm x4 20 M6x30mm x4 21 M6x16mm x4 22 M5x16mm x4 15 5mm Hex key x1 16 6mm Hex key x1 17 8mm Hex key x1 10 M8x14mm...

Page 3: ...51 x 102 mm 2 x 4 in or 38 x 89 mm 1 5 x 3 5 in Horizontal space between fasteners 406 mm 16 in 1 Locate your stud Verify and mark the center of the stud by finding the stud edges using a pencil and an edge to edge stud finder fig 2 1 2 2 2 Drill pilot holes using a 5 5 mm 7 32 in diameter drill bit fig 2 3 3 Install wall plate assembly using four lag bolts and Washer Tighten the lag bolts only un...

Page 4: ... drilled to a depth of 75 mm 3 in CAUTION Avoid potential personal injuries and property damage Mount the wall plate assembly directly onto the concrete surface Minimum solid concrete thickness 140 mm 8 in Minimum concrete block size 203 x 203 x 406 mm 8 x 8 x 16 in 1 Position the wall plate template on the wall at your desired height Level the wall plate and mark the hole locations fig 3 1 2 Dril...

Page 5: ...k or spacer screw washer Round Back Extra Space fig 4 1 IMPORTANT Ensure TV bracket is securely fastened before moving on to the next step 2 Select TV Screw Length Hand thread screws into the threaded inserts on the back of your TV to determine whichscrew diameter M5 M6 or M8 to use FLAT BACK ROUND BACK CABLES INSET HOLES If your TV has a flat back AND you want your TV closer to the wall use the s...

Page 6: ... STEP 5 Attach Bracket Part A to Wall Plate 09 16 08 1 Hang the Bracket part A onto the wall plate assembly by four screw Use 6mm hex key fig 6 1 2 Attach the wall plate cover to the wall board fig 6 2 HEAVY You may need assistance with this step 4 Place a towel or blanket on a flat surface then place your television face down on it Using the two screws attach the connecting rod to the bracket The...

Page 7: ...g 7 1 TV ADJUSTMENTS 17 Adjust the spring pressure to balance the weight of the display so that it can be easily moved and will maintain its position using either a ratchet wrench or the hex key provided fig 8 1 Tilt adjustment Loosen the tilt lock knob on side adjust the TV to desired view angle Then tighten the knob Horizontal level adjustment Slightly loosen the four nuts counterclockwise Hold ...

Page 8: ...17 8 1 8 2 knob 1 4 0 5 45 18 180mm 550mm 5 15 ...

Reviews: