background image

Page 9

Step 6:


Assemble the pedal arms

For this step, please prepare two M12 black Allen bolt sets(No.87)(No.91), plate wrench(No.93)

,

 and M8 

Allen wrench(No.96).

Attention: As the screw directions of two bolts are different, please loosen the Left lock nut clockwise, while 

the Right lock nut anticlockwise. The letters “L” and “R” are on the head of M12 Allen bolts. 

Firstly, smear sufficient grease on the M12 Allen bolts, or the machine might make noise during used. 


Screw a M12 hexagon socket bolt and a M16 wave washer to connect the pedal arm to the crank arm. 
Screw the Left bolt anticlockwise and the Right bolt clockwise. 

Screw a M13 washer and a M12 screw nut with M8 Allen wrench and plate wrench.


The inner ring of right M12 screw nut is white. The inner ring of left M12 screw nut is black. 

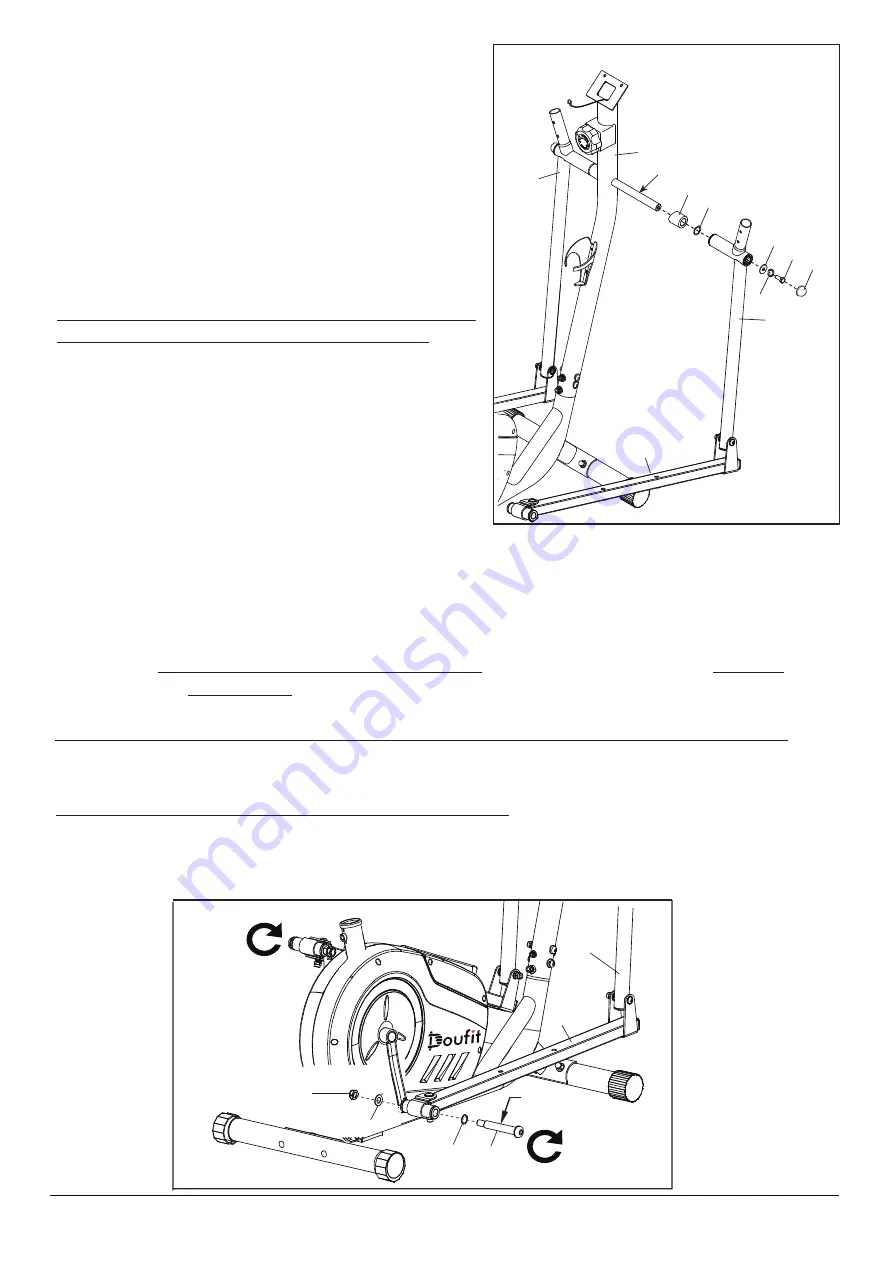
Step 5: Assemble the swing arms

For this step, please prepare left swing arm(No.10), right 

swing arm(No.11), two pivot caps(No.39), two spacers 

(No.46), two pivot wave washers(No.57), two pivot 

washers(No.67), two M8*20mm Hex bolts(No.77), two 

M8 split washers(No.86), and socket wrench(No.94).  


86

46

57

67

77

39

2

10

Grease

15

39

Attention:

 These spacers, washers and bolts were 

pre-attached to the horizontal pipe.

Firstly, smear sufficient grease on both sides of horizontal  

pipe, or the machine might make noise during used. 

Attach a spacer, a pivot wave washer and a swing arm to 

the both sides of the horizontal pipe in turn.

And then screw a M8 Hex bolt through a M8 split washer 

and a pivot washer with the socket wrench on both sides. 

Finally, cover two pivot caps on the both sides.    


11

87

Grease

88

15

11

90

89

Summary of Contents for EM-02

Page 1: ...truction Manual Please read the instruction manual carefully and follow it Please keep the instruction manual for your later use If you want to give this product to your friends don t forget to bring...

Page 2: ...er guardianship For your safety you must keep at least 1 meter away from anything around Always check if all of the screws and bolts are tightened And regularly check all of moving parts for obvious s...

Page 3: ...14 13 20 32 36 36 39 37 40 40 81 41 43 26 26 43 46 42 42 47 57 52 68 65 65 67 71 74 74 77 80 19 55 86 86 65 65 86 49 15 38 33 43 43 26 25 86 84 66 53 66 72 72 76 79 83 26 83 84 86 8 6 65 65 65 65 65 7...

Page 4: ...1 3 4 16 18 17 21 23 22 24 61 63 66 65 65 65 62 62 64 64 27 34 35 45 58 45 73 73 73 59 82 82 82 84 60 60 60 60 56 56 69 70 70 69 35 34 27 54 85 63 51 48 51 9 4 23 23 28 30 30 29 31 31 51 51 51 51 52 5...

Page 5: ...Page 4 Exploded Diagram C 3 22 73 73 51 65 82 4 6 5 6 5 7 3 8 2 8 2 4 2 3 6 6 1 0 5 1 0 3 1 0 4 1 0 2 1 0 1 1 0 0 9 9 9 8 9 7 8 4 2 3 7 8 5 1...

Page 6: ...sion Cable 53 1 Right Pedal Joint 54 1 M8 60mm Allen bolt 55 1 M8 60mm Allen bolt 56 2 M6 Lock Nut 57 2 Pivot Wave Washer 58 2 Crank Arm Axle 59 1 M6 45mm Allen Bolt 60 4 M10 Jam Nut 61 1 Flywheel Axl...

Page 7: ...Allen Bolt x 4 77 M8 20mm Hex Bolt x 2 76 M10 45mm Hex Bolt x 4 84 M8 Screw Nut x 4 82 M8 Acorn Nut x 4 83 M10 Screw Nut x 4 74 M8 16mm Allen Bolt x 6 89 M13 Washer x 2 80 M5 12mm Bolt x 2 pre attach...

Page 8: ...o M8 curved washers by using the wrench The wheels face outward Step 2 Connect the wires in the main pipe A B C 21 20 20 A A 2 21 20 7 1 49 adjust to the top gear For the assembly video please visit D...

Page 9: ...and a M8 lock nut in turn with M6 Allen wrench and socket wrench Attention Please be careful not to pinch the cable Don t tighten all bolts until you finish all assembly steps When tightening the bol...

Page 10: ...h The inner ring of right M12 screw nut is white The inner ring of left M12 screw nut is black Step 5 Assemble the swing arms For this step please prepare left swing arm No 10 right swing arm No 11 tw...

Page 11: ...3 15 Step 8 Assemble the handlebars For this step please prepare left handlebar No 12 right handlebar No 13 four M8 curved washers No 65 four M8 16mm Allen blots No 74 four M8 split washers No 86 and...

Page 12: ...tube Screw three screw nuts and washers by using the socket wrench Attach the seat to the extension pipe Screw a plum knob through a big M10 washer to fix them Finally insert the extension pipe into...

Page 13: ...have burned during your exercise Odometer ODO This mode displays the total distance you have pedaled since the elliptical machine was purchased or reset Pulse PUL This mode displays your heart rate p...

Page 14: ...olts well please screw them in different directions The left M12 bolts should be screwed anticlockwise while the right M12 bolts should be screwed clockwise If you adjust the resistance but the resist...

Reviews: