background image

25

12.03

Contents

CONTENTS

Introduction ........................................................................................................................ 26

Safety Instructions ............................................................................................................. 27

Technical Data .................................................................................................................... 28

Dispenser Components ..................................................................................................... 29

Operation ............................................................................................................................ 30
Description of the Operating Elements ................................................................................ 30
Putting into Operation .......................................................................................................... 31
Cup Carrier .......................................................................................................................... 32
Beverage Delivery Modes .................................................................................................... 33
Hot Water Delivery ............................................................................................................... 34
Switching off the Dispenser ................................................................................................. 34

Options ............................................................................................................................... 35
Key Switch / Counter ........................................................................................................... 36
Version with Water Tank 'Tank Top Version' ....................................................................... 36
Version for the Delivery of Café Cool (Option) ..................................................................... 37

Cleaning and Maintenance ................................................................................................ 38
General Instructions ............................................................................................................. 38
Maintenance Schedule ........................................................................................................ 38
Daily Cleaning -

Cleaning the Drip Grid.......................................................................... 39

Daily Cleaning -

Cleaning the Drip Tray ......................................................................... 39

Daily Cleaning -

Cleaning the Outside ............................................................................ 39

Weekly Cleaning - Cleaning the Cup Carrier ..................................................................... 40
Weekly Cleaning - Cleaning the Outlet Trough .................................................................. 40
Weekly Cleaning - Cleaning the Cooling Compartment ..................................................... 41
Daily Cleaning -

Cleaning the Water Tank ..................................................................... 42

Trouble Shooting ............................................................................................................... 43

Summary of Contents for Cafitesse 110

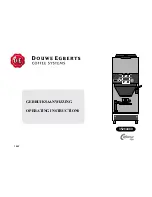
Page 1: ...12 03 GEBRUIKSAANWIJZING OPERATING INSTRUCTIONS 35264400 xxxxx xxxxx STOP ON OFF ...

Page 2: ...h Counter 36 Version with Water Tank Tank Top Version 36 Version for the Delivery of Café Cool Option 37 Cleaning and Maintenance 38 General Instructions 38 Maintenance Schedule 38 Daily Cleaning Cleaning the Drip Grid 39 Daily Cleaning Cleaning the Drip Tray 39 Daily Cleaning Cleaning the Outside 39 Weekly Cleaning Cleaning the Cup Carrier 40 Weekly Cleaning Cleaning the Outlet Trough 40 Weekly C...

Page 3: ...pply plug Before cleaning the dispenser pull out the power supply plug Clean the dispenser inside and outside with a damp cloth do not spray it off Use a cleaning agent approved by the food industry and recommended by your Cafitesse supplier only Observe safety instructions and instructions for use on the pack of the cleaning agent Make sure that the cleaning agent is not poured into the cooling c...

Page 4: ...ing a safety plug socket earthed according to the regulations Follow local regulations If the dispenser will not be used for a longer period of time e g at night or during the weekend close the water cock Switch the power switch to OFF Do not pull out the power supply plug because otherwise the cooling system will not function any more The dispenser must not be used when the water supply is interr...

Page 5: ...ower supply plug otherwise a contact breaking device min 3mm controlling all poles must be installed in the power supply system You must earth the dispenser In addition we recommend to install a fault current safety switch Length of power supply cable approx 1 80 m Acoustic emission The A weighted sound pressure level of the dispenser is below 70 dB Further requirements Height up to 2 000 m for in...

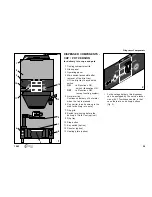
Page 6: ...r tap Continuous delivery of hot water when the tap is pressed 6 Cup carrier can be swung to the side for delivery into pots 7 Drip grid 8 Switch pre rinsing before the delivery of Café Cool option 9 Drip tray 10 Stop button 11 Key switch option 12 Counter option 13 Heating plate option STOP ON OFF COFFEE COFFEE COFFEE COFFEE 2 For beverage delivery this dispenser can be equipped by the service te...

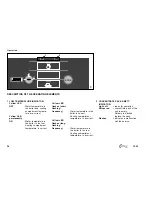
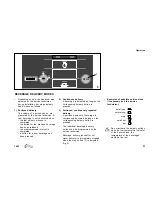
Page 7: ...artment temperature is correct 2 CONCENTRATE PACK EMPTY INDICATOR Light off ready for operation Shines red concentrate pack of this unit is empty Delivery is blocked replace the pack Flashes indicates a malfunction call the service Yellow LED flashes short flashing frequency Water temperature in the boiler is correct Cooling compartment temperature is incorrect Yellow LED flashes long flashing fre...

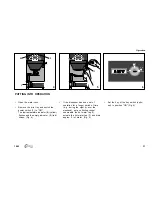
Page 8: ...r switch 1 to ON The low temperature indicator 2 yellow flashes and the empty indicator 3 red shines Fig 4 If the dispenser has been out of operation for a longer period of time e g during the night or over the weekend put a collecting vessel underneath the hot water tap 1 actuate the hot water tap 1 and drain approx 2 l of water Fig 5 Set the key of the key switch optio nal to position ON Fig 6 ...

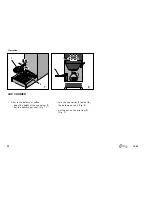
Page 9: ...F 1 7 8 1 2 Operation CUP CARRIER Prior to the delivery of coffee adjust the height of the cup carrier 1 for the delivery per cup Fig 7 turn the cup carrier 1 aside for the delivery per pot Fig 8 put the pot on the drip tray 2 Fig 7 ...

Page 10: ...vice technician A new beverage is only delivered when the last delivery process is completed the button for the previous beverage has been released the preprogrammed interval is completed a button for a new beverage has been pressed 2 Continuous delivery A beverage is delivered as long as the correponding delivery button is pressed 3 Portioned continuously repeated delivery A portioned amount of b...

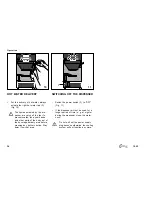
Page 11: ...lose the water cock Do not pull out the power supply plug because otherwise the cooling system will not function any more Operation HOT WATER DELIVERY For the delivery of hot water always actuate the right hot water tap 1 Fig 10 The liquids delivered by the dis penser are very hot In order to prevent scalds take your hands and other parts of the body out of the beverage delivery area before pressi...

Page 12: ...y is switched off during the delivery Nevertheless the counter registers the number of deliveries Turn the key switch 3 to position OFF Switch off the power switch and wait approx 5 6 sec Then switch it on again The display will stay switched on for max 10 sec The display shows the number of delivered cups By actuating the café cool button the number of delivered café cool portions will be indicat...

Page 13: ...nk by our service technicians It serves to fill wa ter into the dispenser by hand Filling the dispenser Plug the power supply plug into the socket Switch on the main switch on the back side of the dispenser to fill the boiler While the boiler is filled take care that there is always enough water in the water tank Fill the tank with drinking water only Replace the water daily ...

Page 14: ...p button 3 is pressed delivery is stopped immediately Fig 13 Check the drinking water quality before delivering Café Cool Observe the regulations specific to the country In order to remove residue water from the lines rinse the dispenser once especially when the dispenser has not been used for a longer period of time e g over night or on the week end Place a cup capacity 1500 ml under the outlet f...

Page 15: ...h a wet piece of cloth If the glass cover is treated improperly injuries due to broken glass might occur The glass cover may only be removed by a service technician CLEANING AND MAINTENANCE GENERAL INSTRUCTIONS Switch the main switch off before starting to clean the dispenser Observe the cleaning instructions on the dispenser All items of the schedule must be carried out in the indicated intervals...

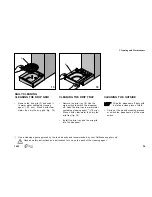
Page 16: ...rip tray in warm water containing cleaning agent 15 min Rinse it with clear water then dry the drip tray fig 16 Install the drip tray and the drip grid into the dispenser CLEANING THE OUTSIDE Wipe the dispenser off daily with a wet and clean piece of cloth Carry out the weekly cleaning process or switch the dispenser on at the main switch Use a cleaning agent approved by the food industry and reco...

Page 17: ...cess Remove the cup carrier 3 and soak it in warm water containing cleaning agent 15 min Rinse it with clear water then dry the cup carrier fig 17 Re install the cup carrier Compress the trough 1 with your thumb and index finger and take it out Fig 18 Clean the trough in warm water con taining cleaning agent 15 min Rinse with clear water then dry it Use a cleaning agent approved by the food indust...

Page 18: ...an the cooling compartment with a wet cloth and the brush which has been delivered with the dispenser Fig 21 Dry the cooling compartment Do not pour any water and no cleaning agent into the cooling compartment Reinsert the concentrate pack Reinsert the trough and the shielding cover Switch the dispenser on again ...

Page 19: ... the main switch Unscrew the closure of the water tank Fig 22 Remove the pump unit 1 Fig 23 Clean the pump unit by means of a soft brush and rinse it several times Empty the water tank rinse it twice with hot drinking water and fill it with drinking water 19 l Fill the tank with cold drinking water only max 30 C Observe local regulations regarding the drinking water quality Insert the pump unit in...

Page 20: ...red or dirty Ambient temperature too high Water temperature in the boiler too low and cooling compartment temperature incorrect Water temperature in the boiler too low Concentrate pack positioned incorrectly Dosing tube not positioned correctly in the slotted pack opening Concentrate pack empty Technical defect REMEDY Switch on the dispenser Switch the key switch to ON Check the power supply Repla...

Reviews: