TL 1128 (TOP HOLES)
Issued August 2016
Revision No: 006
Printed in U.S.A.
Copyright 2016, Bayne Premium Lift Systems
Installation Instructions
5
INSTALLATION INSTRUCTIONS
WI-0104-C
The following information is intended to be a
GENERAL GUIDE
to installing the
Bayne THINLINE
®
lifter on a typical refuse
truck. Before starting the installation, read these instructions completely.
ALWAYS
use the proper tools, lift devices, and
personal protective equipment to prevent injury while performing the installation.
NOTICE
If a
Bayne THINLINE
®
Tap-In Kit was also acquired for this installation, refer to the installation instructions included in the
Tap-In Kit manual for more detailed information.
A. Mounting lifter(s) on the truck :
1. The truck should be emptied and cleaned before any installation. The truck should be parked on a level solid surface,
a concrete floor if possible.
2. All lights, tags, steps, etc. that will interfere with the installation should be removed and/or relocated.
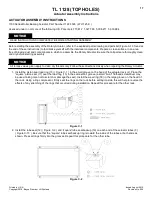
3. Position the lifter(s) on the sill of the truck per Figure A-1 and mounting height drawing and tack weld in place. See
for drawings. If using an “S” unit for bolt on applications, tack weld the mounting plate in place and
attach the lifter to the mounting plate using the 1/2” studs.
NOTICE
Tack weld only at this time so that adjustments can be made if necessary.
Figure A-1
B. Mounting hand valve(s) on the truck :
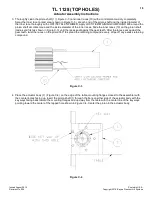
1. Choose and mark an acceptable location(s) on the side(s) of the truck to mount the hand valve assembly(s). See
Figure A-2.
30


