background image

OM/SM-AH-CE

6

1.8 Total Gas Rate

NOTE: With reference to the gas rate, pressure

Model

(G20&

(G31)

Natural

Propane

G25) KW

KW

Natural

Propane

BTU/hr

BTU/hr

AH-20

22

75,100

22

75,100

AH-40

25

85,300

22

75,100

AH-60 &

AH-80

40

136,500

40

136,500

1.9 Injector Diameters-Natural & Propane Gas  

Model

Gas G20 Gas G25 Gas G31

Natural

Natural Propane

(mm)

(mm)

(mm)

No. of

Orifices

(Injectors)

AH-20

4.39

4.70

2.64

1

AH-40

4.57

4.90

2.64

1

AH-60 &

AH-80

5.94

6.75

3.57

1

1.10

Gas Pressure Adjustment

A pressure test point is fitted on the burner
manifold and on the gas control valve.

Model

AH-20

AH-40

AH-60 &

AH-80

NATURAL
GAS G20

mbar

8.75

8.75

8.75

in. WC

3.5

3.5

3.5

NATURAL
GAS G25

mbar

8.75

8.75

7.0

in. WC

3.5

3.5

2.8

PROPANE
GAS G31

mbar

25

25

25

in. WC

10

10

10

adjustments and conversions, this appliance is
CE-approved for use with the following gases: 

a) G20 natural gas may be supplied to the

appliance in Austria, Belgium, Denmark,
Finland, France, Germany, Greece, Iceland,
Ireland, Italy, Luxembourg, Norway, Portugal,
Spain, Sweden, Switzerland and the United
Kingdom.

b) G25 natural gas may be supplied to the

appliance in Belgium, France and the
Netherlands.

c) G31 propane gas may be supplied to the

appliance in France, Germany, Ireland,  the
Netherlands, Portugal, Spain, Switzerland,
and the United Kingdom.

Use of the appliance with non-approved gases in a
listed country, or use in other countries will void CE
certification.

1.11 Burner Adjustment

The burner has a primary air adjustment.  The gap
should be 1/4" (6.35 mm) to 3/8" (9.53 mm).

Section 2 

Assembly and Commissioning

2.1 Assembly

2.3 

Electrical Supply

 a) Unpack the appliance.

Before commissioning the appliance, ensure that the

 b) Place on a firm, level floor. Adjust and fix

relevant regulations. (Paragraph 1.5)  

feet.

Caution:

 Shipping straps are under tension and

can snap back when cut. Take care to avoid
personal injury or damage to the unit by staples
left in the walls of the carton.

2.2  Gas Supply

Connect the unit to the gas supply and test for gas
soundness.  For the part of the integral gas supply
down stream of the gas valve, leak detection
spray or some solution may be used with the
burners lit.

Caution:

 Ensure that the pan contains liquid when

the burners are alight.

electrical installation has been carried out to the

THIS APPLIANCE MUST BE EARTHED. 

2.4 

Jacket Water Level/Jacket Pressure  

 a)  Ensure the water level is correct in the jacket, by

confirming that the level is between the marks on
the gauge glass. If the water is low, follow the
instructions under "Jacket Filling" in the servicing
section of this manual.

 b)  Check the pressure gauge. If the gauge does not

show 20 or more inches of vacuum (that is, a
reading of 20 to 30 below zero) see "Jacket
Vacuum" in the servicing section of this manual.

2.5 

Pre-Commissioning Check

Summary of Contents for GROEN AH-20

Page 1: ...eated Floor Mounted Stationary KEEP THIS MANUAL WITH KETTLE DOCUMENTS OPERATORS AND TECHNICIANS SHOULD READ UNDERSTAND AND FOLLOW WARNINGS AND INSTRUCTIONS IN THIS MANUAL THE SERVICE MANUAL AND THE OPERATOR SECTIONS Information contained in this document is known to be current and accurate at the time of printing creation Unified Brands recom mends referencing our product line websites unifiedbran...

Page 2: ...Y THE USER USERS SHOULD BE CONVERSANT WITH THE APPROPRIATE PROVISIONS OF THE FIRE PRECAUTIONS ACT AND THE REQUIREMENTS OF THE GAS SAFETY REGULATIONS IN PARTICULAR THEY SHOULD BE AWARE OF THE NEED FOR REGULAR SERVICING BY A COMPETENT PERSON TO ENSURE THE CONTINUED SAFE AND EFFICIENT PERFORMANCE OF THE APPLIANCE WARNING TO PREVENT SHOCKS ALL APPLIANCES GAS OR ELECTRIC MUST BE EARTHED UPON COMPLETION...

Page 3: ...onversion 10 3 2 Jacket Vacuum 10 3 3 Jacket Filling 10 3 4 Water Treatment Procedure 10 3 5 Removal of Control Panel 11 3 6 Removal of Spark Ignition Module 11 3 7 Removal of Low Water Level Control 11 3 8 Removal of Gas Control Valve 11 3 9 ON OFF Switch and Reset Button 11 3 10 Removal of Neons 11 3 11 Removal of Thermostat 12 3 12 Removal of Pressure Switch 12 3 13 Low Water Level Sensor 12 3 ...

Page 4: ...d instruct responsible person s in the correct operation and maintenance of the Appliance This equipment is ONLY FOR PROFESSIONAL USE and shall be operated by QUALIFIED persons It is the responsibility of the Supervisor or equivalent to ensure that users wear SUITABLE PROTECTIVE CLOTHING and to draw attention to the fact that some parts will by necessity become VERY HOT and will cause burns if tou...

Page 5: ... BS 5440 2 and are shown conversion in the table below Equipment Ventilation Rate m Min ft Min Range 17 600 Pastry Oven 17 600 Fryer 26 900 Grill 17 600 Steak Grill 26 900 Boiling Pan 17 600 Steamer 17 600 Sterilizing Sink 14 500 Bains Marie 11 400 Tea Coffee Machine 8 5 14 300 500 executed in accordance with the regulations listed in this manual Cable entry is at the lower rear on right hand side...

Page 6: ...e of the appliance with non approved gases in a listed country or use in other countries will void CE certification 1 11 Burner Adjustment The burner has a primary air adjustment The gap should be 1 4 6 35 mm to 3 8 9 53 mm Section 2 Assembly and Commissioning 2 1 Assembly 2 3 Electrical Supply a Unpack the appliance Before commissioning the appliance ensure that the b Place on a firm level floor ...

Page 7: ...ssure during commissioning Connect a pressure gauge to the pressure test point on the burner manifold or the gas control valve See figure for test points b When checking pressure at gas valve test points undo the screw a half turn and slip tube over the nipple c Turn the main gas and electricity supplies on d Light the burners Paragraph 2 5 1 e Remove screws securing control cabinet side panel Par...

Page 8: ...about five PSIG lift the valve enough to vent steam then quickly let it snap back into place WARNING AVOID ANY EXPOSURE TO THE STEAM BLOWING OUT OF THE SAFETY VALVE This procedure should be explained to the user as it is to be carried out at least twice a month Safety procedures and requirements should also be explained to the user when carrying out the procedure Safety Valve Operating Instruction...

Page 9: ...ttached c DO NOT use this valve on a coal or wood boiler having an uncontrolled heat input d Ensure that all connections including the valve inlet are clean and free from any foreign material f DO NOT USE A PIPE WRENCH Use proper type and size wrench on wrench pads only g This valve must be mounted in a vertical upright position directly to a clean tapped opening in the top of the boiler or equipm...

Page 10: ...on Page 8 pertaining to Safety Valve installation and operation WARNING AVOID ANY EXPOSURE TO THE STEAM BLOWING OUT OF THE SAFETY VALVE 3 3 Jacket Filling The jacket has been charged at the factory with the proper amount of treated distilled water You may need to restore the jacket water to its a If you are replacing water lost as steam use distilled water If you are replacing treated water that w...

Page 11: ... Ignition Module Turn the gas and electricity mains off a Remove control panel Paragraph 3 5 b Disconnect electrical leads from spark ignition module c Remove retaining screws securing spark ignition module d Withdraw spark ignition module from supporting bracket e Replace in reverse order 3 7 Removal of Low Water Level Control Turn the gas and electricity mains off a Remove control panel Paragrap...

Page 12: ...DS AND CONNECTIONS SITUATED IN THE KETTLE BASE DO NOT GET WET REMOVE THEM IF REQUIRED Important If water is lost during thermostat removal replace as described in Paragraph 3 3 Jacket Filling Always refer to wiring diagram when reconnecting electrical leads See Page 23 3 12 Removal of Pressure Switch Turn the gas and electricity mains off a Remove control panel Paragraph 3 5 b Disconnect the elect...

Page 13: ...n the pilot line attached to the burner b Remove the two retaining screws securing the spark electrode pilot bracket on the burner c Withdraw the pilot assembly from the burner chamber The pilot orifice can now be changed as required d Disconnect the high temperature lead wire connection to the sparking electrode or the sensing electrode as required e Replace in reverse order f Ensure that there i...

Page 14: ...agraph 3 2 Jacket Vacuum 3 19 Removal of Filling Valve Turn the gas and electricity mains off a Remove filling valve from kettle jacket pipework c Replace fuse identical to fuse removed b Replace in reverse order d Replace in reverse order c Ensure adequate sealing compound is used to seal the valve 3 2 Jacket Vacuum 3 20 Fuse Replacement Turn the gas and electricity mains off a Remove control pan...

Page 15: ...ser a Air in jacket pressure vacuum gauge 20 to 30 below zero when the kettle is cold Safety valve pops User a Air in jacket pressure vacuum gauge 20 to 30 below zero when the kettle is cold b Whether kettle was being heated while empty Auth c If high pressure limit switch is set too high Y Service d Thermostat Thermostat should click when the dial Rep Only is rotated above and below a setting Y e...

Page 16: ...on the spark stays on Service attachments to terminal 13 and the sensor Y Rep Only b Sensor ceramic for cracks Y c That cable is not grounded out If it is correct the ground Y d Sensor cable for continuity and condition of insulation Y e 1 Check the gas pressure Y 2 Clean the pilot Assembly Y 3 Tighten mechanical and electrical connections Y ...

Page 17: ...all be operated by QUALIFIED persons It is the responsibility of the Supervisor or equivalent to ensure that users wear SUITABLE PROTECTIVE CLOTHING and to draw attention to the fact that some parts will by necessity become VERY HOT and will cause burns if touched accidentally 5 1 Equipment Description 5 1 1 General The kettle is charged at the factory with treated Groen AH models are stainless st...

Page 18: ... Kettle has been installed according 6 Switch the On Off switch to the On to service and installation instructions perform position The power on neon will initial start up as a test to ensure that the unit is illuminate operating correctly Follow the steps below Refer to the picture for identification of AH 7 Turn the thermostat dial to the required controls and indicators setting 1 Remove all lit...

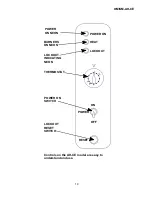
Page 19: ...N HEAT LOCKOUT ON OFF RESET POWER POWER ON NEON BURNERS ON NEON LOCKOUT INDICATING NEON THERMOSTAT POWER ON SWITCH LOCKOUT RESET SWITCH OM SM AH CE 19 Controls on the AH CE model are easy to understand and use ...

Page 20: ... the sensing probe and sends a signal that causes the spark to shut off and the automatic valve to open to full flow once a flame has been detected If a flame is not detected within 15 seconds the gas is automatically cut off and the appliance is locked out The unit can only be re lit once the reset button has been pressed In addition to the lockout timer safety features include the gas supply to ...

Page 21: ...2 hours 2 Scrape and flush out large amounts of food residues Be careful not to scratch the kettle with metal implements 3 Prepare a solution of the detergent cleaning compound as instructed by the supplier Clean the unit thoroughly A cloth moistened with cleaning solution may be used to clean controls control housings and electrical conduits 4 As part of the daily cleaning program clean all exter...

Page 22: ...ulty removing mineral deposits or a film left by hard water or food residue clean the kettle thoroughly Then use a de liming agent such as Groen Delimer Descaler P N 114800 or Lime Away from EcoLab Inc in accordance with the manufacturer s directions Rinse and drain the unit before further use 10 If especially difficult cleaning problems persist contact your cleaning product supplier for assistanc...

Page 23: ...OM SM AH CE 23 ...

Page 24: ...OM SM AH CE 24 Parts Lists ...

Page 25: ...r Natural G25 20 127384 61 Data Plate CE Mark Kettles 114504 11 Burner Injector PropaneG31 80 60 000403 62 Nameplate Groen Large 055450 11 Burner Injector Propane G31 40 000281 68 Cover Assy w Power Aid AH 1 80 047694 11 Burner Injector Propane G31 20 000281 68 Cover Assy w Power Aid AH 1 60 049884 13 Radiation Shield Assy AH 1 60 80 000445 68 Cover Assy w Power Aid AH 1 40 067417 13 Radiation Shi...

Page 26: ...LL WITH 1 2 BSPT THREADS TOWARD GAS VALVE 9 5 1 13 TOWARD GAS VALVE INSTALL WITH 1 2 BSPT THREADS 6 2 4 14 7 11 10 3 18 12 OM SM AH CE 26 Gas Valve and Piping Assembly AH 1 20 Parts Lists Keyed to Parts Listing on Page 29 ...

Page 27: ... INSTALL WITH 1 2 BSPT THREADS TOWARD GAS VALVE 9 5 1 1 TOWARD GAS VALVE INSTALL WITH 1 2 BSPT THREADS 5 2 4 14 7 11 10 B C 18 OM SM AH CE 27 Gas Valve and Piping Assembly AH 1 40 Parts List Keyed to Parts Listing on Page 29 ...

Page 28: ...0E 11 11 10 5 3 4 16 6 INSTALL WITH 1 2 BSPT THREAD TOWARDS GAS VALVE INSTALL WITH 1 2 BSPT THREAD TOWARDS GAS VALVE 15 B B 17 OM SM AH CE 28 Gas Valve and Piping Assembly AH 1 60 1 80 Parts List Keyed to Parts Listing on Page 29 ...

Page 29: ...1 2 NPTx4 Lg black 005554 13 Bushing Reducing 1 2 x 3 8 NPT 007442 6 Nipple 3 8 NPT x 4 1 2 Lg black 005635 AH 40 AH 20 13 Bushing Reducing 1 2 x 1 8 NPT 088290 6 Nipple 1 2 NPTx4 Lg black AH 40 005554 AH 60 80 6 Nipple1 2 NPTx5 1 2 Lg black 010234 14 Bushing Reducing 3 8 x 1 4 NPT 013296 AH 60 80 AH 20 7 Nipple 3 8 NPT close black AH 20 007439 14 Bushing Reducing 1 2 x 1 4 NPT 008739 7 Nipple 1 2...

Page 30: ... a timetable for periodic maintenance with an Authorized Groen Service Agency Space has been provided in the manual for a Maintenance Service Log Keep it up to date and on file Model m _________________________________ Purchased From _________________________ Serial m _________________________________ Location ________________________________ Date Purchased ___________________________ Date Install...

Page 31: ...ts found to be defective during the warranty period IV This warranty does not cover boiler maintenance calibration or periodic adjustments as specified in operating instructions or manuals and consumable parts such as scraper blades gaskets packing etc or labor costs incurred for removal of adjacent equipment or objects to gain access to Groen Equipment This warranty does not cover defects caused ...

Page 32: ...1055 Mendell Davis Drive Jackson Mississippi 39272 Telephone 601 373 3903 FAX 601 373 9587 OM SM AH CE Part Number 128416 Revised 4 99 ...

Reviews: